Having recent backups of your site is crucial, especially when it comes to WordPress, where updates and plugins can potentially:
- Break your site;
- Create conflicts, preventing some elements on your website to function properly;
- Delete data.
Moreover, there’s always a risk of getting hacked. When your site is hacked, your data is either removed or tampered with by adding malware to your code.
Removing malware from your code is a tedious process even for experts. It also costs a lot of money hiring those experts.
All of these headaches can be prevented if you have a backup in place. And although most web hosts and SaaS WordPress platforms, such as ReadyShip, offer backups for free, it’s best to create your own as well, to easily have access to it whenever you want. You can also think of it as having a backup to a backup. 😀
Therefore, in this step-by-step tutorial, I’ll show you how to backup and restore your WordPress site with UpdraftPlus, a simple and reliable plugin.
How to Backup Your WordPress Site Using UpdraftPlus
UpdraftPlus is an awesome and easy-to-use WordPress backup plugin with over 3 million active installations. It allows you to create manual or automatic backups, which you can store in different locations, locally or in the cloud.
Step 1
Install UpdraftPlus. If you’re a WordPress beginner, here’s how to install a plugin in WordPress using 4 different methods.
Step 2
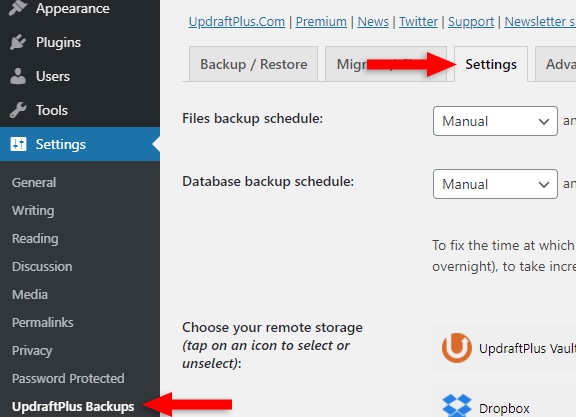
From your WordPress dashboard, access its settings by going to Settings > UpdraftPlus Backups > Settings tab.
Step 3
By default, UpdraftPlus is set to perform manual backups of your WordPress site. I recommend switching to automatic, and only perform an extra manual backup if it’s needed.
So, in the Settings tab, set both Files backup schedule and Database backup schedule to automatic by choosing the interval (Every 2 hours, Daily, Weekly, etc.).
You can also choose how many WordPress backups it will retain. Normally, I leave the default setting, which is 2. You don’t want too many because they can take up a lot of space.
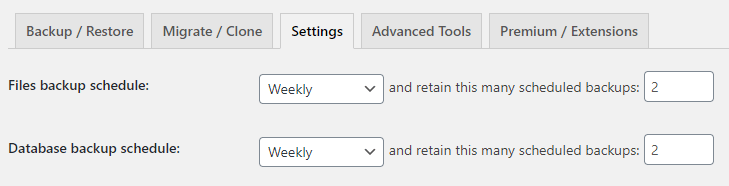
For my example, I scheduled weekly WordPress backups. But you should choose the schedule based on how often something changes on your WordPress site.
For example, if you publish articles daily, then you should probably schedule UpdraftPlus to backup your WordPress site every day.
Step 4
By default, UpdraftPlus can store the backup files within your WordPress files. You can also download the files to your computer. I don’t recommend relying solely on those options because:
- If something happens to your WordPress files on the server, it can happen to the backup as well;
- If something happens to your computer’s operating system, or if your hard drive fails, you can lose the backup.
Therefore, I strongly suggest that you choose remote storage for your WordPress backup. I recommend choosing cloud storage, not FTP or Email. FTP means that it will store the backup on the server, which is not a reliable location, as I mentioned above.
So, for my example, I’ll choose Google Drive because virtually everyone has a Google account these days, which comes with 15 GB of free storage space. That’s more than enough for most of you, for a pretty long time.
So, select the remote storage from the list (Google Drive, in my case). Underneath, some extra options will appear, depending on what you choose.
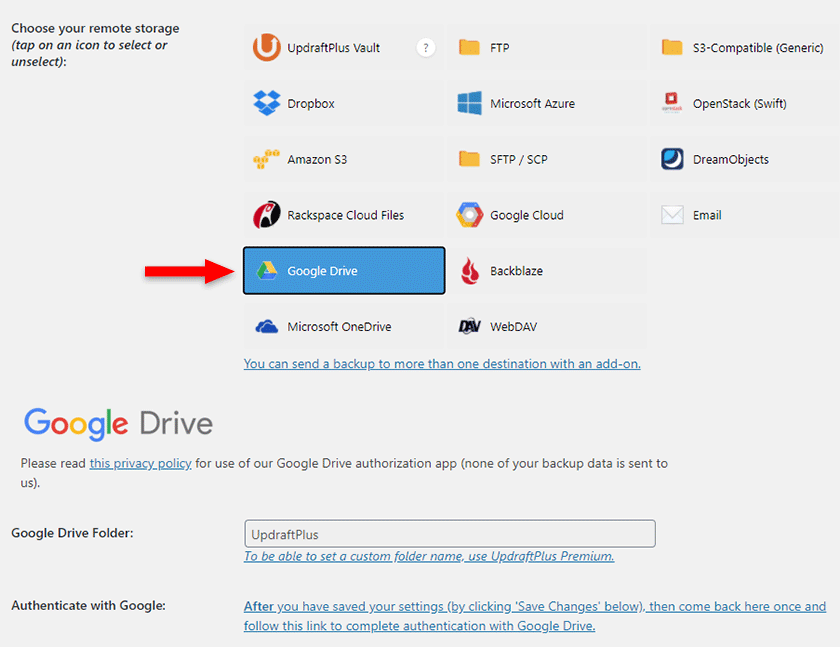
For Google Drive, two things appear:
- Google Drive Folder – Handles the name of the folder created in your Google Drive. Change it to whatever you want;
- Authenticate with Google – You’ll need to grant UpdraftPlus permission to access Google Drive. A pop-up with the authorization link will probably appear after saving (see step 5), so you might not need to come back here and click the link.
Click the Save Changes button.
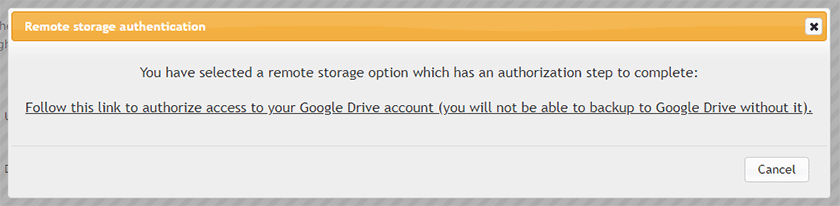
Step 5
After saving the changes, a pop-up will appear with a link to authorize UpdraftPlus access to Google Drive. Click the link.
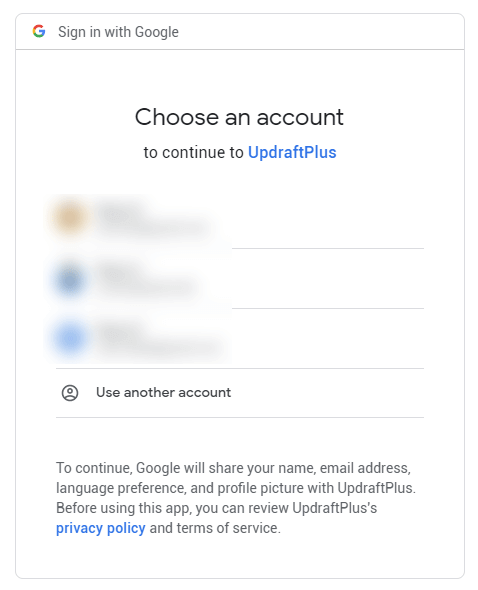
Step 6
Sign in to your Google account. If you have multiple accounts, select the one you want to use.
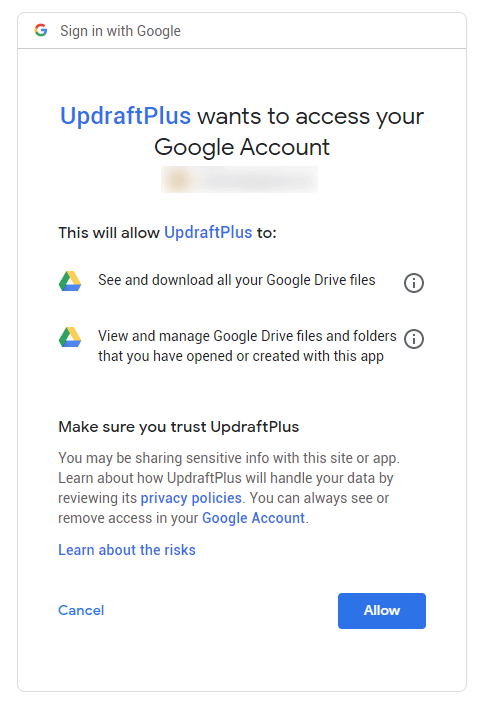
Step 7
Allow UpdraftPlus to access Google Drive. If you don’t, it won’t work.
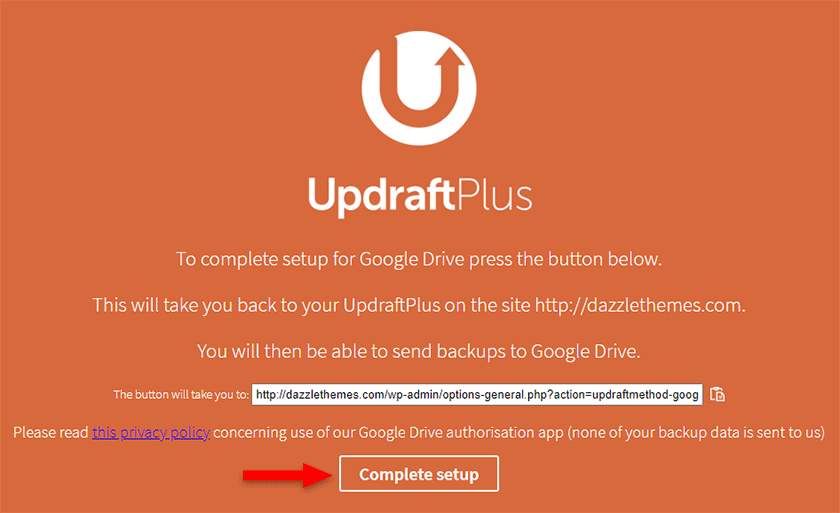
Step 8
After allowing UpdraftPlus to store your WordPress site’s backup on Google Drive, you’ll be redirected to a page where you’ll need to click on the Complete setup button. This will send you back to UpdraftPlus’ settings, in WordPress.
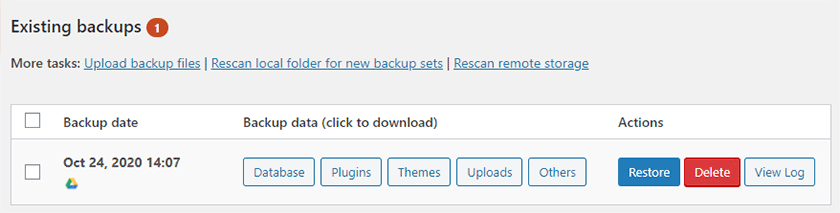
Once you’ll be directed back to your dashboard, you’ll notice that UpdraftPlus has already started creating a backup of your WordPress site.

Don’t mind the errors. 🙂 It’s probably my testing site’s cheap hosting. It created the backup after the next attempt.
You’ll see the completed WordPress backup in the Existing backups section, where you can also download the files to your computer.
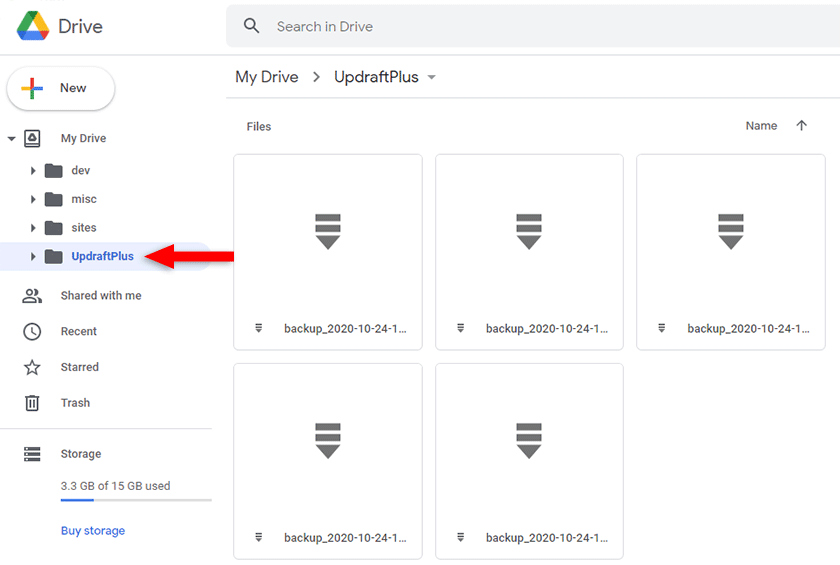
You can also see your WordPress site’s backup files in the folder created by UpdraftPlus in Google Drive.
That’s all you have to do to backup your WordPress site with UpdraftPlus. From now on, it will perform the backups automatically, based on the interval you’ve set at step 3.
“What if I need to manually backup my WordPress site with UpdraftPlus?”
In case you need to perform a manual WordPress backup between the scheduled intervals, all you have to do is to go to Settings > UpdraftPlus Backups and click the Backup Now button from the Backup / Restore tab.

Looking for an All-in-One WordPress Solution?
ReadyShip offers you ready-made WordPress sites and blogs, plus high-quality managed AWS hosting with free SSL and CDN, at no initial cost!
How to Restore Your WordPress Backup with UpdraftPlus
Restoring your WordPress site’s backup with UpdraftPlus is also easy. You can do it automatically or manually. I’ll show you both ways.
Automatically restore a WordPress backup with UpdraftPlus
Step 1
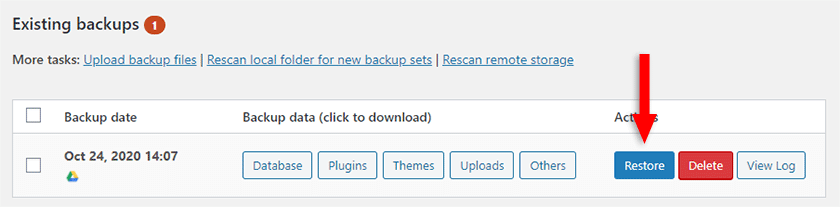
Go to Settings > UpdraftPlus Backups > Backup / Restore tab > Existing backups section, and click on the Restore button next to the WordPress backup that you want to restore.
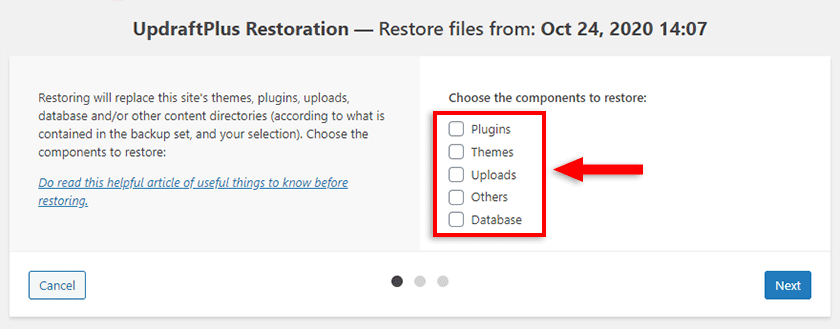
Step 2
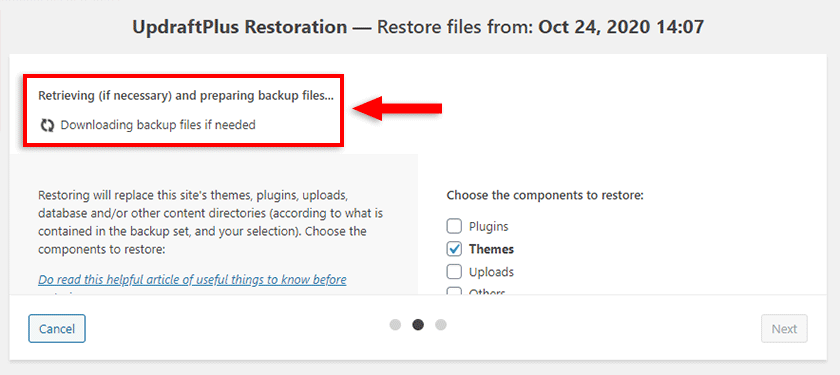
Choose the components that you want to restore (e.g. database, themes, etc.). If you’re not sure what specifically needs to be replaced, select all of them to restore every part of your WordPress site. Then, click Next.
UpdraftPlus will start retrieving the selected WordPress backup files. I only selected Themes.
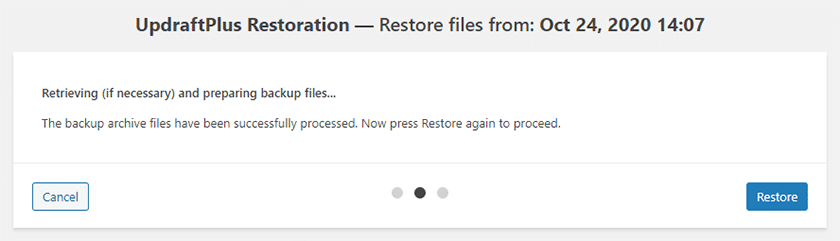
Step 3
After the WordPress backup files were successfully retrieved and processed, click on the Restore button.
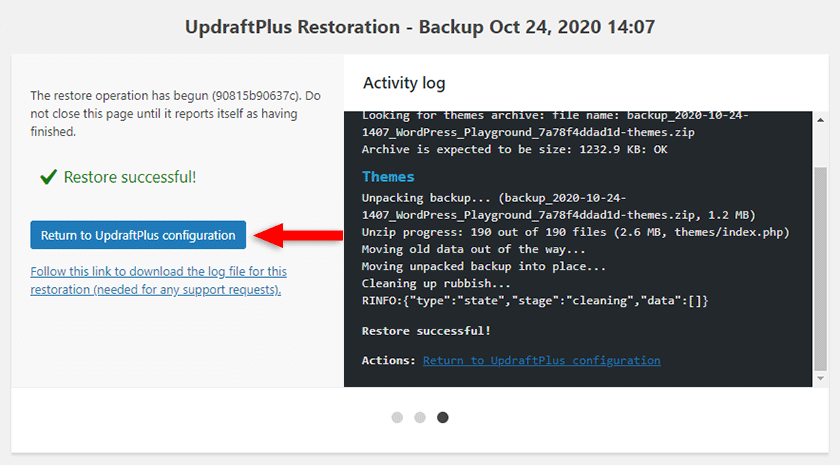
Step 4
Click on the Return to UpdraftPlus configuration button after the WordPress backup restoration was successful, which I assume it will be. 🙂
That’s it for this part. Let’s check the manual part now.
Manually restore a WordPress backup with UpdraftPlus
If for whatever reason, the backup doesn’t appear in the Existing backups section, but you have the files, you can perform a manual WordPress backup, meaning that you’ll have to upload the files to UpdraftPlus.
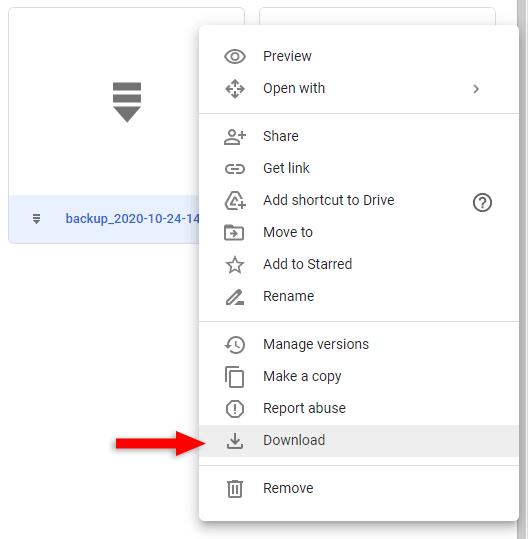
Step 1
In the first section of the tutorial, I used Google Drive to store the WordPress backup. But regardless of the cloud storage you choose, you’ll have to download the files on your computer.
To download a file from Google Drive, you just need to right-click on it, select Download, then save it on your hard drive.
Step 2
Go to Settings > UpdraftPlus Backups > Backup / Restore tab > Existing backups section, and click on the Upload backup files link.
Click on Select Files, or simply drag-and-drop the files from your drive.
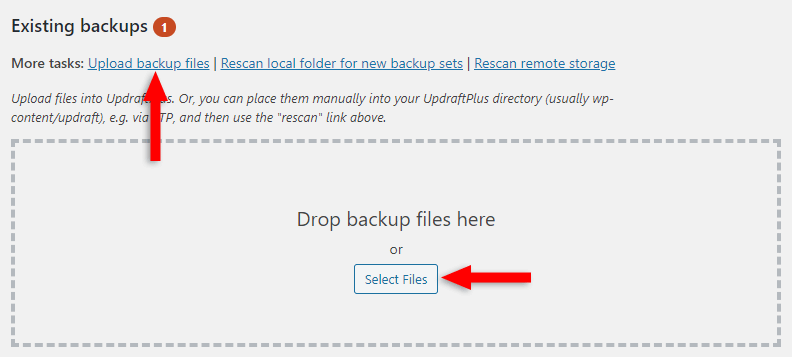
You can upload specific files or all of them if you want a complete WordPress site restoration. I only uploaded the Themes files for my example.
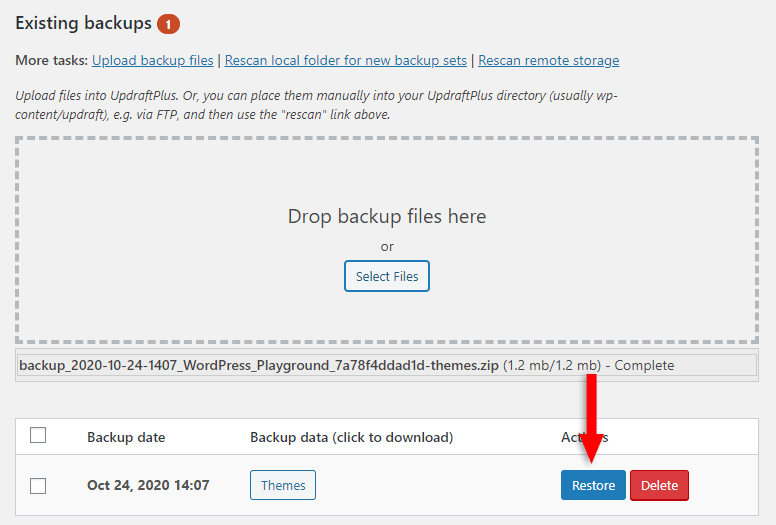
Step 3
Once the WordPress backup file is uploaded successfully, it will appear in the table. You can then click on the Restore button.
After clicking the button, the WordPress backup restoration process will be the same as the one pointed out in steps 2, 3, and 4 from the previous section – “Automatically restore a WordPress backup with UpdraftPlus”.
Looking to Buy or Sell WordPress Sites?
At ReadyShip, we offer an all-in-one WordPress solution for those looking to start a blog or site, as well as the opportunity for WordPress developers or professionals to sell their products!
The End
Having a backup is vital – there’s nothing to debate there. It will save you from going through a nightmare in case something bad happens.
So, I hope that my step-by-step tutorial was comprehensive enough to make it even easier for you to backup and restore your WordPress site with UpdraftPlus.
If you have any questions or want to pitch in, feel free to leave a comment.