The database is the most important part of a WordPress website. It stores your content, users, settings, URLs, and more.
If something bad happens to your WordPress website – like getting hacked and losing your data – and you don’t have the database backed up, then your website is gone forever.
So, it’s critical to either back up your entire WordPress site, or, at the very least, back up your database.
You might need to export your WordPress database for other scenarios as well, not just as a backup in case something goes bad. For example, you might want to manually transfer your WordPress website to another web host.
So, in this step-by-step tutorial, I’ll show you how to manually export and import your WordPress database using phpMyAdmin, as well as how to back it up and restore it using the Backup tool. All this from your cPanel, which is your server’s control panel that virtually all Shared web hosts have.
The cPanel interface differs from host to host. So, yours might look a bit different than the one in my screenshots. But don’t worry, the tools should still be there.
How to Manually Export a WordPress Database with phpMyAdmin in cPanel
Step 1
Access and log in to cPanel.
Usually, you can quickly access cPanel by adding the /cpanel slug after your domain (e.g. https://example.com/cpanel).
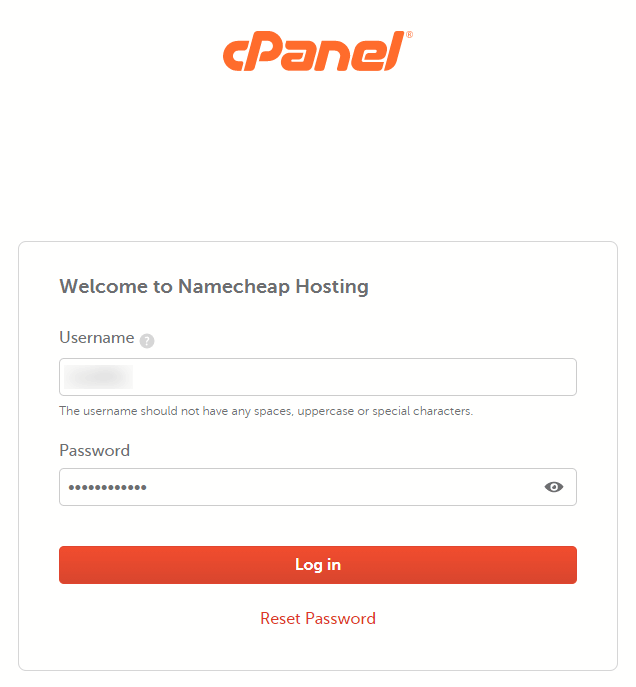
If you didn’t receive your login information after purchasing the hosting plan, check the hosting documentation or contact them for help.
Step 2
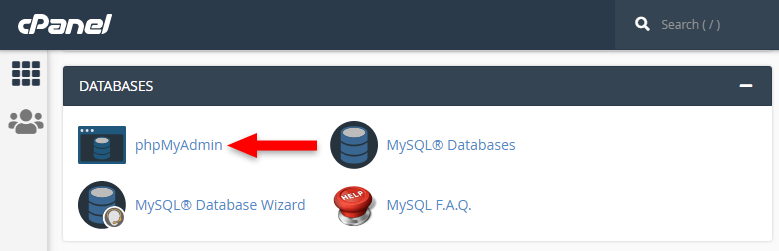
After logging in to cPanel, look for the phpMyAdmin tool. It should be in the Databases section.
Step 3
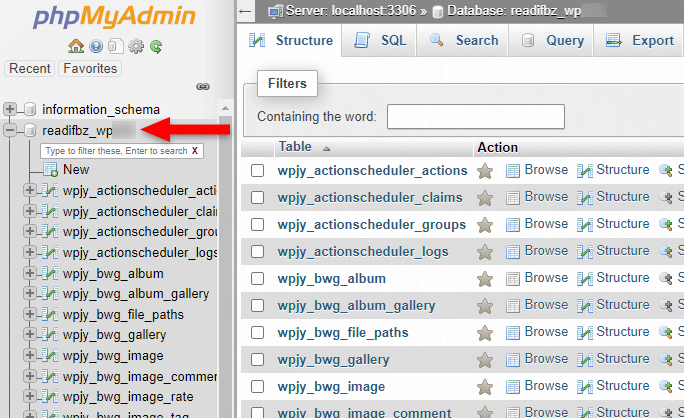
If you have multiple WordPress websites on the same hosting plan, you’ll most likely have multiple databases in phpMyAdmin, one for each website.
Now, if you want to export them all skip to the next step.
If you want to export a particular one, not all, then you’ll need to select it, first, by clicking on it on the left sidebar.
Step 4
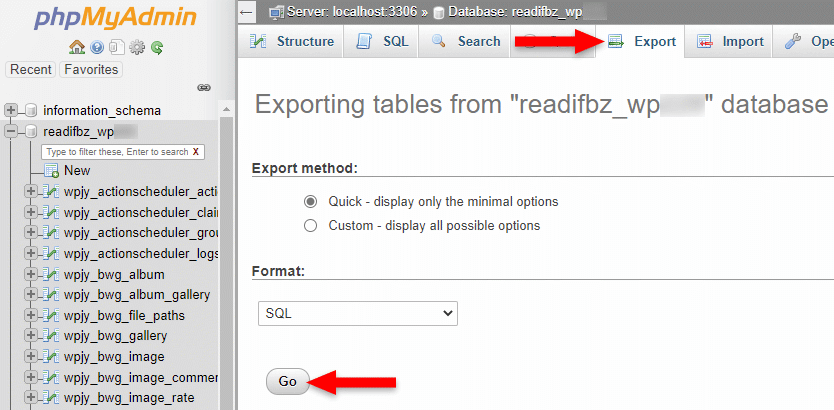
Click on the Export tab found in the upper toolbox. If you selected a WordPress database at step 3, it will only export that one. If you didn’t select any, it will export all of them.
Leave Quick set as the Export method. Leave SQL as the Format unless you have special plans with your WordPress website, and you need another format.
When ready, click on the Go button, which will start the download of the .sql file.
Note that if you opted to export all WordPress databases, it will put them into a single .sql file by default. If you want them into separate files, then:
- Select Custom – display all possible options;
- Enable Export databases as separate files.
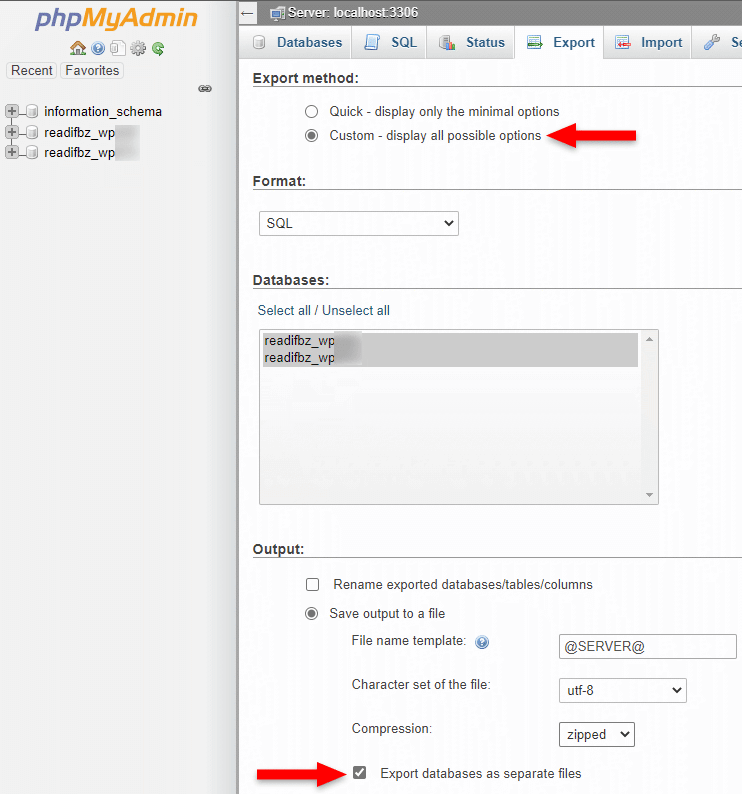
This will create a .sql.zip archive with separate .sql files for each WordPress database.
Looking to Buy or Sell WordPress Sites?
At ReadyShip, we offer an all-in-one WordPress solution for those looking to start a blog or site, as well as the opportunity for WordPress developers or professionals to sell their products!
How to Manually Import a WordPress Database with phpMyAdmin in cPanel
Importing the WordPress database in phpMyAdmin is just as easy as exporting it.
Step 1
Access and log in to cPanel.
Usually, you can quickly access cPanel by adding the /cpanel slug after your domain (e.g. https://example.com/cpanel).
If you didn’t receive your login information after purchasing the hosting plan, check the hosting documentation or contact them for help.
Step 2
After logging in to cPanel, look for the phpMyAdmin tool. It should be in the Databases section.
Step 3
If you’re manually installing WordPress on a new host or plan, or manually transferring it to another web host, you’ll need to create a database first.
Select the WordPress database from the left sidebar, click on the Import tab, click the Choose File button to add the WordPress database file from your drive, and click on Go for the importing process to begin. Leave everything as is.
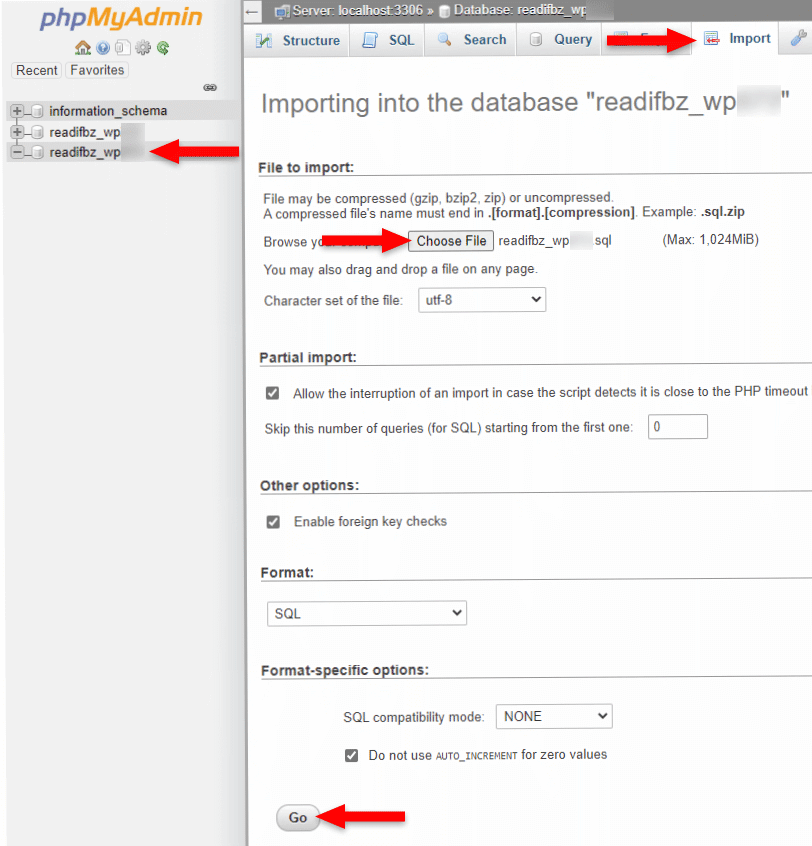
Single database files should have the .sql extension, while multiple, compressed database files should end in .sql.zip or .sql.gzip, depending on what type of compression you chose.
phpMyAdmin mentions that, too, above the Choose File button.
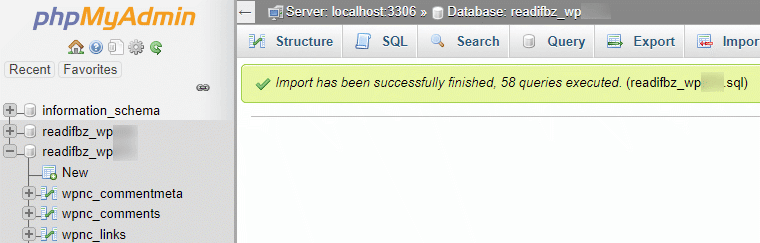
If everything worked fine, you’ll see a success message, letting you know that the WordPress database was successfully imported.
The “#1050 – Table already exists” error – Deleting tables
Normally, when you want to import a WordPress database, it’s because:
- You’re manually transferring/installing WordPress;
- Your current WordPress database is damaged/corrupt/hacked.
In the first case, you’ll need to create a new WordPress database, then import your SQL file, which will add the tables to the newly created database.
In the second case, if you can’t repair it or remove the malware, you should delete the tables and then import the WordPress database in phpMyAdmin, which will add the backed-up tables.
In both cases, the #1050 - Table already exists error should not appear because the WordPress database doesn’t contain any tables when the importing starts.
But if you try to import your WordPress database while there’s another one with the same tables, it will result in a #1050 - Table already exists error. phpMyAdmin can’t create those tables while importing because they are already there.

So, you’ll have to get rid of them.
Warning! If your WordPress database contains new data that’s added after the export, it will get deleted forever when removing the tables! Make sure that you export the database with the latest updates unless you know there’s malware mingled in there, too. Then, you’ll need a clean backup before the malware was infiltrated.
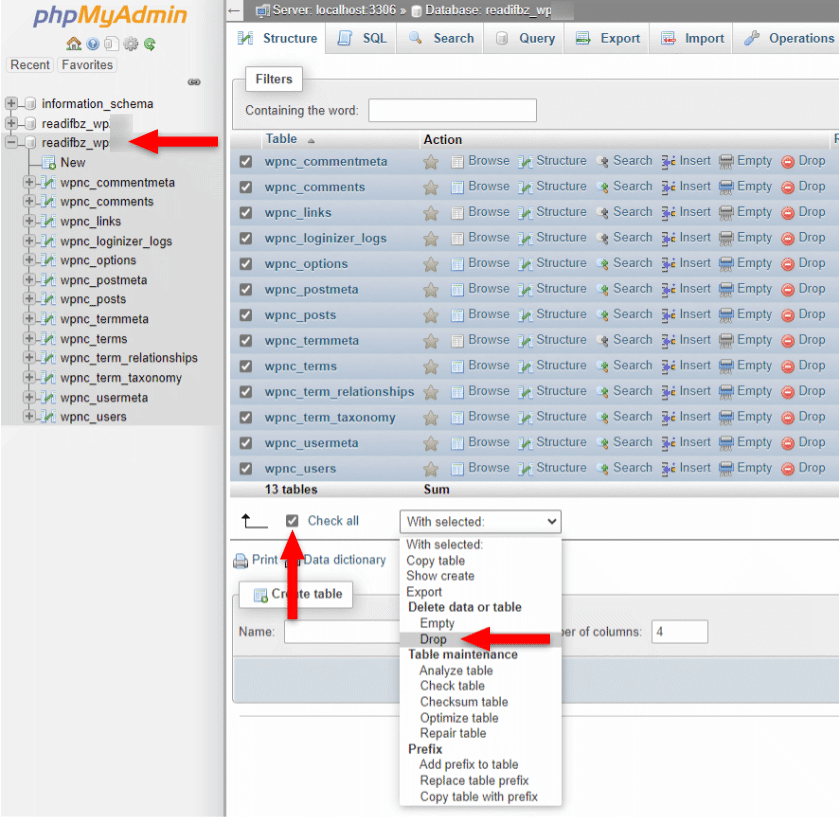
Here’s how to delete the tables from the WordPress database before importing the SQL file:
- Select the WordPress database on the left sidebar to display its tables;
- Under the Table that displays the WordPress database tables, select Check all;
- From the With selected drop-down menu, select Drop from the Delete data or table section. It will automatically start deleting the tables then.
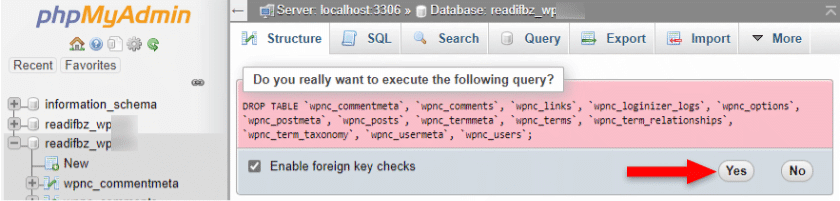
When it asks you “Do you really want to execute the following query?”, click on the Yes button.
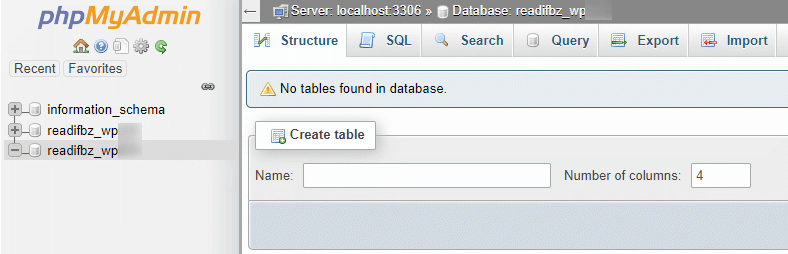
After that, your WordPress database will have no tables, and you can proceed with importing your SQL file, which will add the backed-up tables.
Looking for an All-in-One WordPress Solution?
ReadyShip offers you ready-made WordPress sites and blogs, plus high-quality managed AWS hosting with free SSL and CDN, at no initial cost!
How to Manually Back Up a WordPress Database with the Backup Tool in cPanel
Most of you will also have access to a Backup tool in cPanel. Let’s see how to use that to manually back up your WordPress database.
Step 1
Access and log in to cPanel.
Usually, you can quickly access cPanel by adding the /cpanel slug after your domain (e.g. https://example.com/cpanel).
If you didn’t receive your login information after purchasing the hosting plan, check the hosting documentation or contact them for help.
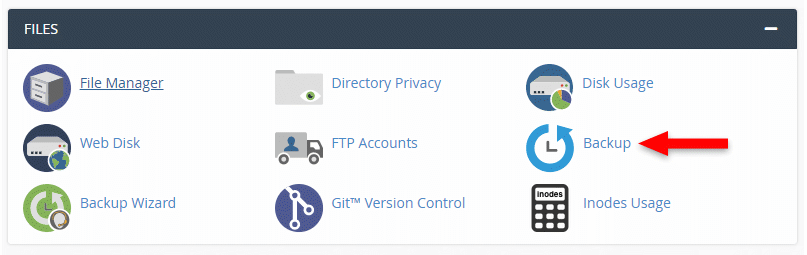
Step 2
After logging in to cPanel, look for the Backup tool.
Step 3
Search for a section that handles MySQL downloads. In my case, it’s called Download a MySQL Database Backup. It might be called differently for you depending on the cPanel version or if it was customized in any way.
There, you’ll have all your WordPress database displayed. Click on one to download it to your local drive.
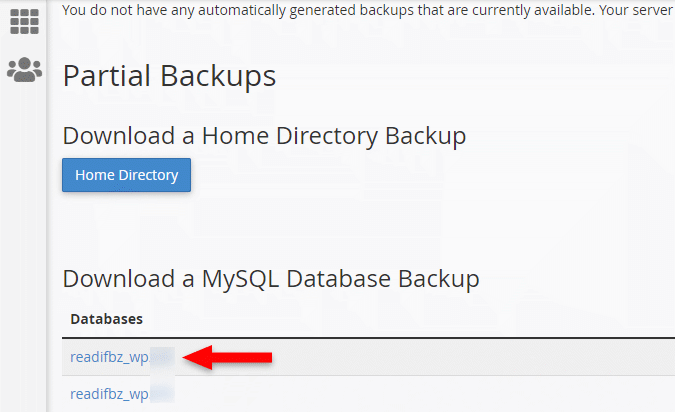
Unlike phpMyAdmin, the single file will be compressed and saved in a .sql.gz format.
This file also works if you import it in phpMyAdmin (see above section).
How to Manually Restore a WordPress Database with the Backup Tool in cPanel
Manually restoring a WordPress database with the Backup tool in cPanel is just as easy. Let’s see how to do it.
Step 1
Access and log in to cPanel.
Usually, you can quickly access cPanel by adding the /cpanel slug after your domain (e.g. https://example.com/cpanel).
Step 2
After logging in to cPanel, look for the Backup tool.
Step 3
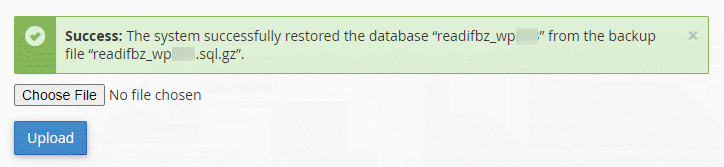
In the same place where you downloaded a backup of your WordPress database, you’ll find a section where you can restore it.
In my case, it’s called Restore a MySQL Database Backup. It might be called differently for you.
So, click on the Choose File button, select the WordPress database file from your local drive, then click on the Upload button.

Once it’s finished, you’ll see a success (hopefully 😀) message, letting you know that the WordPress database backup was restored.
Looking for an All-in-One WordPress Solution?
ReadyShip offers you ready-made WordPress sites and blogs, plus high-quality managed AWS hosting with free SSL and CDN, at no initial cost!
The End
These are the two tools that you can use in cPanel to export and import or back up and restore your WordPress database.
Always be extra careful when handling WordPress databases. Double-check and make sure you do everything right.
If you have questions or thoughts, feel free to leave a comment below.