Adding icons to your WordPress menu can improve the design, user experience, and even conversions because visuals can grab the users’ attention.
One of the best ways to achieve this is to use Font Awesome, which is a well-known platform that provides a lot of quality icons that you can add to your WordPress menu and other places.
Font Awesome also makes it easier to implement their icons in your WordPress website, with or without a plugin.
In this step-by-step tutorial, I’ll take the latter approach. I’ll show you how to add Font Awesome icons to your WordPress menu without a plugin. It’s a little bit more advanced, but I’ll try to make it easier for beginners as well.
Let’s get to work!
Using Font Awesome Kit vs CDN
Before getting to the main point, let me write a bit about the Font Awesome Kit and CDN.
In most tutorials on this topic, you’ll see that the CDN method is used. That’s because they’re old and not updated yet.
While the CDN option is still somewhat available, it’s discontinued, as it’s mentioned by Font Awesome:
John, this version of Font Awesome’s CDN is being Sunsetted.
You may still use it for any of the domains you’ve set below, but we will not be bringing new features to this service. Instead, we’re using Font Awesome Kits host and do even more for you with auto-accessibility, better performance, updates without touching code, and more!

If you’re wondering why they call me John, not Radu – it’s because I set up an account for testing purposes, and I added John Doe as my name. 🙂
Back to the point – You’ll also need to subscribe to the Pro version to use the CDN.
You Need a Pro Subscription to use the Pro CDN
A subscription gets you access to services like the Pro CDN, new icons as soon as they are released, updates, and dedicated support from the Font Awesome Team.
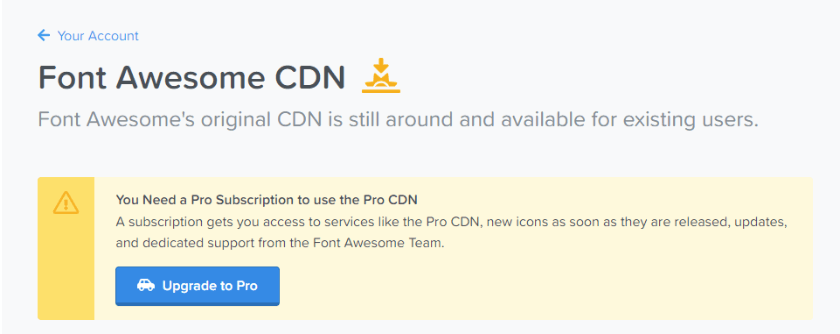
Moreover, using the CDN feature is more complicated, requiring more custom code to be added, as you can see in the documentation.
So, since the Font Awesome Kit is the new kid on the block, bringing new features, auto-accessibility, better performance, and updates, you’d be better off using it from the start to add icons to your WordPress menu.
Oh, and don’t think that the Font Awesome Kit doesn’t rely on a CDN, because it does, as they mention here.
So don’t think that the kits approach in these examples is sans-CDN. Kits are backed by a fast and stable CDN.
So, your Font Awesome icons will still be served fast.
Now, let’s see how to use it.
Looking to Buy or Sell WordPress Sites?
At ReadyShip, we offer an all-in-one WordPress solution for those looking to start a blog or site, as well as the opportunity for WordPress developers or professionals to sell their products!
Setting Up the Font Awesome Kit in WordPress
So, I mentioned above why Font Awesome Kit is the way to go nowadays. Now, let’s see how to set it up in WordPress to enable the icons for the menu.
Step 1
Create a Font Awesome account here.
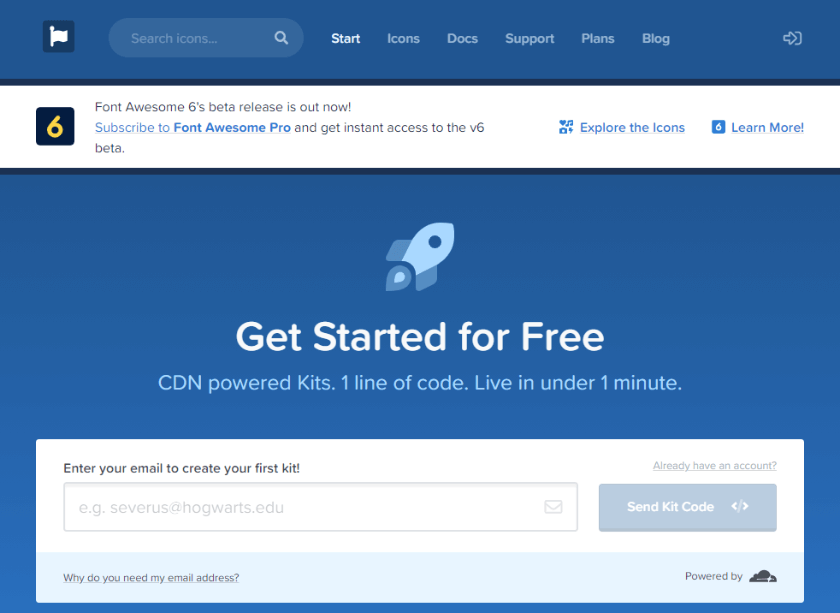
Add your email, click on the verification link that you receive in your inbox, then set up your password.
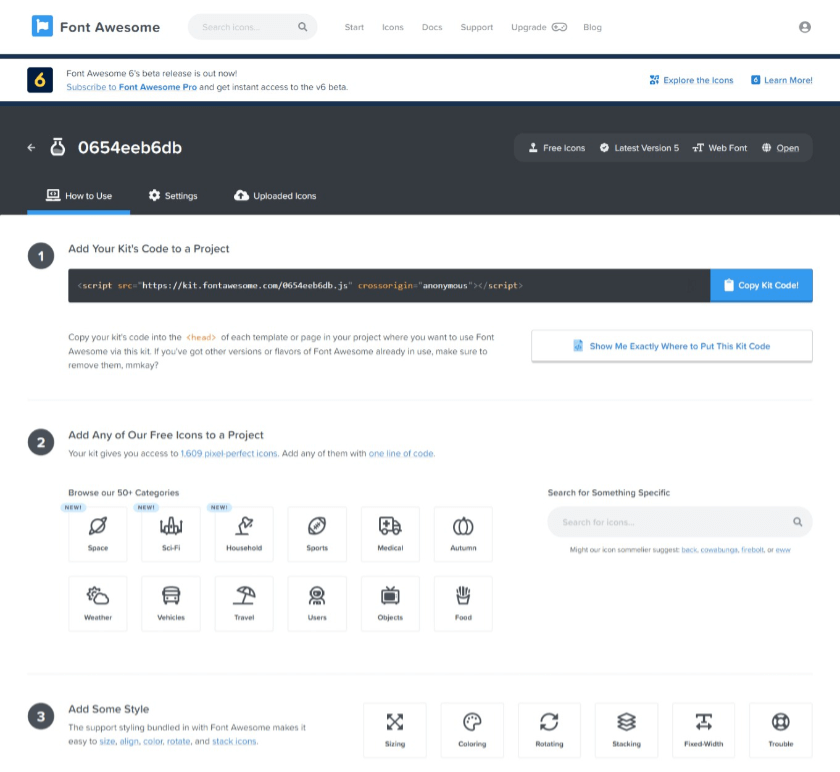
Once you finish that, you’ll be brought to your Font Awesome Kit, which is automatically created for you.
Step 2
Your Font Awesome Kit will be named something random, hard to remember. You can see from the above screenshot that mine was named 0654eeb6db.
I recommend changing that with something else.
So, go to Settings and change the name in the Kit Name field. You could add your website name, for example. I’ll be adding wplab, which is the domain name for my WordPress testing site.
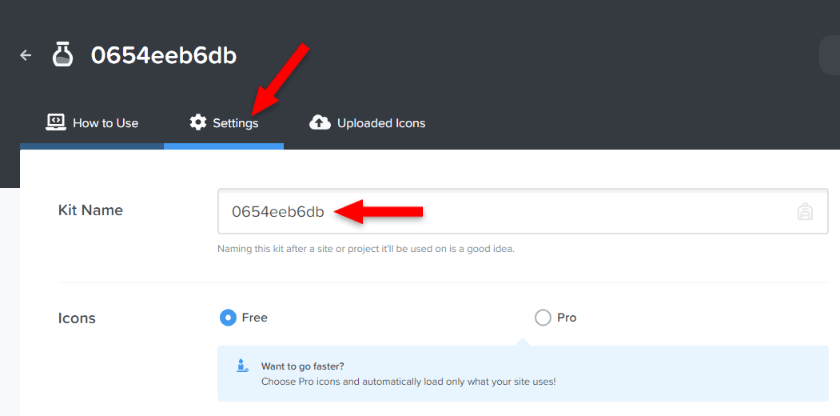
Scroll down and click on the Save Changes button.
Step 3
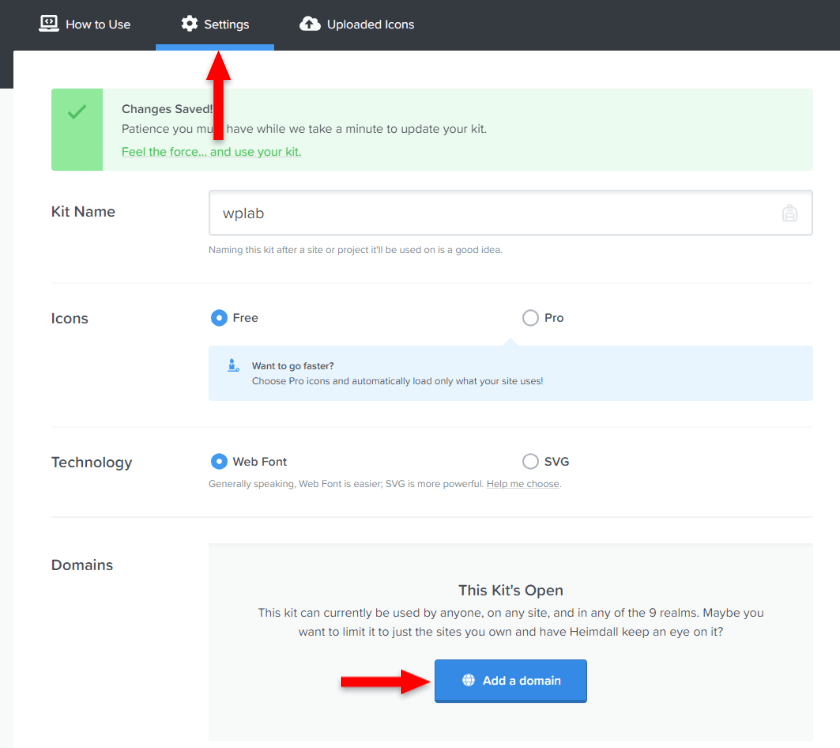
It’s a good idea to add your domain to your Font Awesome Kit. Otherwise, other people can use it on their sites because the link will be visible on your WordPress site’s source code. Anyone can grab it.
So, it’s best to limit the Kit usage only to your domain(s).
To do that, go to the Settings page if you’re not there already from step 2, scroll down to the Domains section, and click on the Add a domain button.
Step 4
Depending on your needs, you can add it in different ways.
For example, I added *.wplab.cyou because I want the Font Awesome Kit to cover any potential subdomains as well, including www.

You can find details and examples by clicking on the Full details link under the field. A popup will show up with what you need to know.
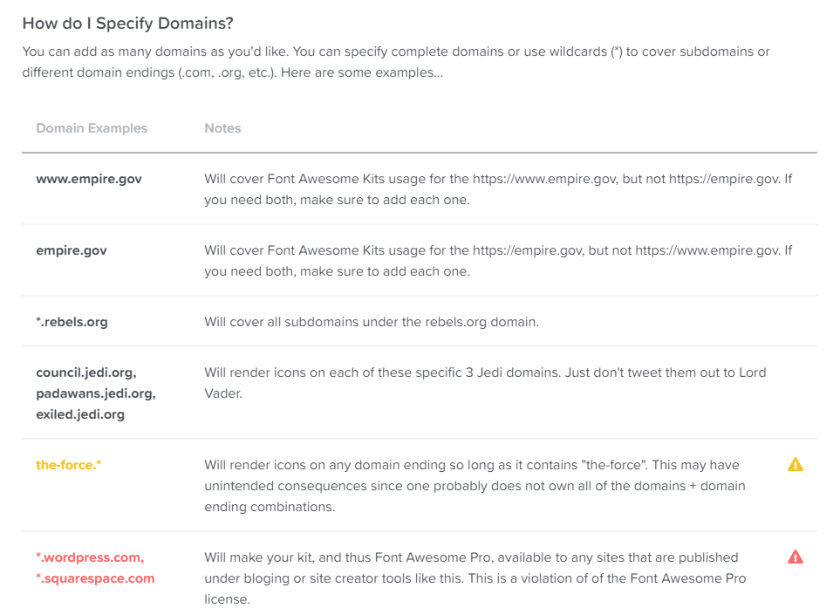
If you have a simple domain name without www, like example.com, and you know for sure that you’ll only use Font Awesome on that one, then you can simply add example.com there. The same goes for the www version.
Click on the Save Changes button again once you’re done.
Step 5
Now, we’ll use the official documentation on how to set up Font Awesome Kit in WordPress without a plugin.
The first thing you need to do is to access your theme’s functions.php file because you’ll need to add a code snippet there. Here’s a tutorial that I wrote on how to access and edit your WordPress files using 3 different methods.
For safety, especially if you’re a beginner, I recommend that you back up your functions.php file or the entire WordPress website.
I strongly recommend having a child theme in place and adding the code in its function.php file. Otherwise, the changes will be gone with the next theme update if you add it in the parent theme’s file.
The usual path to the file is:
public_html/wp-content/themes/YourThemeName-child/functions.php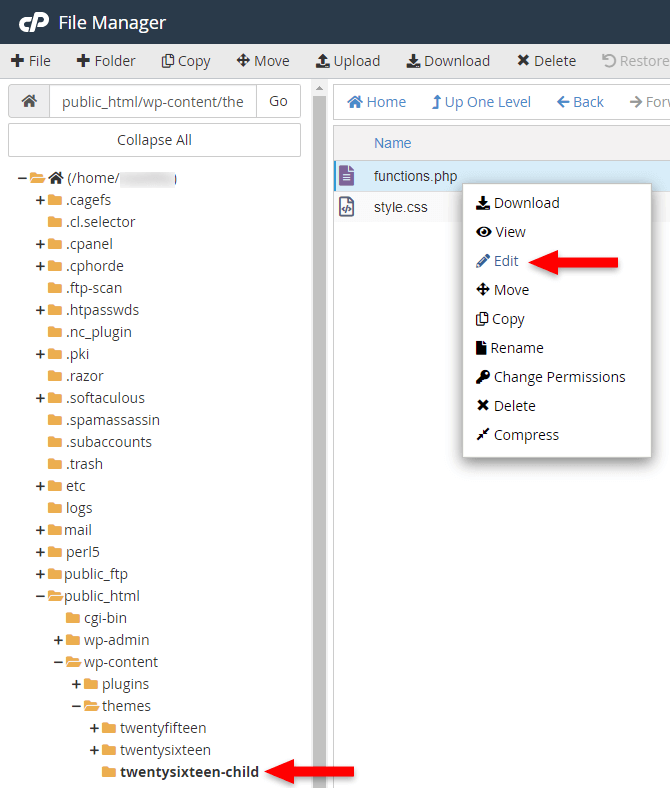
If you don’t have a child theme, then you can use a plugin called Code Snippets. It allows you to add PHP code snippets to your WordPress website.
The Code Snippets plugin could be a better choice if you think that you might change your WordPress theme in the future.
Step 6
Now that you found and opened the functions.php file, or installed the Code Snippets plugin, you can copy and paste the following code snippet there.
Note that this code is taken from Font Awesome’s documentation. While it will probably not change soon or at all, you should still check it out to see if any updates were made to it.
/**
 * Font Awesome Kit Setup
 *
 * This will add your Font Awesome Kit to the front-end, the admin back-end,
 * and the login screen area.
 */
if (! function_exists('fa_custom_setup_kit') ) {
  function fa_custom_setup_kit($kit_url = '') {
    foreach ( [ 'wp_enqueue_scripts', 'admin_enqueue_scripts', 'login_enqueue_scripts' ] as $action ) {
      add_action(
        $action,
        function () use ( $kit_url ) {
          wp_enqueue_script( 'font-awesome-kit', $kit_url, [], null );
        }
      );
    }
  }
}
If you’re using the functions.php file, paste it right after anything that you already have there.
Now, right after that snippet, paste this line as well:
fa_custom_setup_kit('https://kit.fontawesome.com/42deadbeef.js');Now, here, it’s important to change the .js file name from the link with your own Font Awesome Kit token, which was the random name from step 2, before the change.
Don’t worry, you can still find it in your Font Awesome account by going to Kits, then clicking on your Kit’s name.
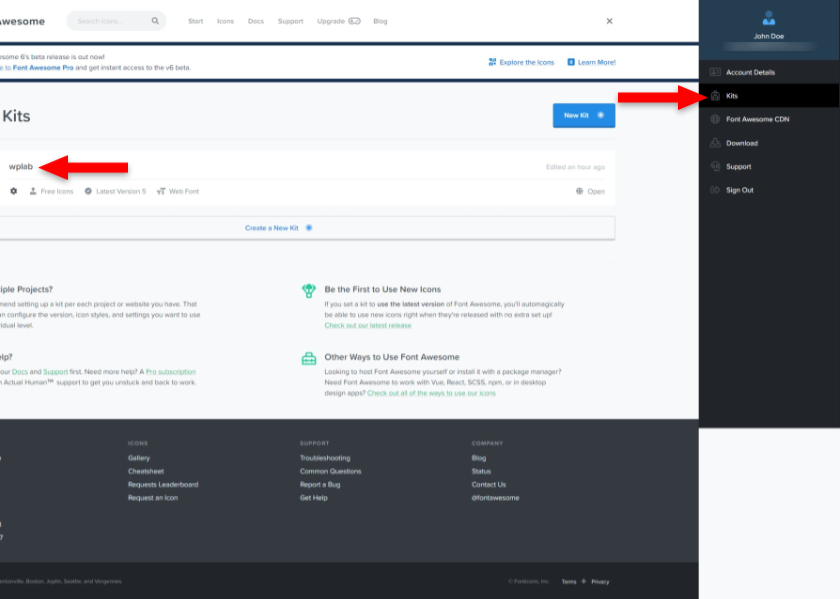
This will bring up your Kit’s dashboard. There, on the How to Use tab, from the Kit Code, copy only the token, which is basically the name of the .js file from the link. Copy it without the .js extension.

In my case, the token is 0654eeb6db. So, I’ll replace it in the last line of code that I told you to paste at the end of the first code snippet. Thus, the last line of code for me will be this one, with my own token in it:
fa_custom_setup_kit('https://kit.fontawesome.com/0654eeb6db.js');So, I replaced 42deadbeef with my token, which is 0654eeb6db. And, finally, the whole code looks like this:
/**
 * Font Awesome Kit Setup
 *
 * This will add your Font Awesome Kit to the front-end, the admin back-end,
 * and the login screen area.
 */
if (! function_exists('fa_custom_setup_kit') ) {
  function fa_custom_setup_kit($kit_url = '') {
    foreach ( [ 'wp_enqueue_scripts', 'admin_enqueue_scripts', 'login_enqueue_scripts' ] as $action ) {
      add_action(
        $action,
        function () use ( $kit_url ) {
          wp_enqueue_script( 'font-awesome-kit', $kit_url, [], null );
        }
      );
    }
  }
}
fa_custom_setup_kit('https://kit.fontawesome.com/0654eeb6db.js');
Here’s how it looks pasted in a child theme’s functions.php file, using cPanel’s File Manager.
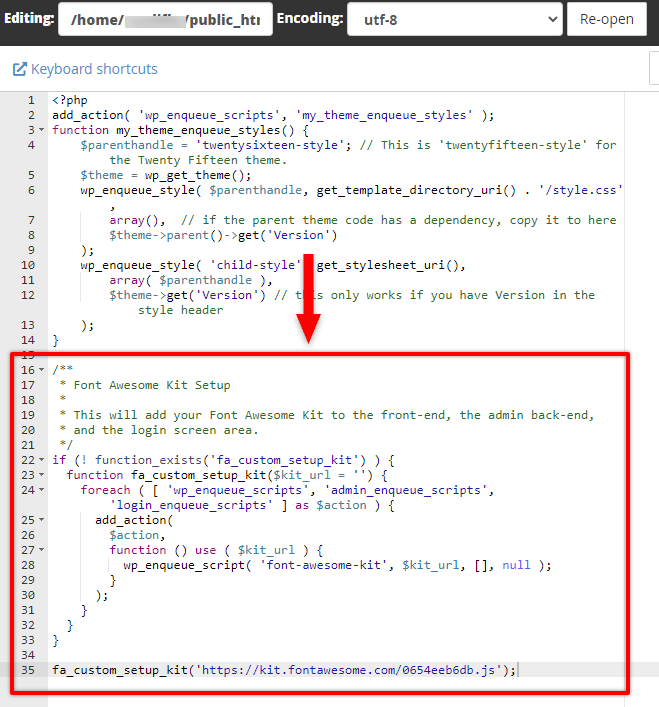
And here’s how it looks like in Code Snippets, instead of a child theme’s functions.php file:
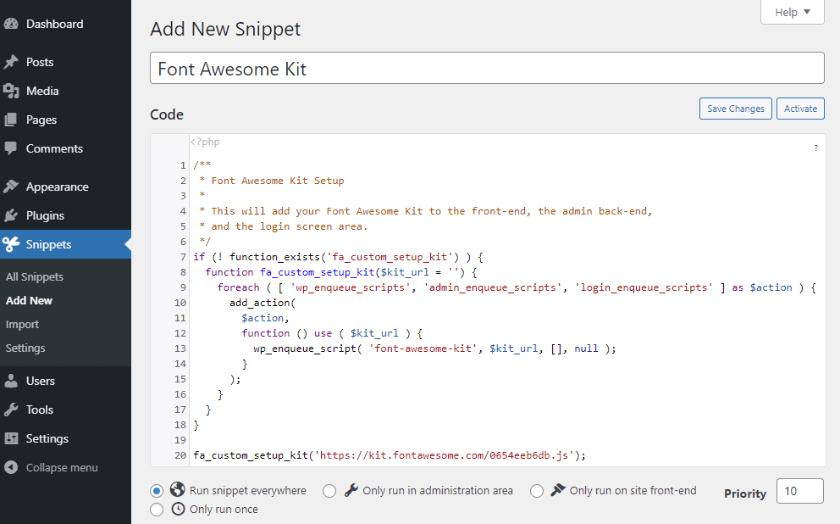
In Code Snippets, you just click on Add New, add a descriptive name, paste the code, then save.
Looking for an All-in-One WordPress Solution?
ReadyShip offers you ready-made WordPress sites and blogs, plus high-quality managed AWS hosting with free SSL and CDN, at no initial cost!
Adding the Font Awesome Icons to the WordPress Menu
Now that you’ve set up the Font Awesome Kit, let’s see how to add the icons to the WordPress menu manually, without a plugin.
Step 1
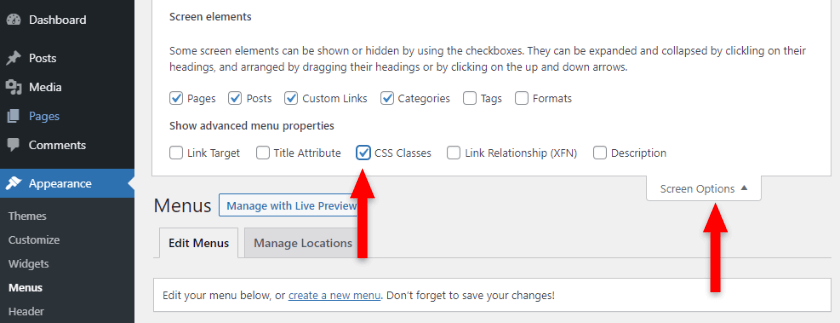
Access your WordPress menu by going to Appearance > Menus.
There, click on Screen Options, which you’ll find in the top-right corner, right under your WordPress username and avatar.
Now, under Show advanced menu properties, enable CSS Classes by checking the box next to it.
Step 2
Go to Font Awesome’s free icons (if you don’t have Pro), search for the icon that you want, and click on it to bring up more options.
I’ve chosen a house icon to add for the Home page in my WordPress menu.
After selecting your Font Awesome icon, copy only the class from the <i> tag. That’s all you need. You don’t need the whole tag in this case.
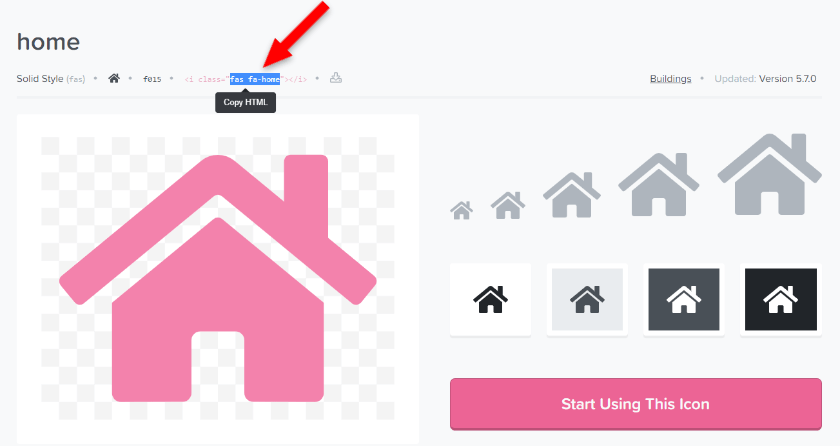
In my case, the class is fas fa-home.
Step 3
Go back to your WordPress menu, open up a menu item by clicking on the down arrow, and paste the class from Font Awesome in the CSS Classes (optional) field.
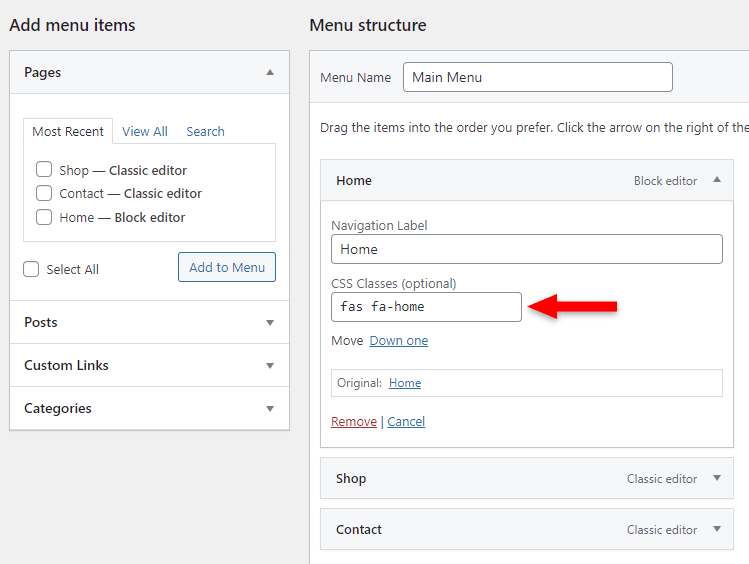
Repeat steps 2 and 3 for every WordPress menu item where you want to add Font Awesome icons.
Click on the Save Menu button when you’re done.
Step 4
Check to see if the Font Awesome icons appear in your WordPress menu.
If they don’t show up at all, it might be a caching issue. Make sure you clear any caching system that you might have from a plugin, CDN, your hosting, and even your theme in rare cases.
Also, use a Private/Incognito window in your browser to bypass its cache.
They did show up for me, but they are not positioned right, as you can see.

The Font Awesome classes also affected the text’s style.
This happens because the Font Awesome class is added in the tag that handles the whole WordPress menu item. So, whatever code the Font Awesome class holds, it’s passed onto the WordPress menu item as well.
This type of problem might not happen to you. Or it might happen differently. It depends on your WordPress theme.
Fortunately, it can be fixed with some CSS code. Unfortunately, there’s no one-size-fits-all solution. All I can do is to show you how I fixed my problem, hoping that in case you have an issue, it’s the same one, and you can fix it, too.
Looking for an All-in-One WordPress Solution?
ReadyShip offers you ready-made WordPress sites and blogs, plus high-quality managed AWS hosting with free SSL and CDN, at no initial cost!
Fixing the Font Awesome Icons in the WordPress Menu
To fix the issues that I got, I used some CSS code. You can use it, too, if you have the same problem.
Here’s a tutorial that I wrote on how to add custom CSS in WordPress using different methods.
I’ll be using the WordPress Customizer to add the CSS code. You’ll find that by going to Appearance > Customize > Additional CSS.
To bring the Font Awesome icons on the same row with the WordPress menu items, I used this code:
/* Add Font Awesome icons on the same row as menu items */
.main-navigation li.fas {
	display: flex;
	align-items:center;
}
What’s between /* */ are commentaries, so I can know what’s the code for. I recommend that you do the same. You’ll be thanking yourself in the future.

As you can see, it aligned them nicely.
Now, to bring back my initial font family and weight for the WordPress menu, I added this code:
/* Font Awesome classes changed the menu items' style. Changing it back */
.main-navigation li a {
	font-family: 'Montserrat';
	font-weight: 300;
}
As you can see, they look different now. Back to normal.
Of course, your WordPress theme might use another font family and weight. You’ll need to find them out, most likely from your theme settings.
If the theme settings are of no help, you’ll need some basic CSS knowledge, as well as knowing how to use the browser’s Inspect Element feature.
Or, if your theme developers are nice and helpful, you could ask them about the font and weight.
Customizing the Font Awesome Icons in the WordPress Menu
Your Font Awesome Kit also offers you some styling options, such as spacing, coloring, rotating, and more. You can find them in your Kit, under the Add Some Styles section.

Each of those provides more classes that you can use in addition to the icon class that you added in the menu item field, in WordPress.
So, if you click on Sizing, you’ll find out that there are several additional classes that you can use to resize your Font Awesome icons in the WordPress menu.
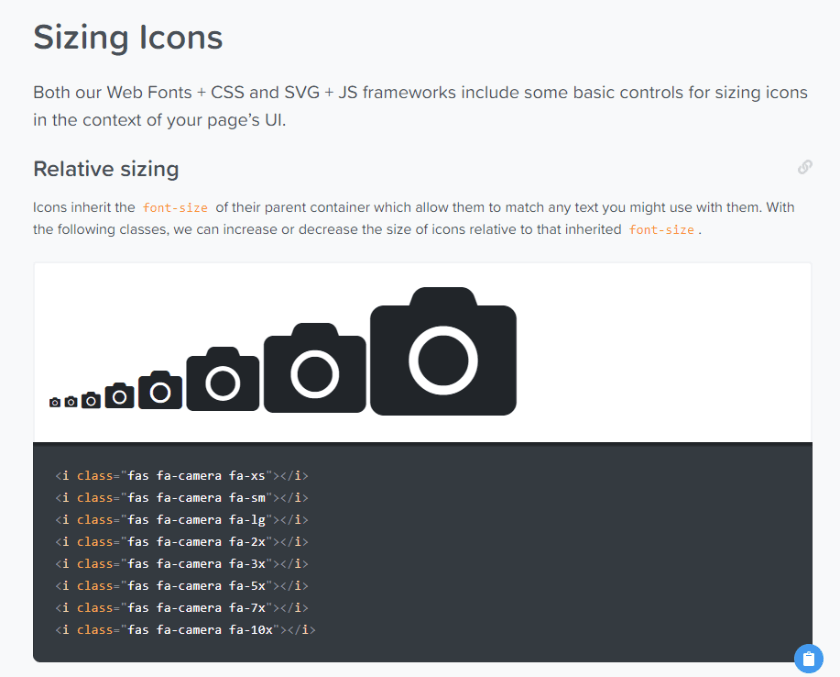
Note that some classes are available only for Pro users.
So, to make a Font Awesome icon large, for example, you’ll need to use the fa-lg class. That class, in addition to the main Font Awesome class that you added, will result in this, in WordPress:
fas fa-home fa-lg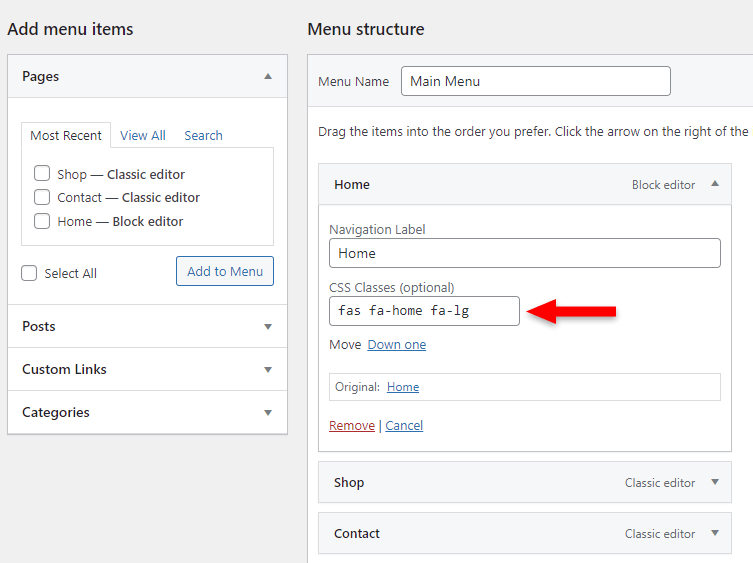
Of course, you can further customize the icons based on your preference by using custom CSS. You don’t have to limit yourself to the pre-made classes offered by Font Awesome.
For example, since some coloring classes are only available for Pro users, and it doesn’t actually involve colors anyway, you can change it yourself.
/* Styling Font Awesome icons in the menu */
.main-navigation li.fas {
	color: #ff0000; /* Making the icons red */
}

If you know some basic CSS, you’re gucci.
Looking for an All-in-One WordPress Solution?
ReadyShip offers you ready-made WordPress sites and blogs, plus high-quality managed AWS hosting with free SSL and CDN, at no initial cost!
The End
That’s it, folks! That’s how you add Font Awesome icons to your WordPress menu without a plugin.
You set up the Font Awesome Kit, add the code snippet, enable CSS classes for the WordPress menu, then add the Font Awesome icon classes.
Unfortunately, some issues with styling might appear, so you’ll need to get your hands dirty some more by tweaking things with some custom CSS code.
Adding things manually usually requires a bit more work than using a plugin. So, if you’re a complete beginner to WordPress, CSS, and all that jazz, you might need to rely on a plugin.
If you have questions or thoughts, feel free to leave a comment.


