
Either you have a website, blog, or online shop, you’ll most likely want to add a subscription form to create a list of subscribers to whom you can send newsletters with your latest posts, products, services, deals, and so on.
Having a hefty list of subscribers can generate a good amount of traffic, which can significantly increase your revenue.
So, in this step-by-step tutorial, I’ll show you how to:
- Set up your Mailchimp account;
- Add a Mailchimp subscription form in WordPress using three different methods;
- How to connect a plugin to Mailchimp;
- How to create Segments in Mailchimp;
- How to make the subscription form compliant with GDPR.
Let’s start!
1. Set Up a Mailchimp Account
First, let’s start with creating and setting up a Mailchimp account.
Step 1
Go to Mailchimp and sign up for an account. Don’t forget to activate it using the link that you’ll receive in your email.
Step 2
After clicking the link in your email to activate your account, you’ll be directed to the Account Set Up page. The first step will be to choose a plan.
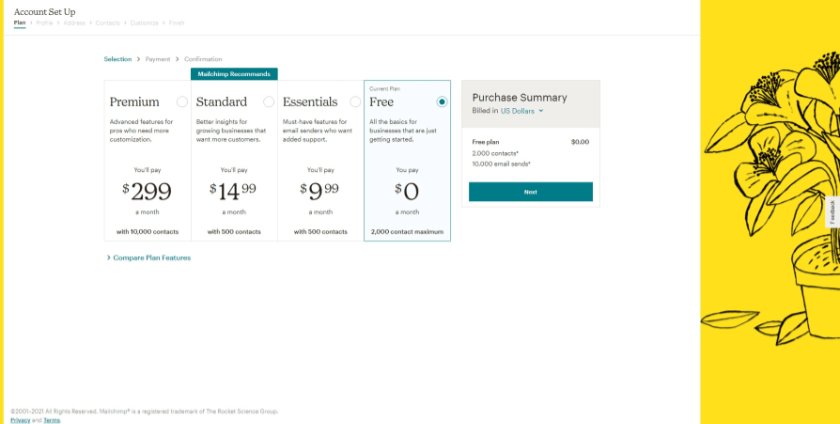
For this example, I’ll choose the Free plan, of course. 😀 I recommend that you do the same if you’re new to Mailchimp. Maybe you won’t like it and decide not to use it.
Once you’re ready, click the Next button.
Step 3
Set up your profile by adding your name, business name, website URL, and phone number.
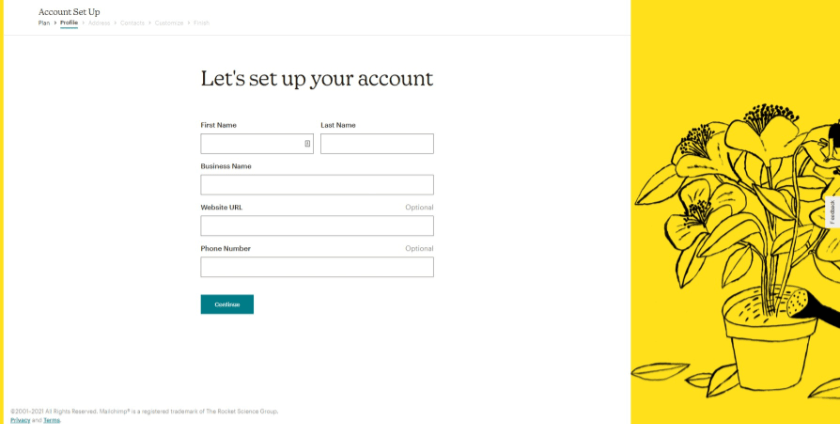
The last two are optional. I don’t know why the business name is mandatory, as if everyone has a business. Maybe someone is blogging for pleasure, not money, for example? It’s an annoying request.
Anyway, click on the Continue button when you’re done.
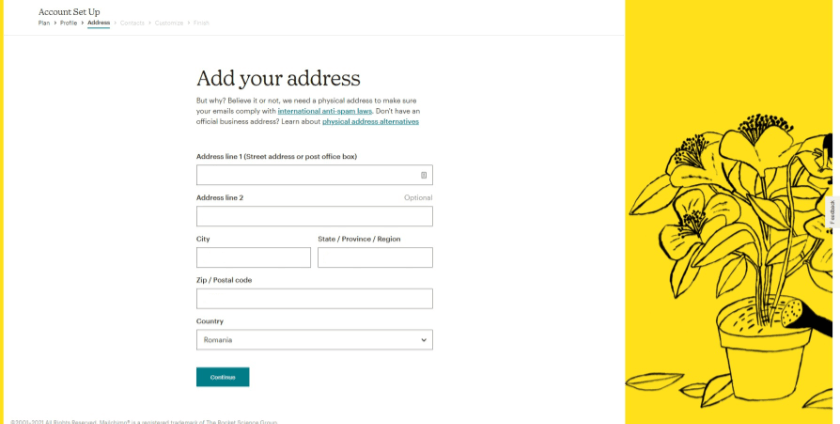
Step 4
Add your address.
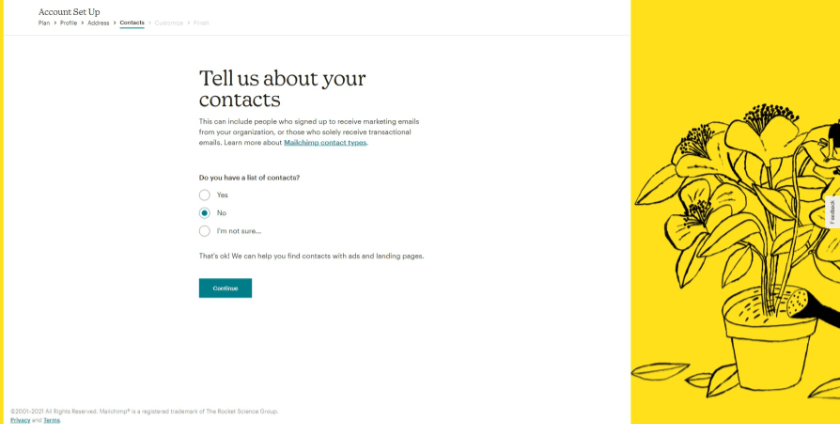
Step 5
Now, they’ll ask if you already have a list of contacts, meaning people who already signed up somewhere else to receive emails from you.
If you do have a list, choose Yes. Then, you’ll have to select how many email contacts do you have.
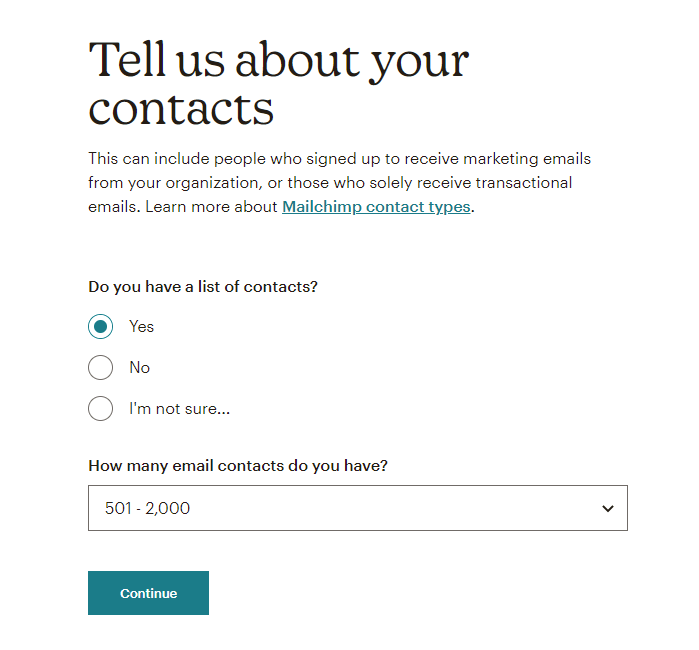
Note that the Free plan only includes up to 2000 contacts. If you’re going to import more, you’ll have to upgrade your plan.
Since I don’t have a list of contacts, I’ll choose No.
Step 6
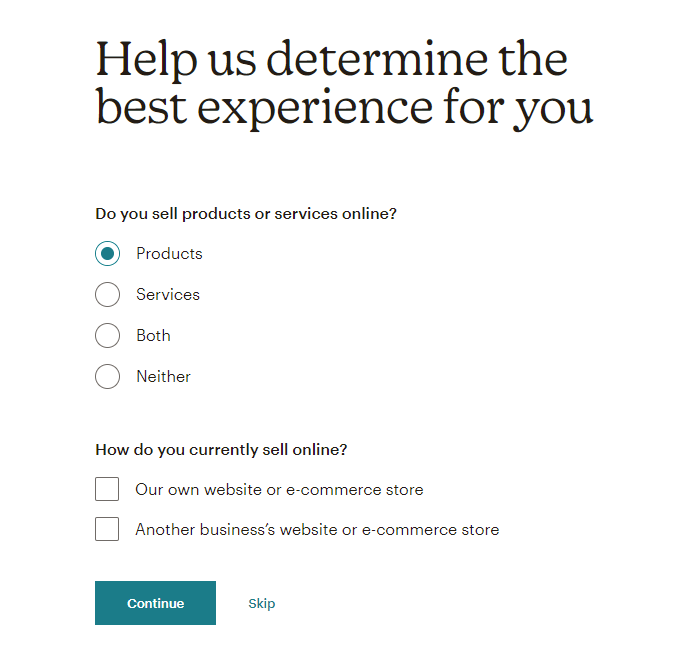
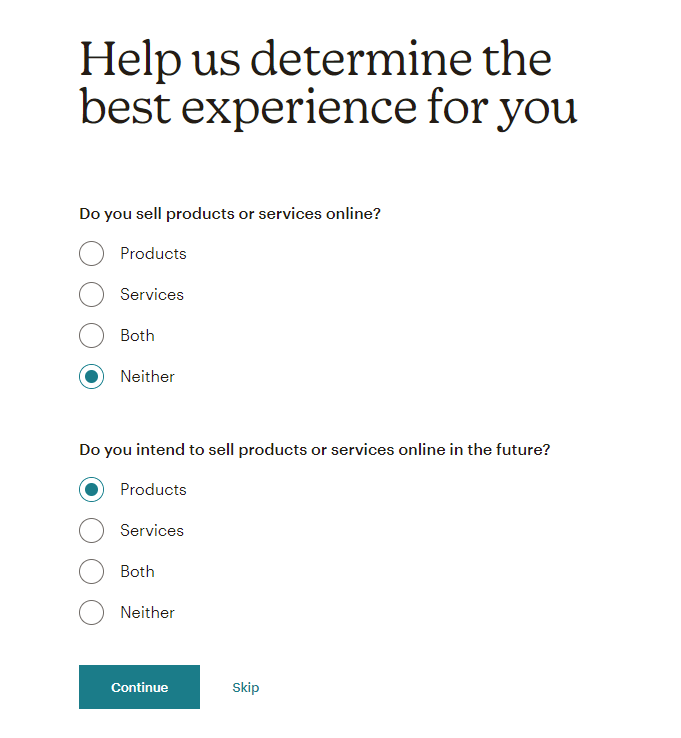
At the Customize step, select if you sell products or services online.
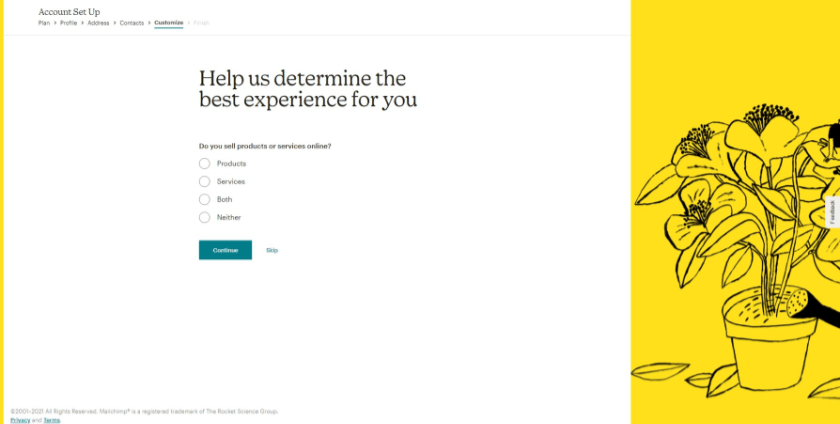
New questions can appear, depending on what answer you choose. For Products, Services, or Both, you’ll get this additional question: “How do you currently sell online?”
If you choose Neither, then you’ll be asked if you plan to sell products or services in the future.
Click on the Continue button once you’re done. You’ll be directed to the Mailchimp dashboard.
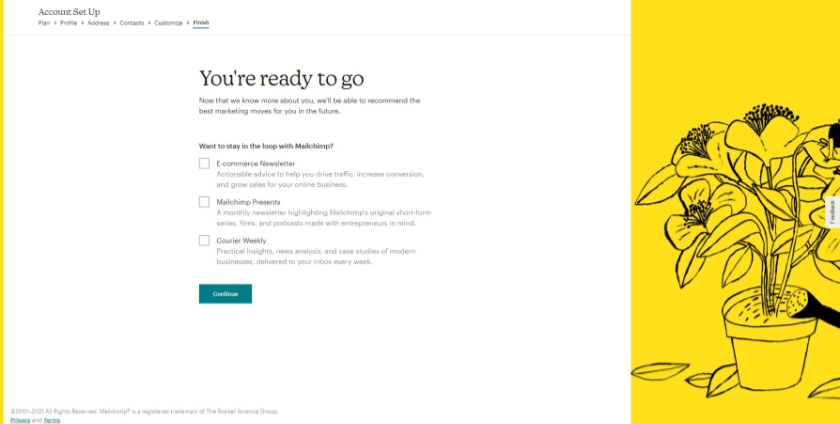
Step 7
The last thing to do for your Mailchimp account setup is to choose if you want to receive different types of newsletters from Mailchimp.
Looking to Buy or Sell WordPress Sites?
At ReadyShip, we offer an all-in-one WordPress solution for those looking to start a blog or site, as well as the opportunity for WordPress developers or professionals to sell their products!
2. Set Up Marketing Permissions for GDPR
If you have visitors from the European Union, you’ll have to make your subscription form, along with your newsletter, compliant with the GDPR law.
And last time I checked, and if I understood correctly, the GDPR law requires you to allow users to choose what type of newsletters they want to receive. That’s besides giving their consent to store and use their email address, along with other personal information that you might require.
The GDPR law is weird and susceptible to interpretation, so please do your own research as well. I might not have gotten it right.
More similar laws are starting to pop up as well, because why not have 200 different privacy laws to deal with, right? 🙂
For example, Brazil has come up with Brazilian General Data Protection Act. California, in the United States, has a similar law, called California Consumer Privacy Act.
So, basically, you can’t run away from this nightmare, no matter where your audience is coming from.
Anyway, let’s see how to enable GDPR marketing permissions in Mailchimp, which will work with the Segments that we’ll set up in the next section.
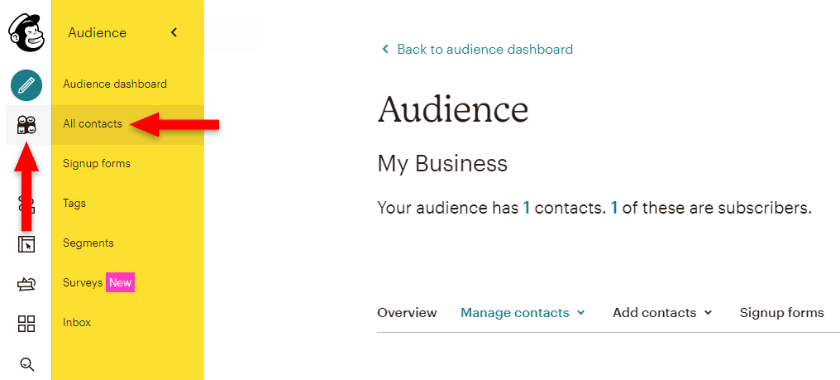
Step 1
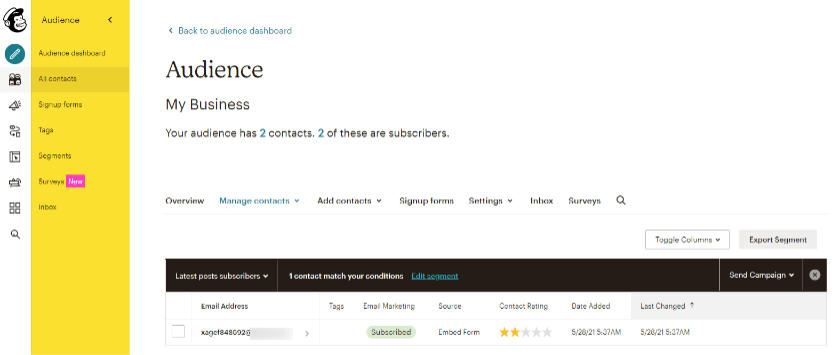
From your Mailchimp dashboard, go to Audience > All contacts.
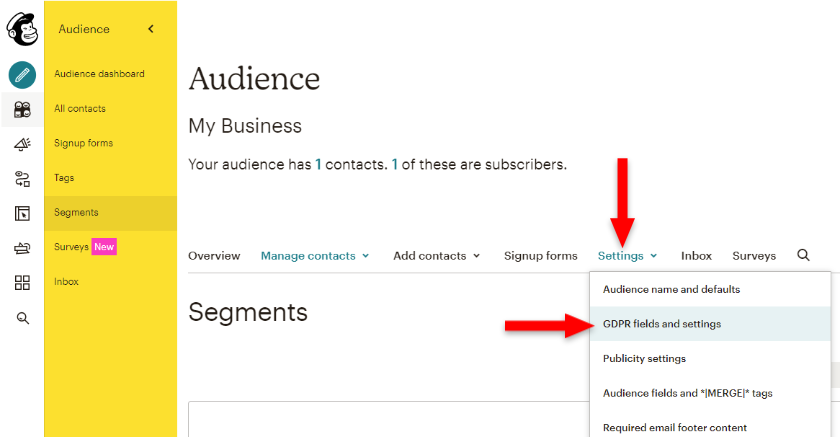
Step 2
From the Settings drop-down, choose GDPR fields and settings.
Step 3
There, you’ll see a page with a form, called GDPR Marketing Preferences.
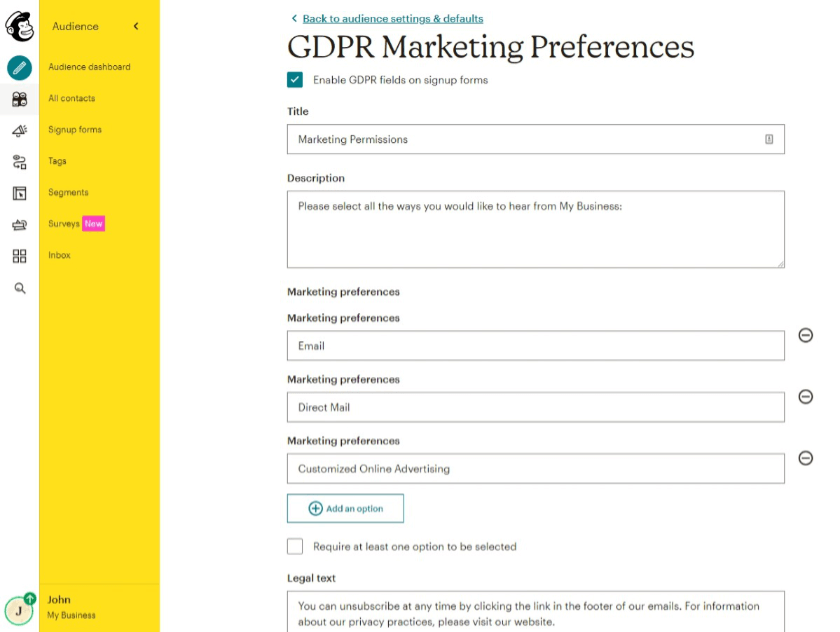
You can add whatever title, description, and legal text you want.
For the Marketing preferences options, I like to add different types of newsletters, so that the users opt-in for the one they’re interested in. This will:
- Increase the user experience because they’ll only receive newsletters that they’re interested in;
- Convert better. That’s because some users would be more willing to subscribe for something they specifically want or need, such as the latest posts or deals. Most don’t want to receive everything you have to offer, so they won’t subscribe.
So, I replaced the default description with “Please select the newsletters that you want to subscribe for”, and Marketing preferences with:
- Latest posts;
- Marketing.
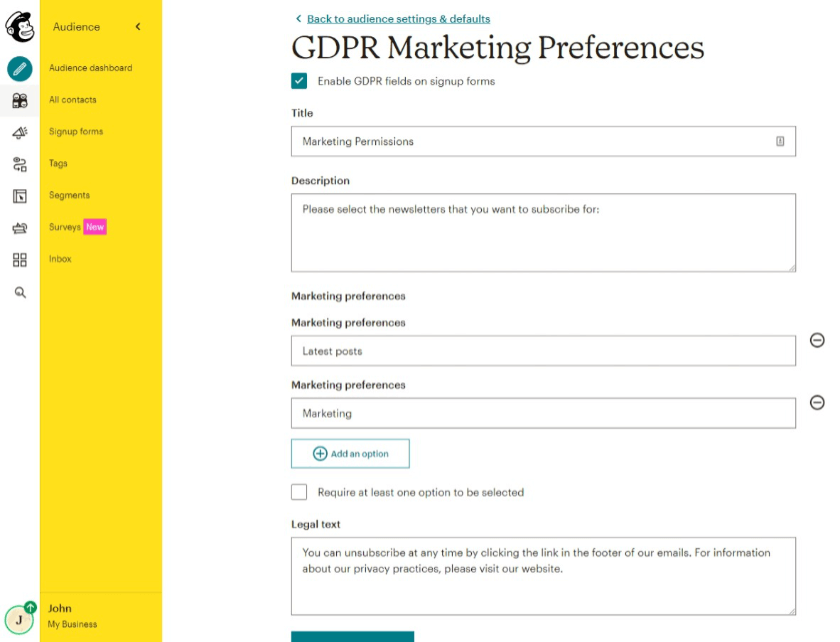
Click the Save GDPR settings button when you’re done.
3. Create Segments in Mailchimp
You might be interested in Groups instead. The plugin that I recommend at the end works with Groups but not with Segments.
Segments in Mailchimp allow you to send targeted newsletters to your subscribers. Think about them as categories.
For example, you might want to send your latest posts to all subscribers, but marketing newsletters only to some, not all of them. Basically, it’s what I mentioned in the above section.
When users choose what type of newsletter they want to receive, in the marketing preference section, their email address will automatically go to the specific Segment.
Let’s see how to create Segments in Mailchimp.
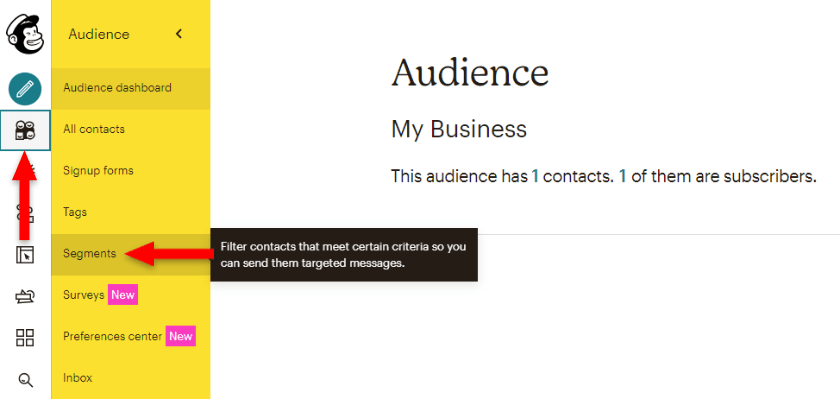
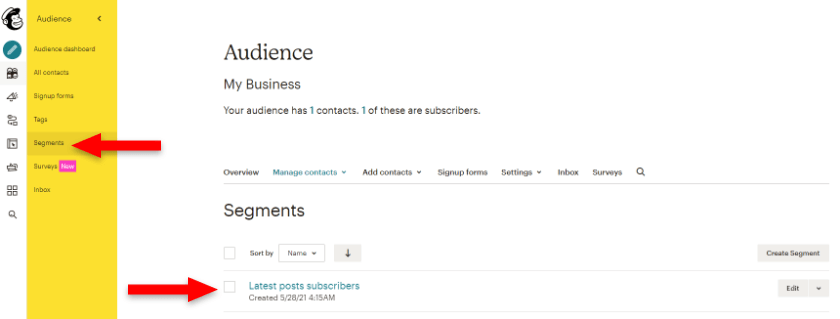
Step 1
From your Mailchimp dashboard, go to Audience > Segments.
Step 2
Click on the Create Segment button.

Step 3
For example, I want to create a Segment where the users who choose Latest posts from Marketing preference are added. That way, they only receive a newsletter with my latest posts.
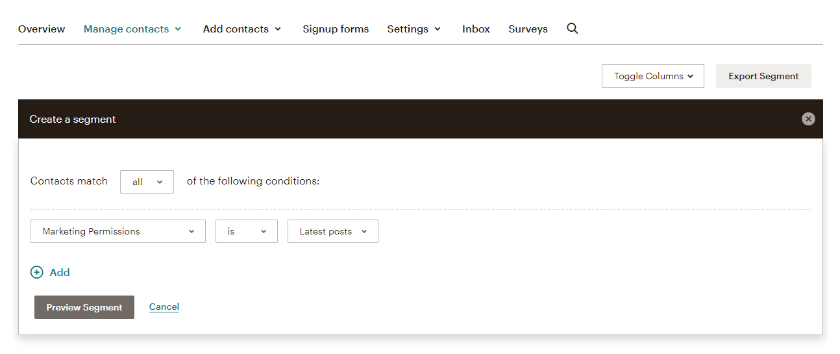
Here’s what I did. I:
- Set Contacts match to all.;
- Selected Marketing Permissions, is, and Latest posts from the drop-downs.
You can add multiple conditions, depending on your needs.
Once you’re done, click on the Preview Segment button.
Step 4
Click on the Save Segment button.

Step 5
After saving, a popup will appear, where you can name the Segment. I named it “Latest posts subscribers”.
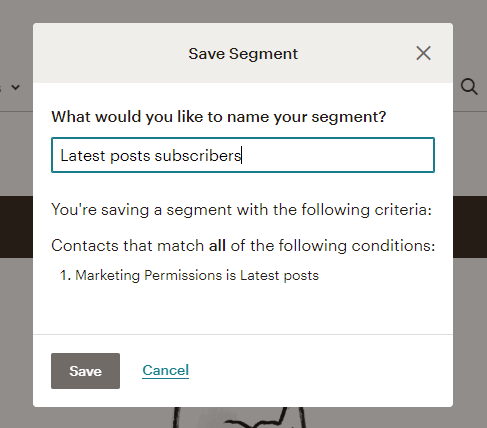
Click on the Save button.
Now, if you go to Audience > Segments from your dashboard, you’ll see it there, in the table.
Repeat these steps for every Segment that you want to create.
Looking for an All-in-One WordPress Solution?
ReadyShip offers you ready-made WordPress sites and blogs, plus high-quality managed AWS hosting with free SSL and CDN, at no initial cost!
4. Create and Embed a Mailchimp Subscription Form in WordPress
Mailchimp lets you create two types of subscription forms:
- An Embedded form, which consists of an HTML code that you can paste into WordPress;
- A pop-up form.
Let’s start with the first one.
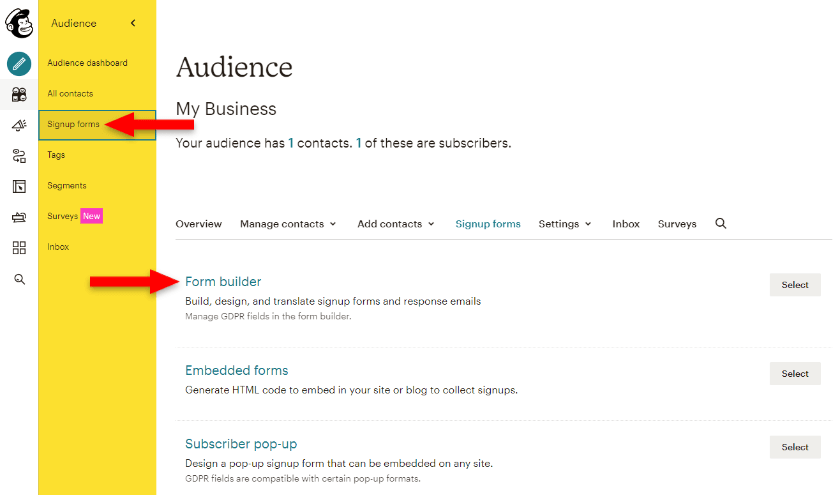
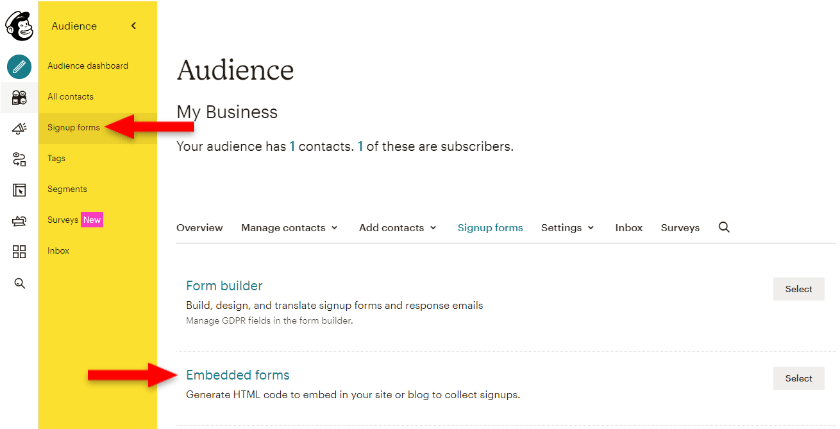
Step 1
Go to Audience > Signup forms and select Form builder.
Step 2
Here’s a lot of work.
You can build your subscription form by adding, editing, removing text and fields. You can design it by changing colors, fonts, etc. And you can also translate it.
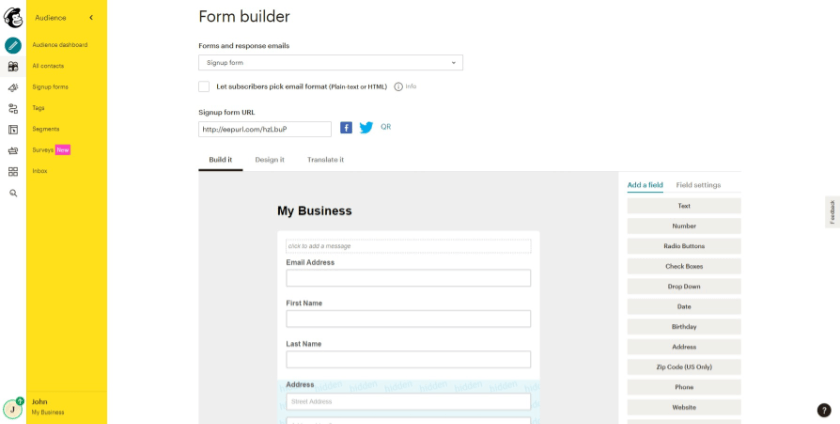
The changes will save automatically, there’s no button.
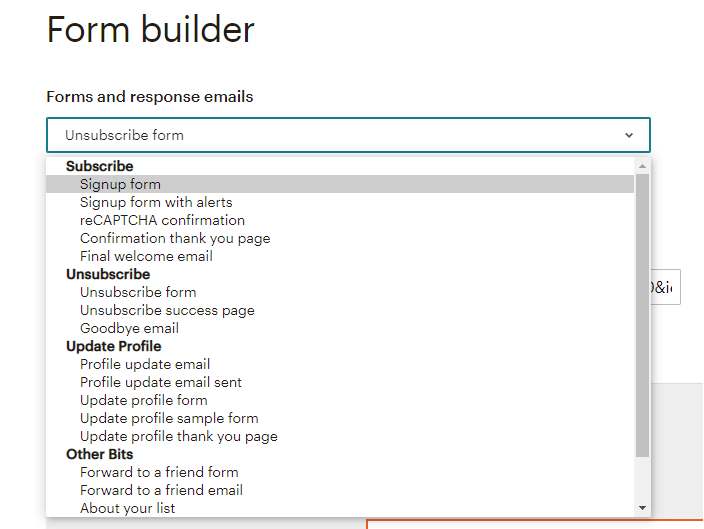
Note that you can do this for your signup form, unsubscribe form, confirmation page, and a lot more, as you can see in the Forms and response emails drop-down.
If you care about details like I do, you’ll spend a lot of time here. 🙂
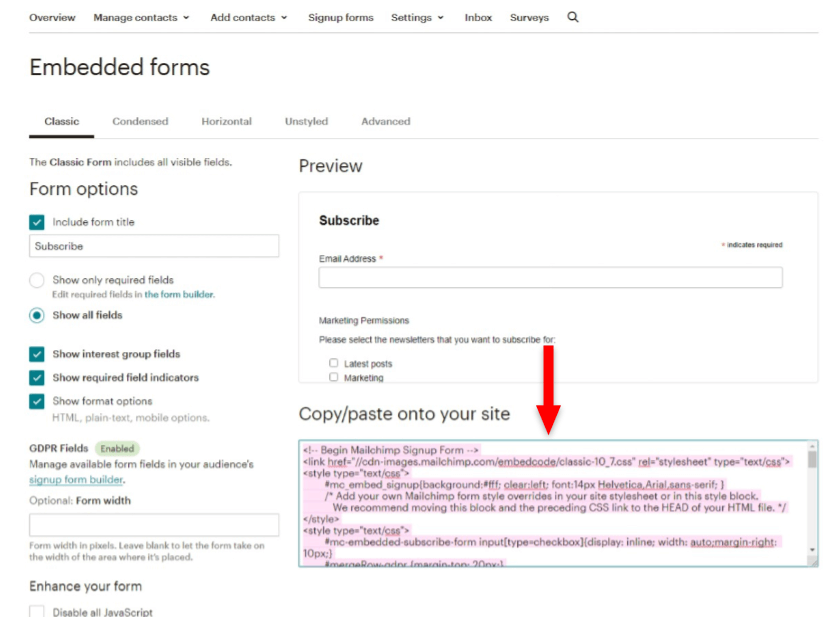
Step 3
After finishing setting up your Mailchimp subscription form for WordPress, go to Audience > Signup forms and select Embedded forms.
Step 4
Here, you’ll have a bunch of other options. You can also preview your subscription form, but it might look different than it will look on your WordPress site. Mine is the default one because I didn’t spend any time on it.
The important thing to do here is to copy that HTML code where it says Copy/paste onto your site.
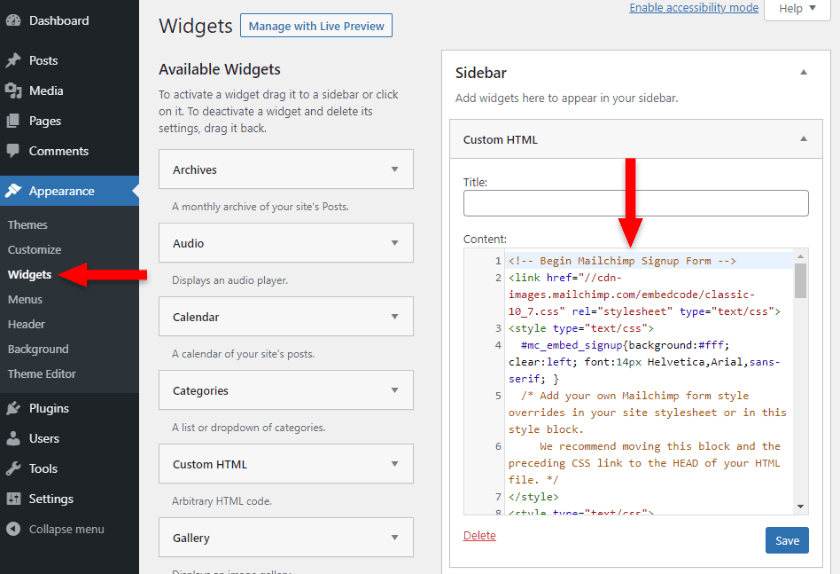
Step 5
Now, usually, you want to embed this Mailchimp subscription form in a WordPress widget – in your sidebar, for example.
So, log in to WordPress, go to Appearance > Widgets and drag a Custom HTML widget to your sidebar. Then, paste the code from Mailchimp to embed the subscription form in WordPress.
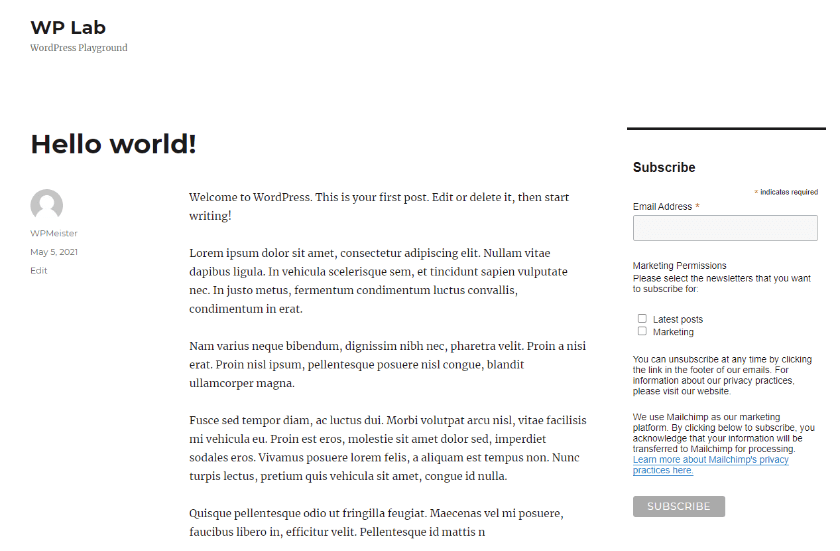
Step 6
Check your embedded Mailchimp subscription form in the front-end now.
Mine looks ugly, of course, because I didn’t tweak it at all. Your WordPress theme might also interfere with the design.
Step 7
Check if the Mailchimp subscription form works, and the subscriber is added to the proper Segment, based on the marketing preference.
I added an email address and chose the Latest posts preference, and it worked!
The email address was added in the Latest posts subscribers Segment, but not in the Marketing subscribers Segment.
5. Create and Add a Mailchimp Subscription Pop-Up in WordPress
This is the second option Mailchimp offers you – a pop-up with a subscription form that you can add to your WordPress website or blog.
Let’s see what you need to do.
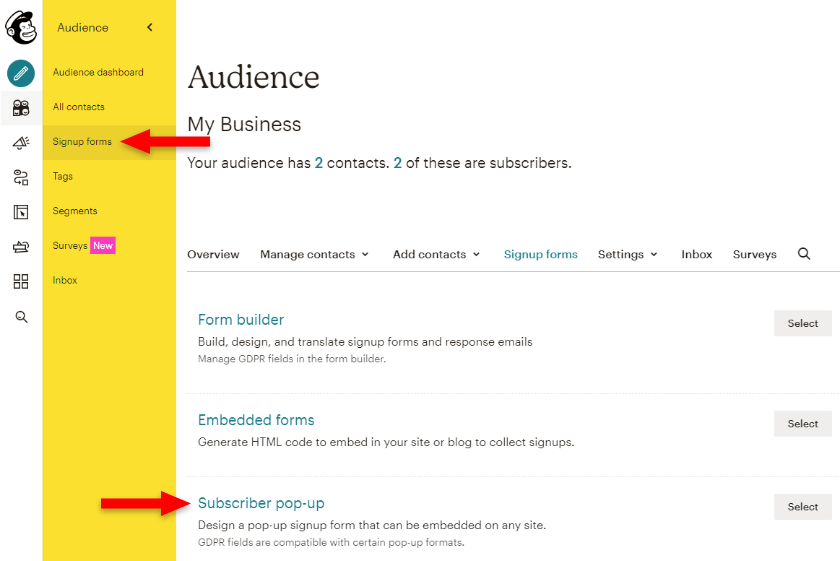
Step 1
In Mailchimp, go to Signup forms and select Subscriber pop-up.
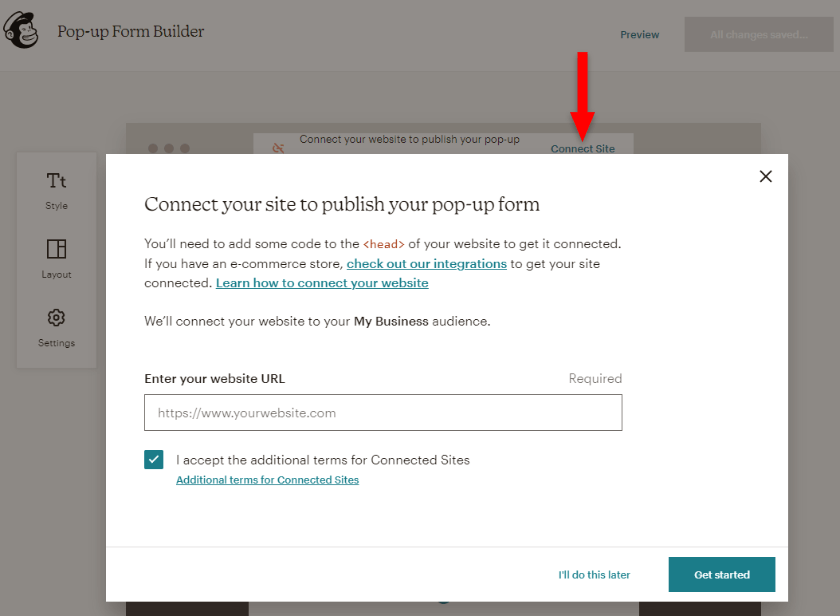
Step 2
Click on the Connect Site link. It will bring up a pop-up where you need to add your website’s URL and accept the terms.
Then, click on Get started.
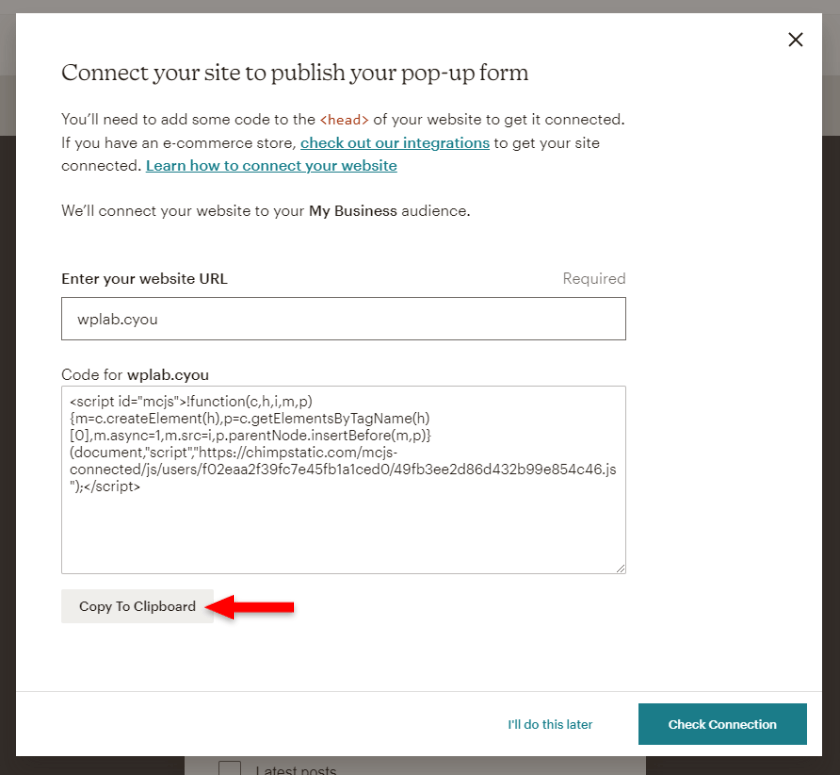
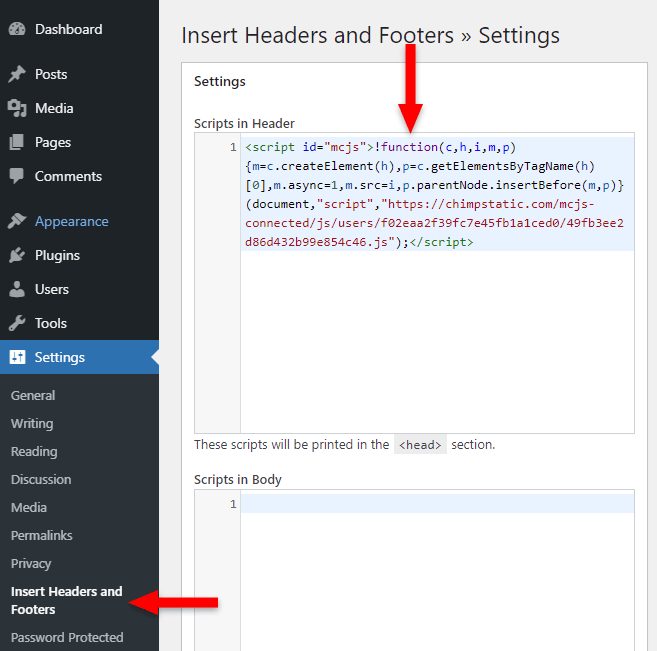
Step 3
You’ll be given a code that you need to paste into the <head> section of your WordPress site. So, click on the Copy To Clipboard button. Leave the pop-up open.
Step 4
Go to your WordPress website and install the Insert Headers and Footers plugin. If you need help, here are 4 ways to install a WordPress plugin.
You’ll most likely need it for other things as well, such as adding a Google Analytics code in WordPress, and stuff like that.
Alternatively, check to see if your theme has a feature like that, which lets you add code in the <head> section of your site. If it does, use that. The fewer plugins you have, the better!
After installing and activating the plugin, go to Settings > Insert Headers and Footers and paste the code in the Scripts in Header box. Don’t forget to click the Save button.
Step 5
Go back to Mailchimp to click on the Check Connection button. A success message should appear.
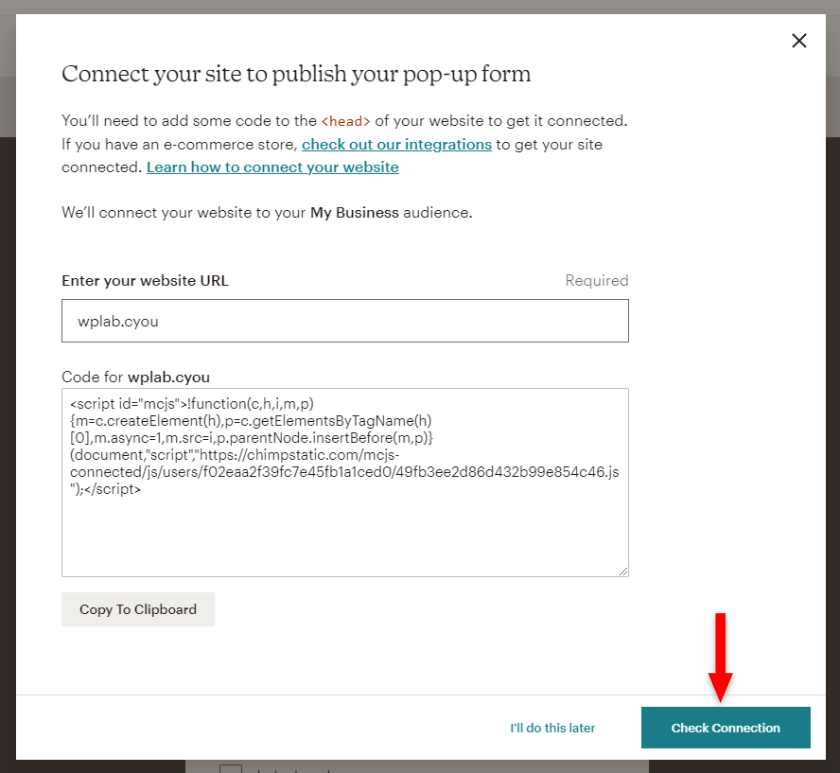
Make sure that your WordPress website is not password-protected, put on Coming Soon mode, or something like that because the connection might fail.
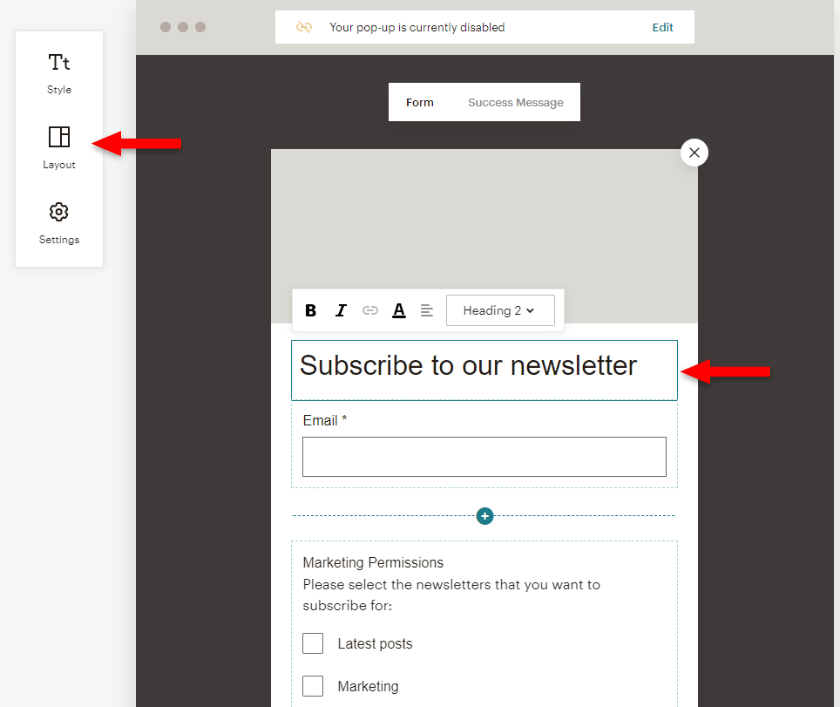
Step 6
Now, you can customize your Mailchimp subscription pop-up using the options on the left. You can also edit fields on the form itself.
Note that the Slide position and some layouts don’t support the GDPR fields.
I recommend going to Settings and selecting On exit from the Display drop-down.
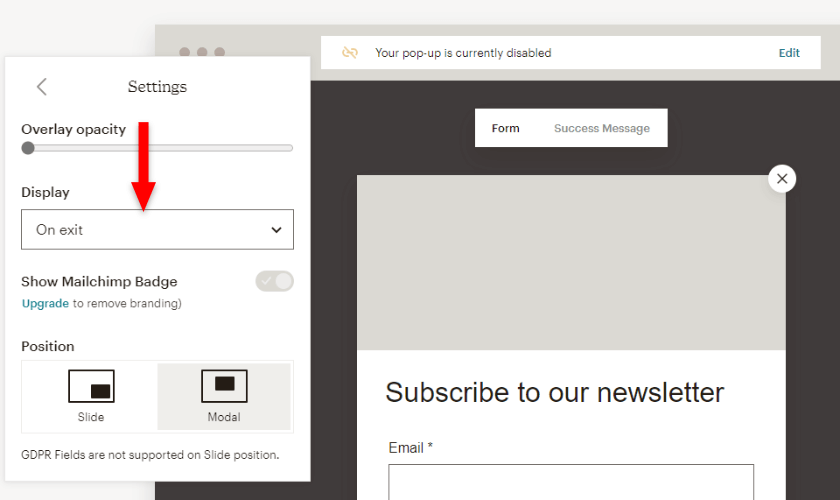
This means that the Mailchimp subscription pop-up will appear when the users want to exit your WordPress website. When they’re done reading or whatever.
From experience, this method converts the best because the users had the chance to check your content without being interrupted, and form an opinion about your site.
If the subscription pop-up appears too early, it will only interrupt the users, annoying them, which will lead to the pop-up being closed quickly, without converting.
Think about how often and quickly you close those pop-ups on websites, without even reading them. Closing pop-ups is part of our instinct nowadays. 🙂
Step 7
Once you’re done customizing the Mailchimp subscription pop-up, click on the Edit link to enable it for your WordPress website.
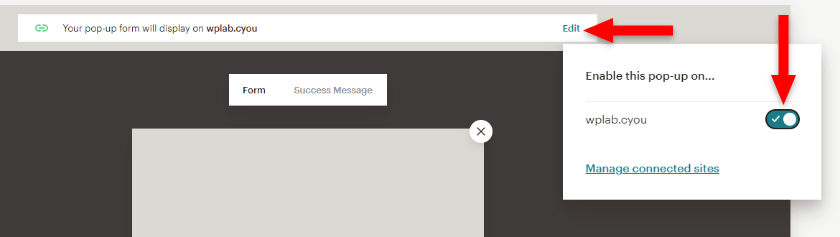
Step 8
Go to your WordPress website, visit a page or post, and move your mouse cursor off the top of the web page, like you’re trying to close the tab. The Mailchimp subscription pop-up should appear then.
Don’t check the WordPress site while logged in because the Mailchimp subscription pop-up might appear broken, with fields missing and whatnot.
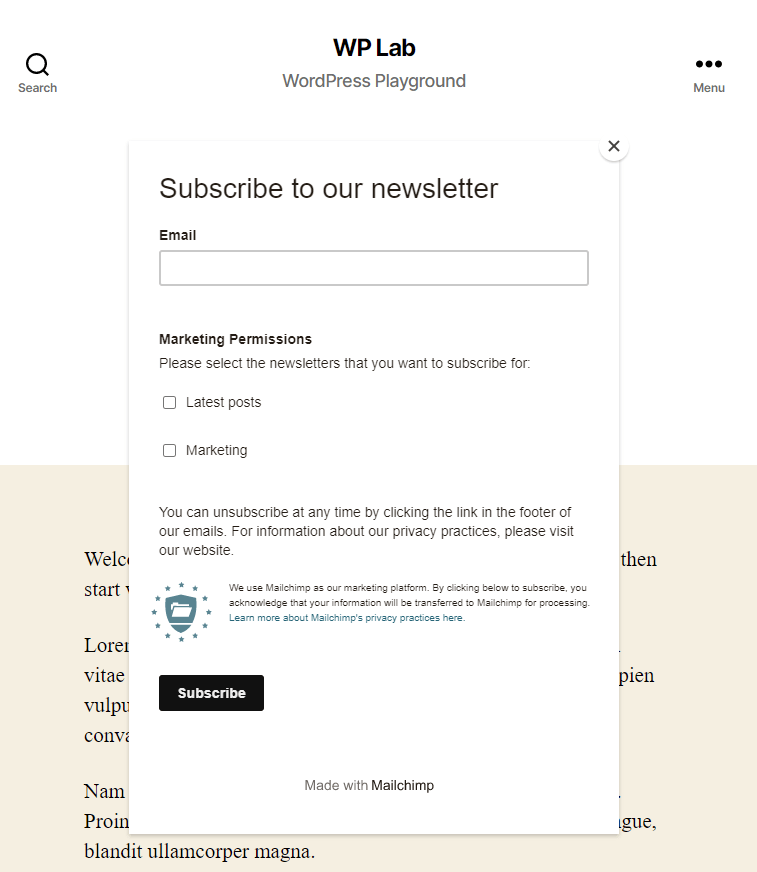
Now, add an email address to test if it works. It did for me.
Looking for an All-in-One WordPress Solution?
ReadyShip offers you ready-made WordPress sites and blogs, plus high-quality managed AWS hosting with free SSL and CDN, at no initial cost!
6. Add a Mailchimp Subscription Form in WordPress Using a Plugin
Some of you might want or need a plugin when setting up Mailchimp for WordPress because:
- The embedded form or pop-up provided by Mailchimp is being a pain in the butt. It might not look or work properly, mainly because it might conflict with your theme or another plugin;
- It’s easier to add the subscription form in different places using a shortcode provided by the plugin;
- You might want to use your own pop-up plugin, which gives you more flexibility and customization options.
So, here’s what you need to do.
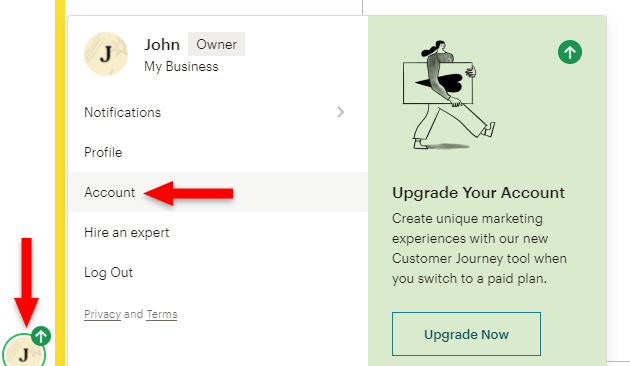
Step 1
Access your Account settings by clicking on your avatar, under the dashboard menu, in the bottom-left.
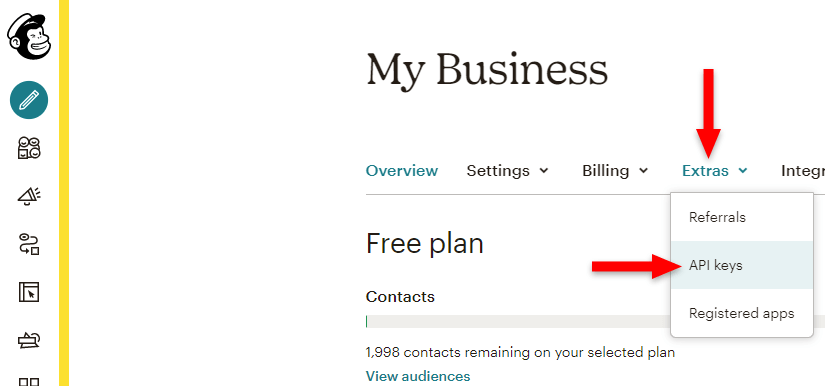
Step 2
From the Extras drop-down, choose API keys.
Step 3
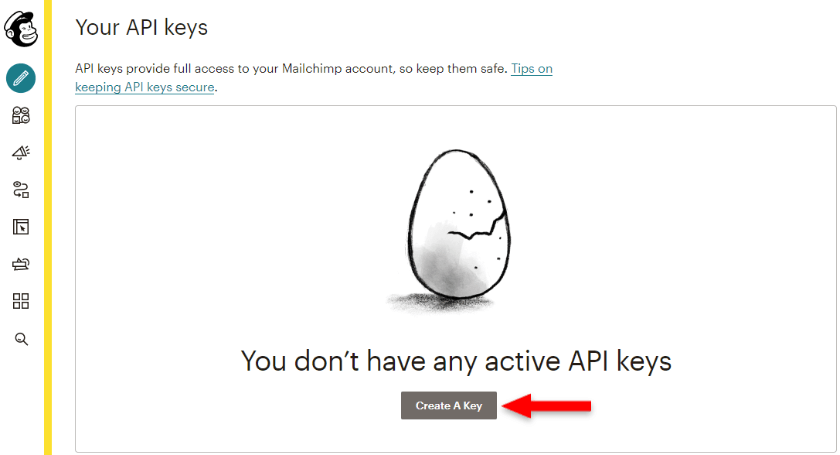
Scroll down to Your API keys and click on the Create A Key button.
Step 4
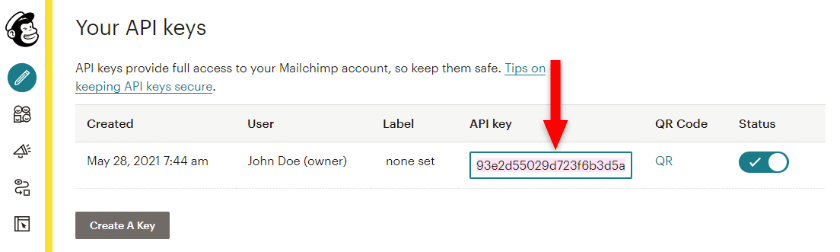
Copy the Mailchimp API key that was created.
Step 5
Go to your WordPress website to install and activate the MC4WP: Mailchimp for WordPress plugin.
Then, go to MC4WP from your dashboard’s menu to paste the Mailchimp API key in the plugin’s API Key field. Click the Save Changes button.
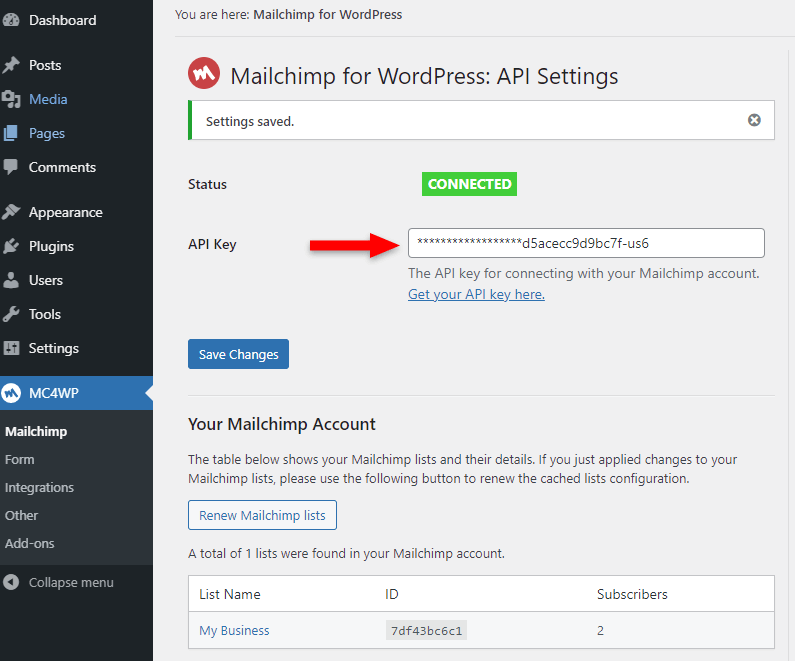
As you can see, it already sees the list created in Mailchimp. It also displays the number of subscribers. So, it works! Awesome!
Step 6
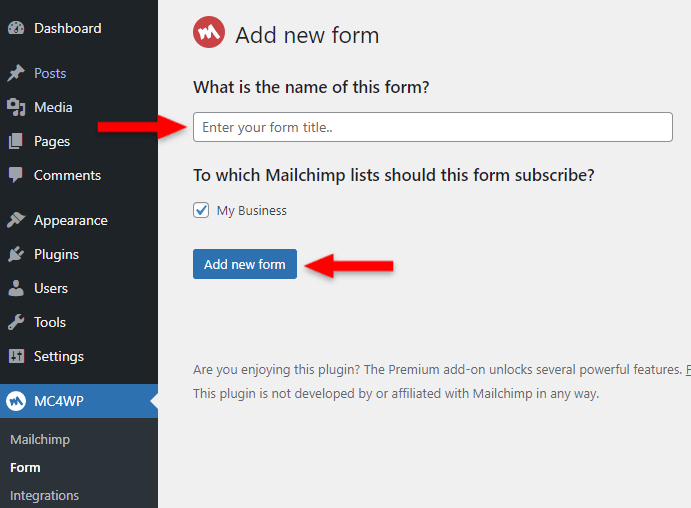
Go to MC4WP > Form.
Add a name for your WordPress subscription form, then click on the Add new form button.
Step 7
After creating the Mailchimp form, you can edit it. You can add fields, change the messages, and more. You also have a Preview feature that helps.
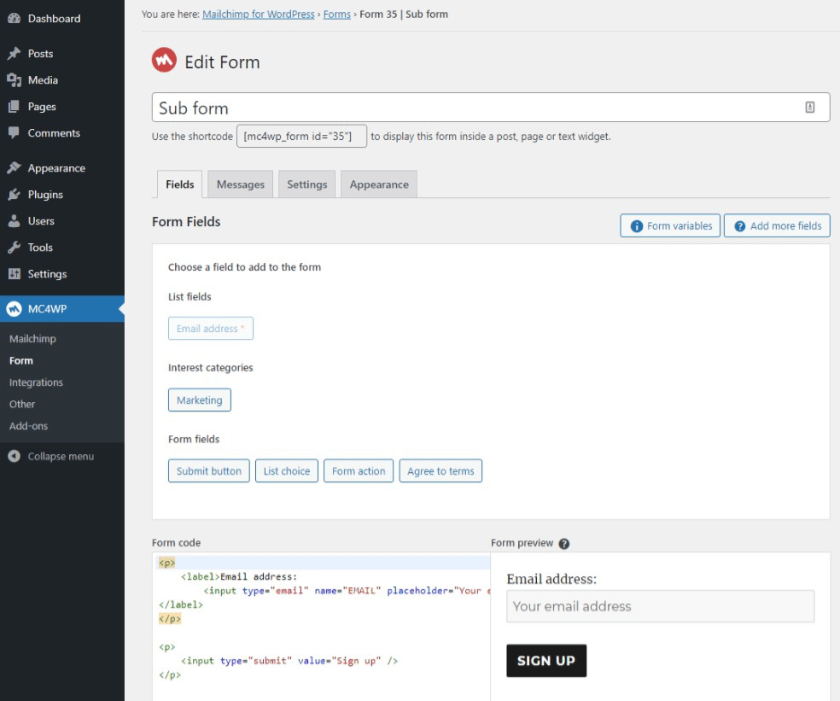
Unfortunately, this plugin doesn’t work with the GDPR fields or Segments. Instead of Segments, it works with Groups. Once you create Groups in Mailchimp, an additional section with Interest categories will appear for the form.
Step 8
Once you’re done, add the Mailchimp subscription form in WordPress using the generated shortcode. In my example it’s [mc4wp_form id="35"].
The plugin already creates a widget, so you don’t have to add the shortcode if you’re planning on using a widget to add the subscription form.
The widget is called Mailchimp Sign-up Form.
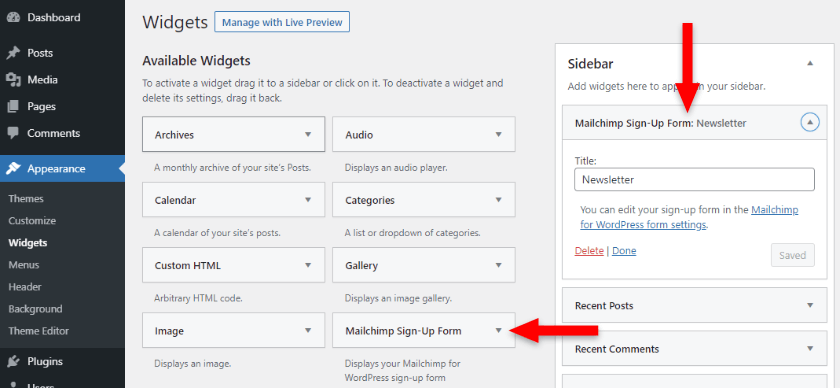
Of course, after adding the subscription form in WordPress, check to see if it works properly.
Looking for an All-in-One WordPress Solution?
ReadyShip offers you ready-made WordPress sites and blogs, plus high-quality managed AWS hosting with free SSL and CDN, at no initial cost!
The End
I hope that the tutorial was comprehensive enough, and you managed to set up Mailchimp in WordPress without any hassle. Now all you need to do is to fatten up that subscriber list. 😀
If you have questions or thoughts, feel free to drop a comment below.