
If you’re serious about SEO (Search Engine Optimization) and marketing for your WordPress website, then you should definitely use Google Analytics.
It provides a tremendous amount of information about your website’s activity, which you can use to tweak things in order to offer users a better experience, improving conversion rates in the process.
For beginners, creating a Google Analytics account and connecting it to a WordPress website might be a tedious process. So, in this step-by-step tutorial, I’ll show you how to create an account on Google Analytics 4, which is the latest version, and how to connect it to WordPress by adding the tracking code with or without a plugin.
Contents
- Brief: What Is Google Analytics and How Can It Help You
- How to Create a Google Analytics Account
- How to Add the Google Analytics Code in WordPress with a Plugin
- How to Add the Google Analytics Code in WordPress Without a Plugin
- How to Check if the Google Analytics Code Was Added in WordPress
- What if the Google Analytics Code Doesn’t Show Up?
Brief: What Is Google Analytics and How Can It Help You
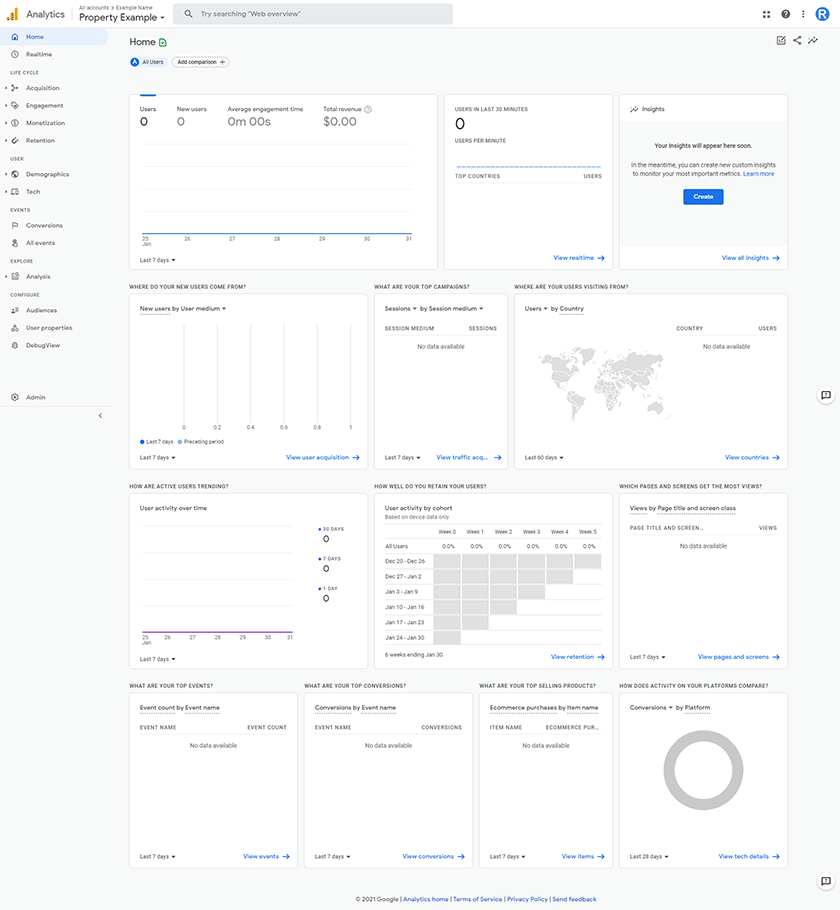
Google Analytics is a free web analytics tool offered by – you guessed – Google. In a nutshell, Google Analytics monitors your website’s traffic and helps you understand your visitors/customers better by providing very detailed reports, such as:
- Realtime – It provides information about your website’s traffic in real-time;
- Life Cycle:
- Acquisition – New users, sessions, etc.;
- Engagement – Views, user activity, events, etc.;
- Monetization – Total purchases, total ad revenue, first time purchasers, etc.;
- Retention – Returning users, user retention, user engagement, etc.;
- User:
- Demographics – Countries, languages, interests, etc.;
- Tech – Operating systems, type of browsers, mobile devices, etc.;
- Events:
- Conversions – Sign-ups, purchases, leads, etc.;
- All events – Reports about the events you create;
- Explore:
- Analysis – Funnel and path analysis, charts, etc.;
- Configure:
- Audiences – Adjust your audience into groups with names, descriptions, etc.;
- User properties – Identify different attributes of your users to use as building blocks for your audiences;
- DebugView – Monitor events in debug mode.
These are the main reports that Google Analytics provides. You can use the information there to better understand your visitors and improve your WordPress website accordingly.
For example, if you notice that most visitors exit from your shop page, then there might be a problem on that page. The price might be too high, the information might be too little, the page might load slowly, and so on.
Now, let’s proceed to our main topic – how to set up Google Analytics for WordPress.
Looking to Buy or Sell WordPress Sites?
At ReadyShip, we offer an all-in-one WordPress solution for those looking to start a blog or site, as well as the opportunity for WordPress developers or professionals to sell their products!
How to Create a Google Analytics Account
Before creating a Google Analytics account, you’ll need a Google account, which I assume you already have.
Step 1
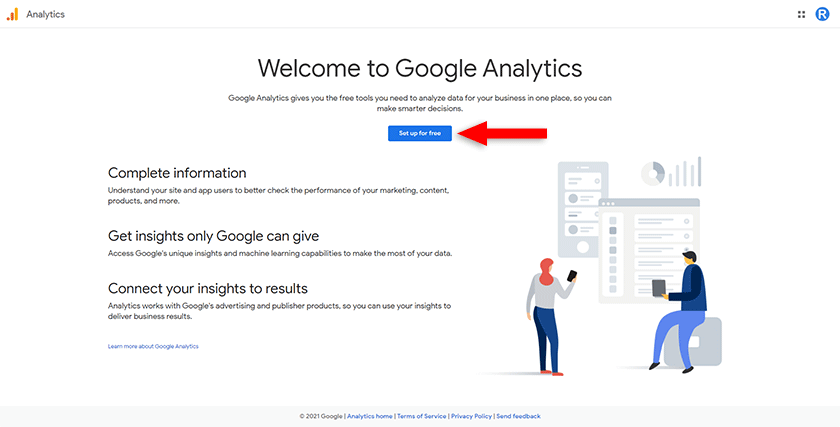
After creating a Google account, in case you didn’t have one, go to the Google Analytics website and click on the Set up for free button.
Step 2
Add your Account name. You can add whatever you like. You could add an account name that will group up multiple properties (see next step).
For example, if you have a bunch of e-commerce WordPress websites that you want to add on Google Analytics, you can name the account “E-commerce Websites”, to separate them from other types, such as blogs or whatever you might have. You can have multiple accounts with multiple properties.

Also, take a look at the Account Data Sharing Settings. They are enabled by default. Read them and see what you’d like to share depending on your needs.
Usually, I disable them all, mainly because of the European Union’s “beloved” GDPR law. If you have traffic from the E.U., you need to consider this. Or, these options might not have any implications. I don’t know 100%. But I don’t need whatever they offer there, so I disable them to be sure.
Step 3
The next step is Property setup. You can have multiple properties under one account.
- Add a Property name. You could add your website’s name here, for example;
- Add your Time Zone. It doesn’t have to be your country’s time zone. It depends on what time zone you prefer for your reports. For example, if your visitors are from the U.S., it might be useful to have the reports in the U.S. time zone;
- Add your preferred Currency.
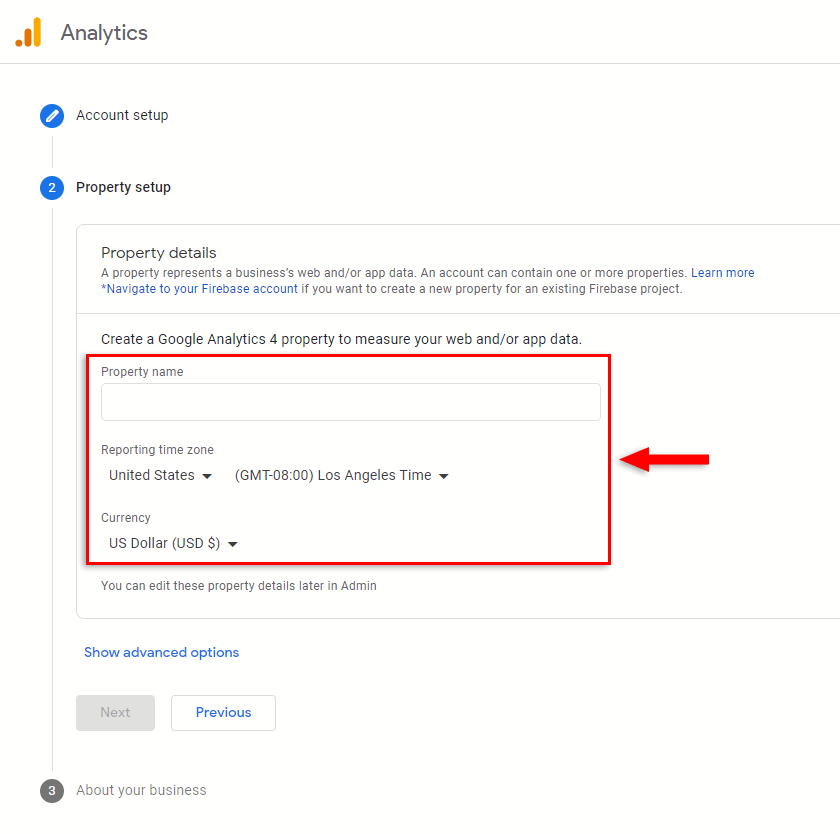
You can always change these details in your Admin dashboard later on. So, no worries if you get it wrong.
The Show advanced options link will allow you to create a Universal Analytics property.
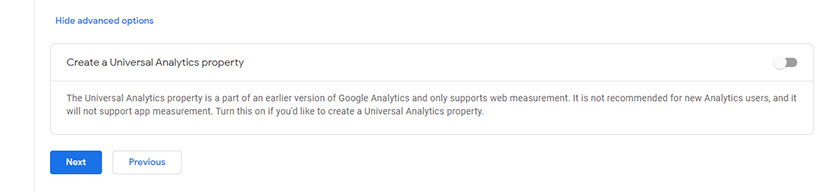
That’s the old stuff now. Leave it disabled unless some platform wasn’t updated to support Google Analytics 4. In that case, I recommend enabling the Universal Analytics property so you can get a code that starts with the UA- ID.
In cases like these, Google recommends creating and using both properties: Universal Analytics and Google Analytics 4.
Step 4
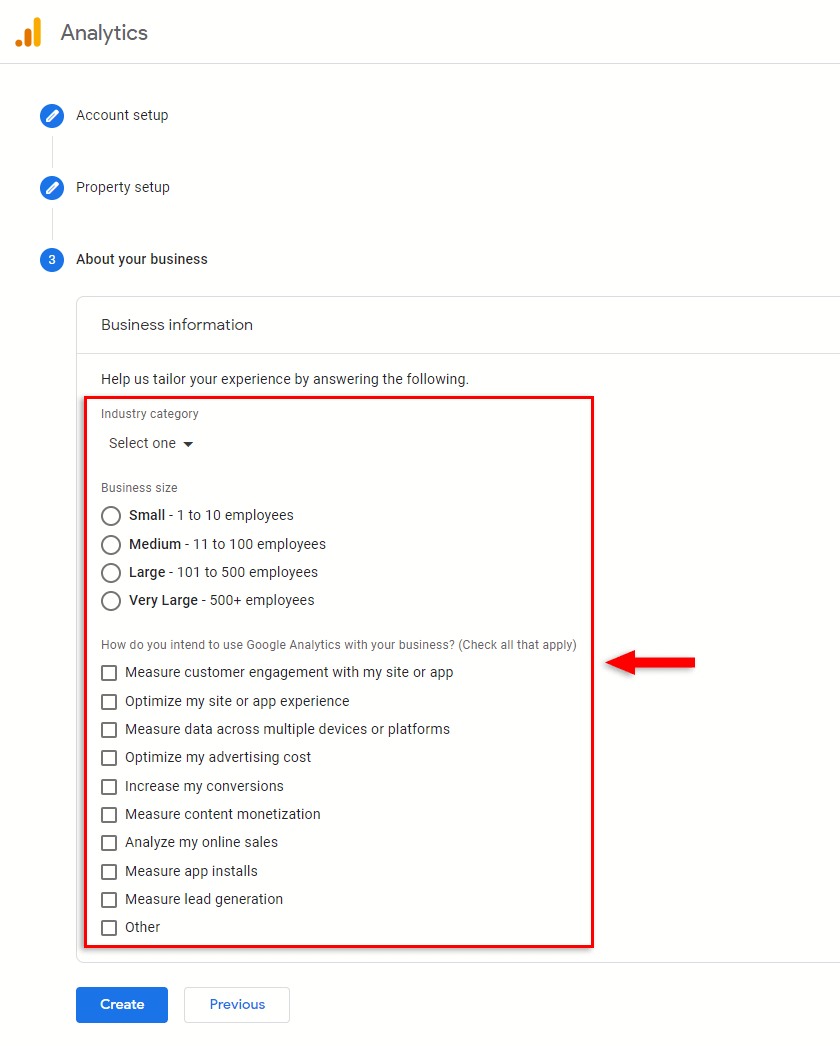
At the About your business step, you’ll need to add your business information:
- Industry category (e.g. Finance, Games, Health);
- Business size based on the number of employees;
- How do you intend to use Google Analytics with your business?
All of these depend on your type of website and business.
Click Create once you’re done.
Step 5
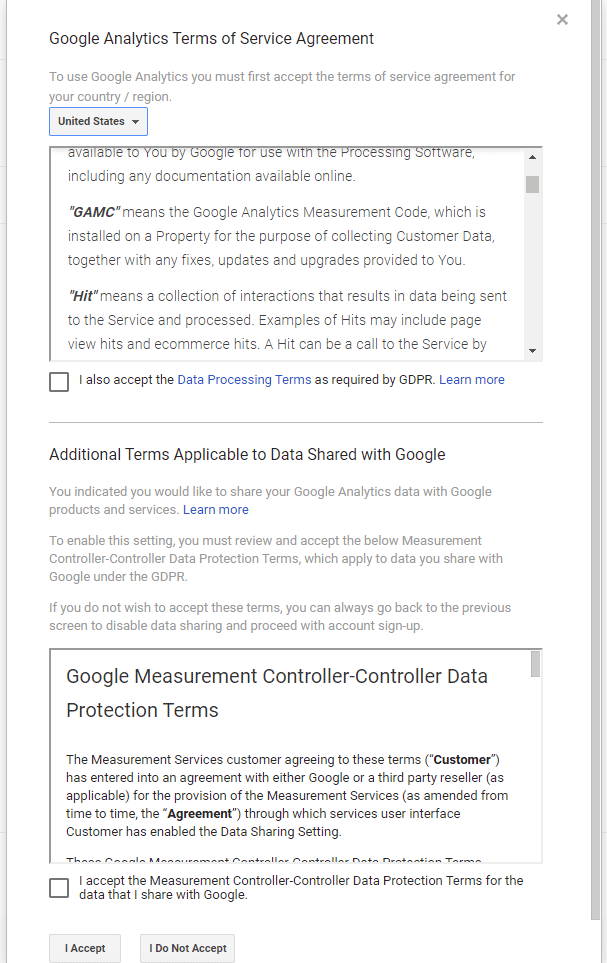
Accept the Google Analytics Terms of Service Agreement. If you don’t, well… this was all for nothing because you won’t be able to proceed with Google Analytics. 🙂
Step 6
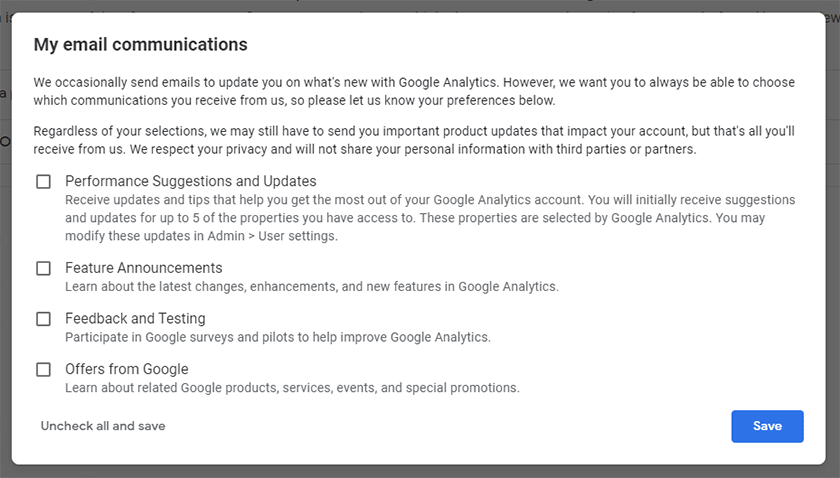
Choose what email notifications you want to receive from Google Analytics. The Performance Suggestions and Updates notification might be useful to receive, especially if you’re a beginner.
Step 7
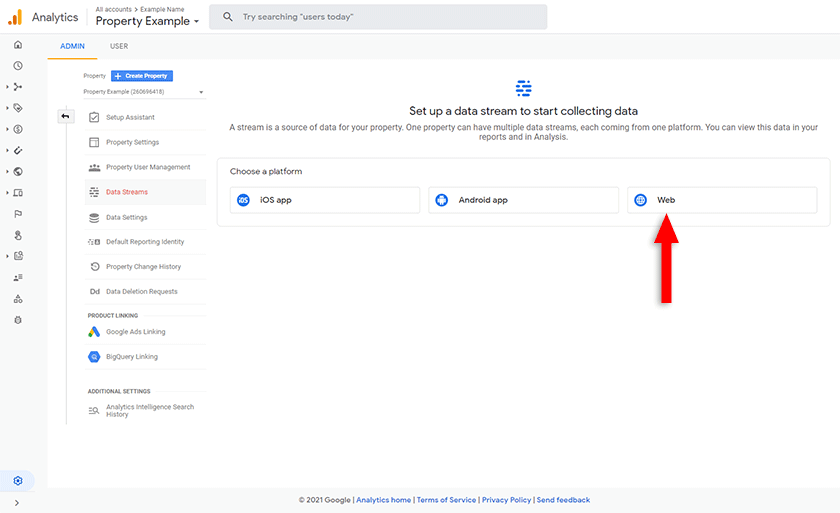
You need to choose a platform. And since this tutorial is about how to set up Google Analytics for WordPress, not mobile apps, you have to choose the Web platform.
Step 8
Set up your web stream.
- Website URL:
- Choose the protocol:
https://orhttp://. You should definitely not havehttp://for your domain. So, make sure you install an SSL certificate on your domain to usehttps://. Ideally, this should always be done before installing WordPress. Also, make sure you have a proper redirection from HTTP to HTTPS; - Add your domain with or without
www, depending on how you have it set.
- Choose the protocol:
- Stream name – You could add your WordPress website’s name here.
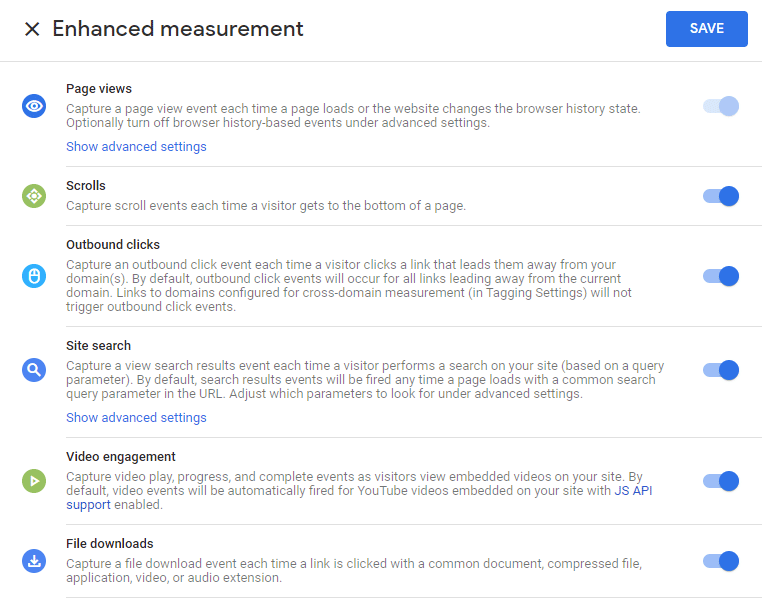
- Enhanced measurement – You can leave it enabled for extra useful reports, but be careful with the personally-identifiable information, as mentioned by Google there. The GDPR law, remember?
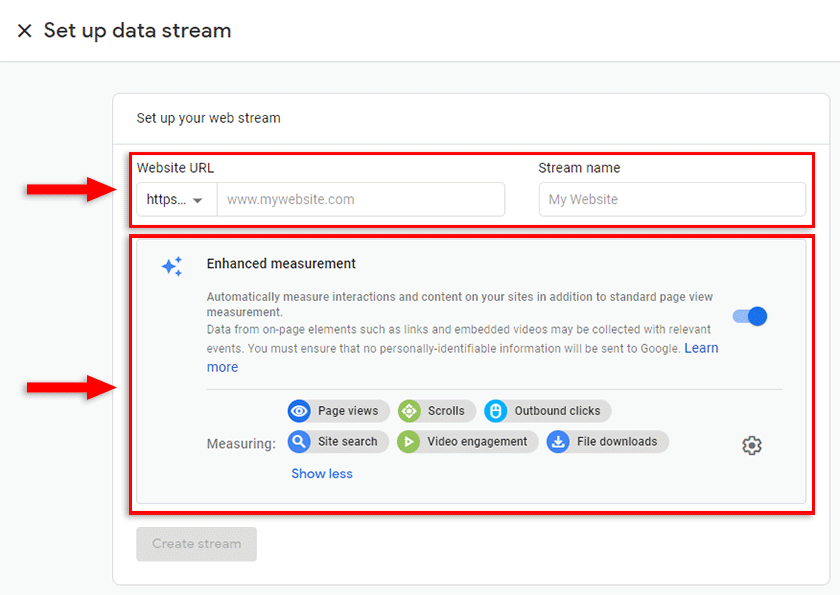
You can also click on the gear icon, next to those measuring options, to bring up a popup where you can manually pick which measures you want or not. Page views will remain, no matter what.
Click on Create stream once you’re done.
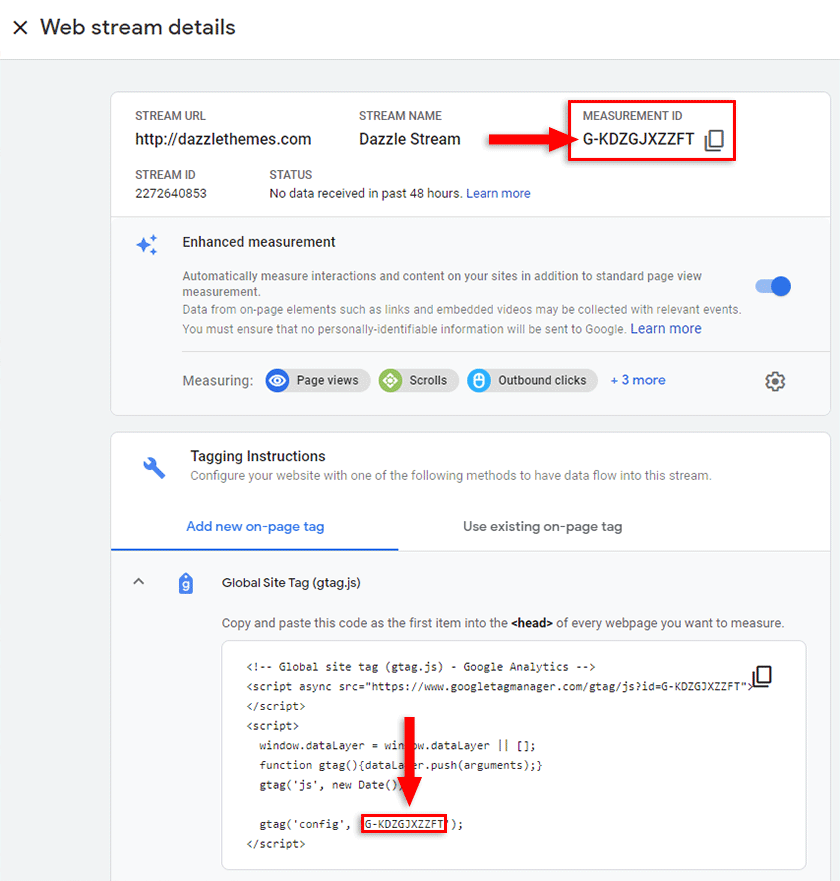
Step 9
Check your Google Analytics tracking code (Global Site Tag) in Web stream details panel > Tagging instructions > Add new on-page tag > Global Site Tag (gtag.js).
You don’t have to copy it now because, first, you have to see how to add the Google Analytics tracking code in WordPress. You can leave the browser tab open so you can come back later and copy it.
That’s pretty much it for the account setup. Once you insert the code in WordPress, Google Analytics will start kicking in. The rest of the settings are mainly based on preference and personal needs.
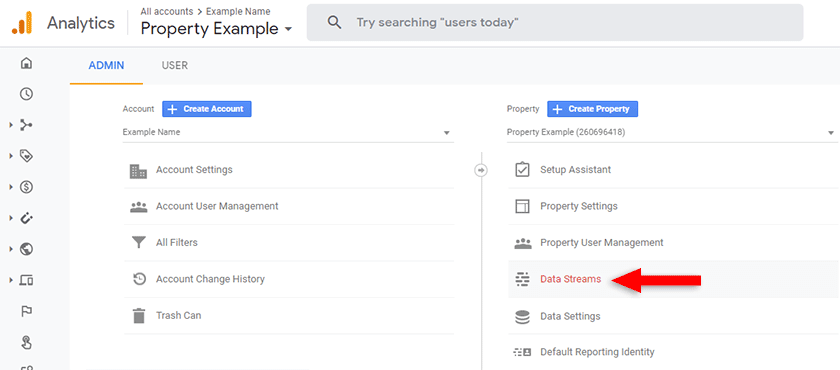
In case you close the panel with the details, you can always reopen it by going to your Google Analytics dashboard and clicking on Data Streams from the Property section.
Now, let’s see how to add the Google Analytics code in WordPress. There are several ways to do it. I’ll show you how to do it with and without a plugin.
Looking for an All-in-One WordPress Solution?
ReadyShip offers you ready-made WordPress sites and blogs, plus high-quality managed AWS hosting with free SSL and CDN, at no initial cost!
How to Add the Google Analytics Code in WordPress with a Plugin
I’m going to show you three different free plugins:
- One that enables you to add scripts into your WordPress website’s
<head>section, including the Google Analytics code; - One that’s designed specifically for Google Analytics, offering you more settings;
- One that lets you integrate the Google Analytics reports into your WordPress dashboard, besides adding the code to your website.
In case you need it, here’s a tutorial on how to install a plugin in WordPress using 4 different methods.
Insert Headers and Footers
The Insert Headers and Footers plugin is very simple. All you have to do is to install it, activate it, then go to Settings > Insert Headers and Footers and paste the Google Analytics code in the Scripts in Headers box.
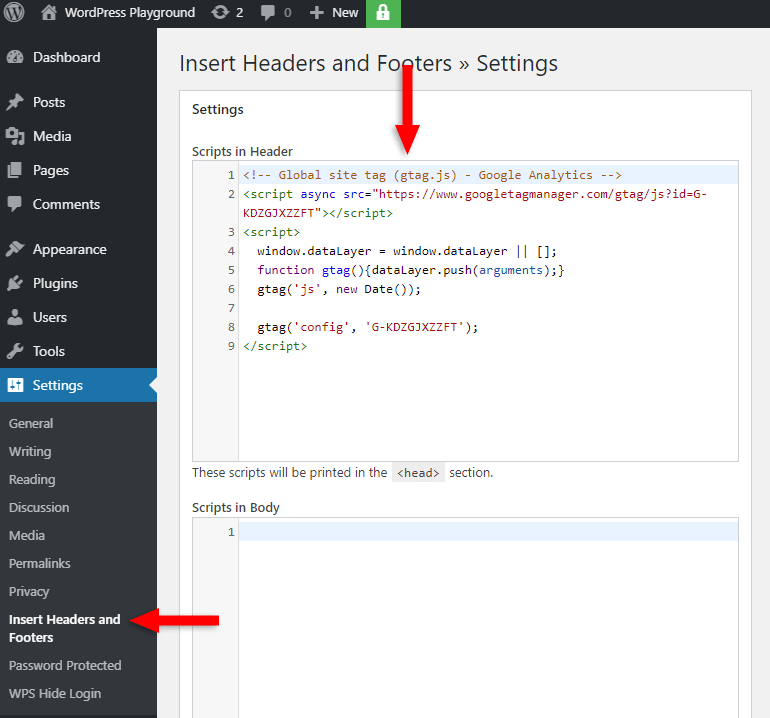
Click Save and it’s done.
GA Google Analytics
The GA Google Analytics is an easy-to-use plugin designed specifically for Google Analytics.
After you install and activate the plugin, go to Settings > Google Analytics > Plugin Settings. There are three main settings that you need to handle:
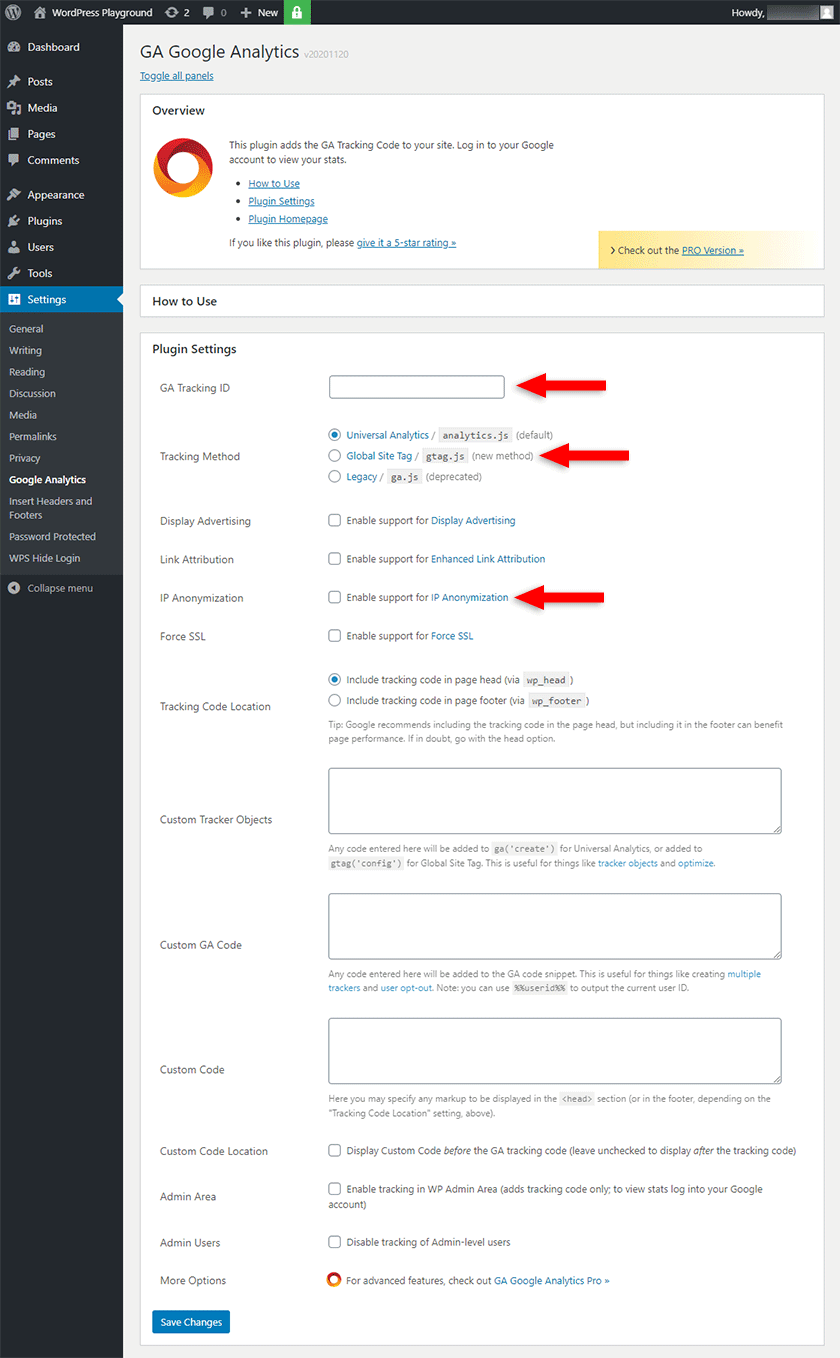
- GA Tracking ID – Here, you only need to add your tracking ID, not the entire code. You can find it in Web stream details, as seen at step 9, under Measurement ID. You can also get it from the Global Site Tag, without the single quotes. In my example, the Measurement ID is
G-KDZGJXZZFT. Yours will be different;
- Tracking Method – Unless you had to create a Universal Analytics property (see step 3), select the Global Site Tag option because we’re using Google Analytics 4 now, the newer version;
- IP Anonymization (only for Universal Analytics) – You should consider enabling this for the GDPR law. IPs won’t be collected by Google. For Google Analytics 4, which we are using in this tutorial, IP anonymization is enabled by default, so those settings will disappear when selecting Global Site Tag.
You can leave the other options as-is unless you want to change something based on preference. Click the Save Changes button once you’re done.
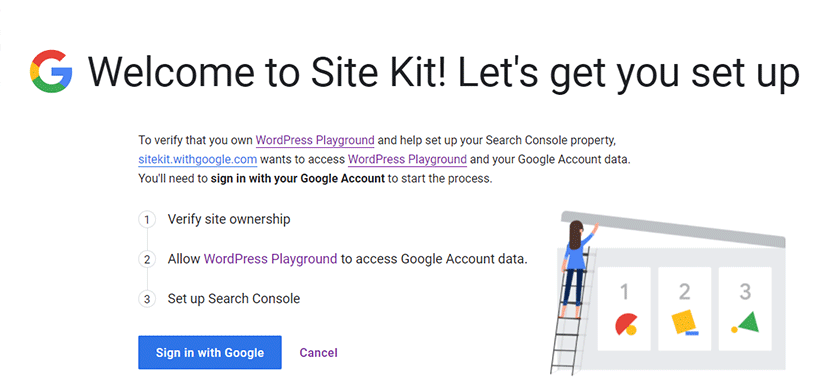
Site Kit
Site Kit is a plugin developed by Google. Unlike the other two, it allows you to integrate Google Analytics reports into your WordPress dashboard. It also allows you to integrate other Google tools, such as Search Console (also important for SEO), AdSense, Page Speed Insights, Tag Manager.
Personally, I don’t use nor recommend plugins to integrate Google Analytics or other tools in WordPress. I check everything in the web app.
It’s best to have as few plugins as possible because they can cause different issues, especially “heavy” ones. I always recommend using only plugins that are essential for your WordPress website.
But you might still find it very useful, so I’m mentioning it to you, but without going into details. I can tell you that it’s annoying to set up Google Analytics in WordPress with it. It requires some steps.
How to Add the Google Analytics Code in WordPress Without a Plugin
There are three main ways to add the Google Analytics code in WordPress without a plugin. If your theme will save you, it will be easy-peasy. If not, you’ll need to get your hands dirty.
Theme settings
You might get off easy if your theme has a feature that allows you to add scripts in the header of your WordPress website. Some WordPress themes, such as the Genesis themes from StudioPress, have a feature like that.
So, check your theme’s settings, and if you find something like that, add the code there.
Ok, now it’s time to get geeky and enter a pretty complex zone that is not so beginner-friendly, no matter how well I’ll try to explain. But I hope that you feel adventurous because this method is better than using yet another plugin.
For both methods, you’ll need to have a child theme! Otherwise, the Google Analytics code will be gone with the next theme update. It’s best to always add/create one right after installing WordPress. Talk to the theme developer to see if they can help. Also, some themes are based on child themes, so they come automatically with one.
I recommend backing up the files that you’re about to edit, or you can back up your entire WordPress website.
The header.php file
This method requires you to edit the header.php file in your child theme.
Step 1
Access your WordPress theme files. Your child theme should be in:
public_html/wp-content/themes/themename-childIn some cases, public_html might be replaced by another folder name.
Step 2
If you don’t have a header.php file in your child theme, copy the one from your parent theme while keeping the same file/folder structure.
By that, I mean that you should copy the header.php file right in the root folder of your child theme because that’s where it’s normally found in the parent theme. Don’t add it in an extra folder or something like that.
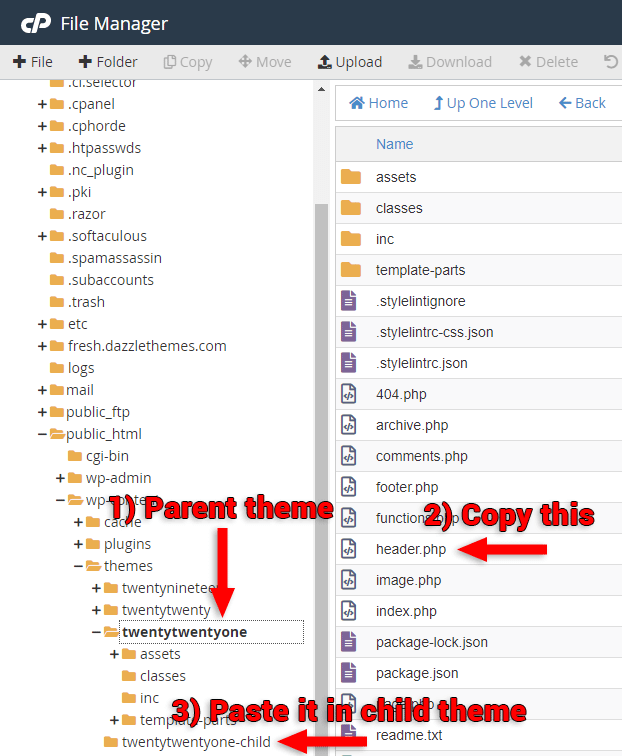
So, the header.php file should be found here after it’s been copied:
public_html/wp-content/themes/themename-child/header.php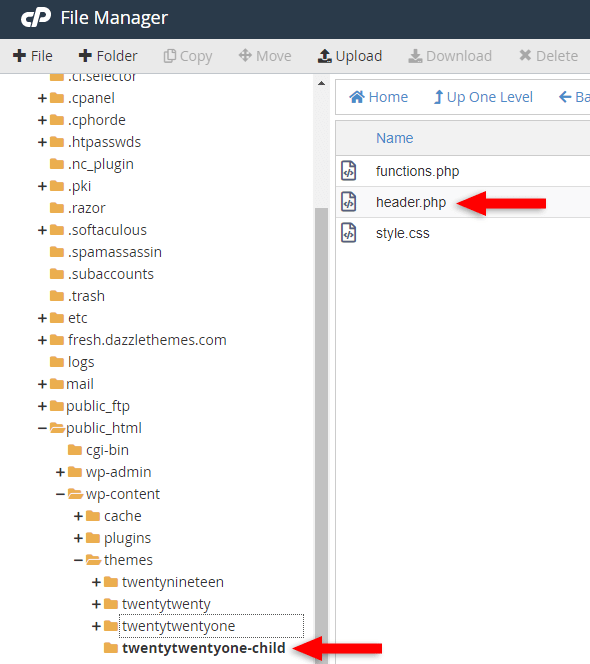
The other two files, functions.php and style.css, are mandatory for the child theme.
Step 3
Edit the header.php file in your child theme and add your Google Analytics code right after the <head> tag. It should look like this:
<head>
    <!-- Global site tag (gtag.js) - Google Analytics -->
    <script async src="https://www.googletagmanager.com/gtag/js?id=G-KDZGJXZZFT"></script>
    <script>
        window.dataLayer = window.dataLayer || [];
        function gtag(){dataLayer.push(arguments);}
        gtag('js', new Date());

        gtag('config', 'G-KDZGJXZZFT');
    </script>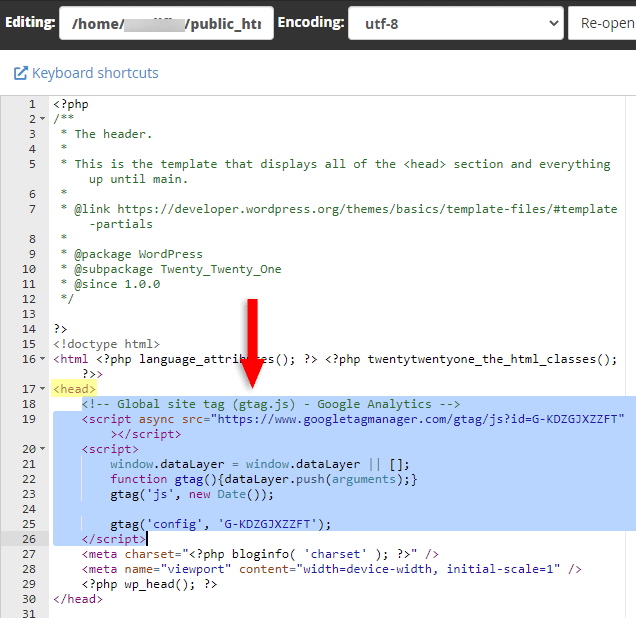
Save the file, and the Google Analytics code will be added to every WordPress page. And, with this method, it will also be added right before the <head> tag, as Google recommends it.
The functions.php file
This is a bit easier because the functions.php file is mandatory for a child theme if you want it to inherit the styles (design, layout, etc.) from the parent theme. So, it should already be there.
Step 1
Access your WordPress theme files. Your child theme’s functions.php file should be in the root folder:
public_html/wp-content/themes/themename-child/functions.phpIn some cases, public_html might be replaced by another folder name.
Step 2
Edit functions.php and add the following snippet after whatever code you have there already, but replace the Google Analytics code with yours.
function google_analytics_code() { ?>
<!-- Global site tag (gtag.js) - Google Analytics -->
<script async src="https://www.googletagmanager.com/gtag/js?id=G-KDZGJXZZFT"></script>
<script>
window.dataLayer = window.dataLayer || [];
function gtag(){dataLayer.push(arguments);}
gtag('js', new Date());
gtag('config', 'G-KDZGJXZZFT');
</script>
<?php
}
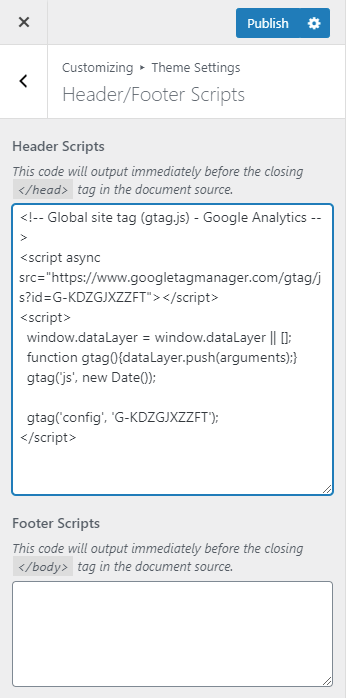
add_action( 'wp_head', 'google_analytics_code', 10 );In the below screenshot, you’ll see the code added in the functions.php file.
The red square contains the whole snippet. What’s highlighted in blue should be your Google Analytics code. The code highlighted in yellow contains the function that wraps the Google Analytics code and adds it in WordPress.
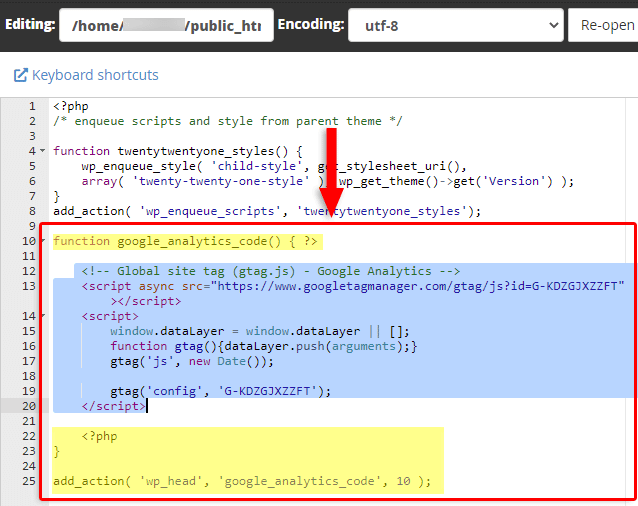
So, copy the whole code above, paste it in the file without saving it, then replace what’s highlighted in blue with your own Google Analytics code. Then save and you should be good to go.
Looking for an All-in-One WordPress Solution?
ReadyShip offers you ready-made WordPress sites and blogs, plus high-quality managed AWS hosting with free SSL and CDN, at no initial cost!
How to Check if the Google Analytics Code Was Added in WordPress
To see if the Google Analytics code was added in WordPress, follow these quick steps.
Step 1
Go to your homepage or any other web page from your website, right-click on it, and select Inspect or Inspect Element, depending on the browser that you use.
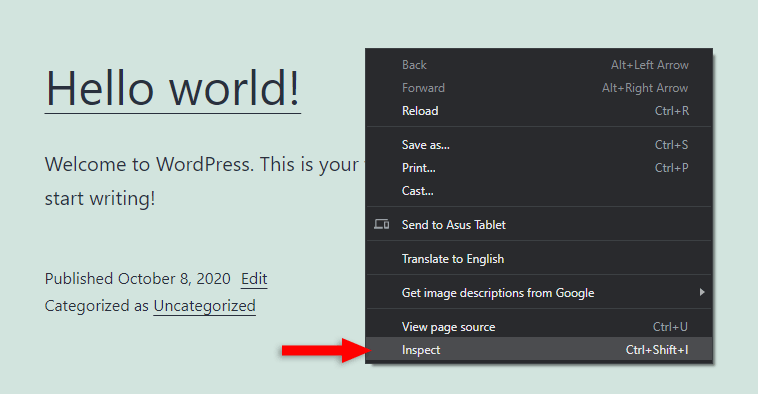
A separate tab with your WordPress website’s source code will appear.
Step 2
To quickly find the Google Analytics code in that mess, press CTRL+F or Cmd+F on Mac (I think) to open up the search box, and add your Measurement ID or just type “global site tag”.
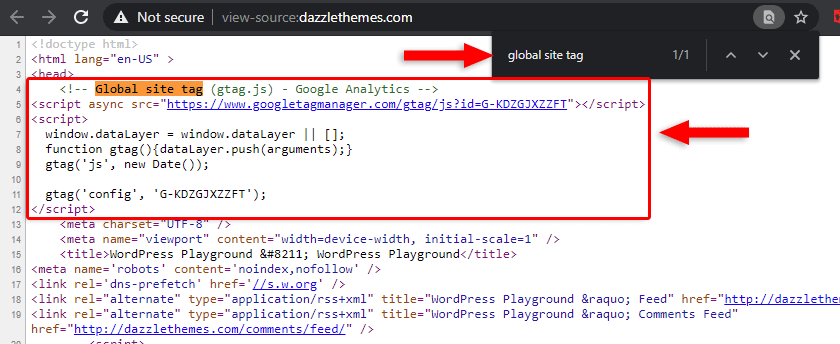
As you can see from my screenshot, I searched for “global site tag”, the text got highlighted, and I found my Google Analytics code. Yay!
What if the Google Analytics Code Doesn’t Show Up?
There are two main reasons why the Google Analytics code might not show up:
- The code was not properly added, especially if you’ve added it manually, without a plugin;
- The cache prevents the changes to show, so you need to clear the WordPress cache from one or more of the following: browser, caching plugin, server, CDN (e.g. Cloudflare, Cloudfront, etc.).
Most of the time, it’s the second reason.
Also, it may take 24-48 hours until data shows up in Google Analytics.
The End
That’s it, friends!
After this tutorial, you’re experts on how to set up Google Analytics for WordPress. 😀 You know how to create an account and how to add the tracking code (aka Global Site Tag) in WordPress with and without a plugin. Preferably without, even though it can be tedious for beginners. I know, I know…
If you get stuck, have questions or thoughts, please leave a comment below, and I’ll be happy to help.