
By default, WordPress comes with search functionality, but it’s basic, nothing fancy. It just provides search results based on the title and content of a post.
That’s fine for a standard blog, but what if you have a WordPress blog or website about movies, for example. You’d want your users to be able to perform searches based on certain filters, such as genre, ratings, actors, and so on.
So, in this step-by-step tutorial, I’ll show you how to create a search filter in WordPress using a free and simple plugin.
Let’s begin!
Create a Search Filter in WordPress with the Free “Search & Filter” Plugin
Search & Filter is a simple plugin that enhances the default WordPress search form, allowing you to add different types of filters to it. You can perform searches by categories, tags, post types, and more!
It currently has over 40,000 active installations and a rating of 4.6 out of 5. In case you care about this stuff. 😀
Now, let’s see how to use it.
Looking to Buy or Sell WordPress Sites?
At ReadyShip, we offer an all-in-one WordPress solution for those looking to start a blog or site, as well as the opportunity for WordPress developers or professionals to sell their products!
Step 1
Install and activate the Search & Filter plugin.
If you need help, here’s a detailed tutorial on 4 ways to install a plugin in WordPress.
If you’re searching for the plugin in the Plugins > Add New section, note that it might appear further down in the search results, which is unusual. So, don’t think it’s not there because it didn’t appear in the very first search results.
Step 2
From your WordPress dashboard’s menu, access Search & Filter. There, you’ll find information on how to use the plugin, along with the shortcode needed.
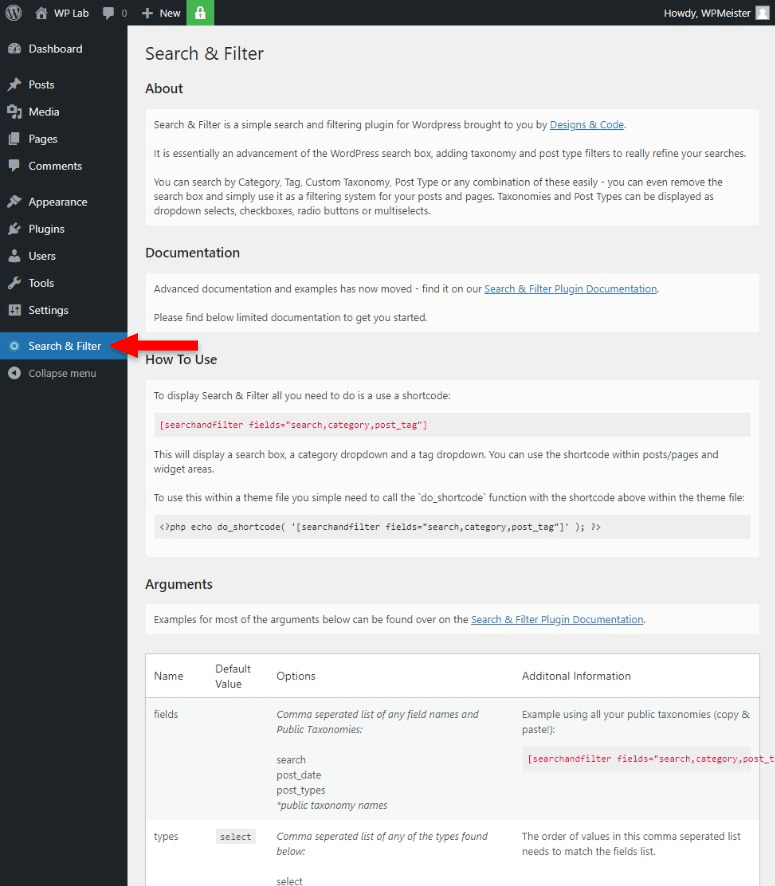
Step 3
Let’s see how to use those shortcodes, which a lot of plugins are based on. Maybe not so much nowadays, but still…
The shortcode always starts with searchandfilter, like this [searchandfilter ...]. That’s how the plugin knows that you’re calling it.
In the Arguments table, under the Name column, you have the arguments. Every argument has options, which you can find in the Options column. Options are always between quotes and separated by a comma, without space.
For example, the fields argument adds taxonomies, such as categories, tags, and so on. The types argument handles the type of input for the fields, such as select, radio button, checkbox, etc.
The fields argument is required. So, it’s mandatory to have searchandfilter and fields inside the shortcode, like this:
[searchandfilter fields="search,category,post_tag"]That’s the most basic implementation, and it would look something like this.

The way it looks depends on your WordPress theme. The Search & Filter plugin inherits your theme’s design.
Now, in my example, I played a little with the arguments and options to create a more advanced search filter for WordPress. I’ll explain what I did so that you understand how the plugin and its shortcode work.
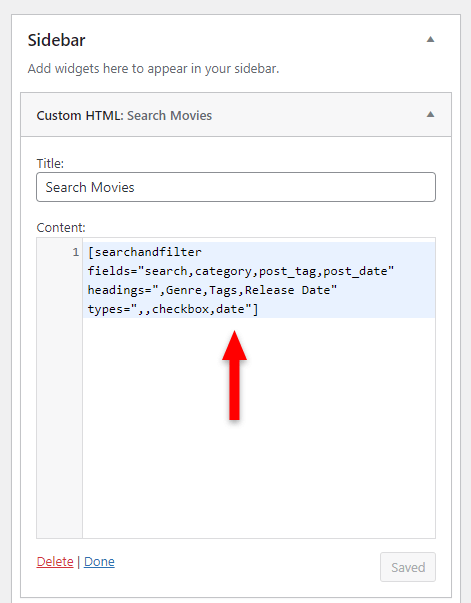
I added this shortcode
[searchandfilter fields="search,category,post_tag,post_date" headings=",Genre,Tags,Release Date" types=",,checkbox,date"]in a Custom HTML widget, which you can find in Appearance > Widgets. You can also use a Text widget if you want.
I recommend adding the shortcode somewhere global, like your sidebar. If you add it inside individual posts, for example, you’ll end up with a lot of plain text shortcodes that you have to clean up when removing the plugin. Imagine doing that for hundreds of posts. Not fun.
So, the above shortcode created the following search filter in my WordPress sidebar:

Let’s go through the shortcode that I used, so you can understand what I did. I’ll paste the shortcode again.
[searchandfilter fields="search,category,post_tag,post_date" headings=",Genre,Tags,Release Date" types=",,checkbox,date"]The arguments and their options:
fields:search– Adds the search form;category– Adds the post categories;post_tag– Adds the post tags;post_date– Adds the post’s date.
headings– Adds headings (titles) to thefieldsarguments:,– The first field I chose to display is the search form, by adding thesearchoption tofields. But, I didn’t want a heading for it. So, I just added a comma, which tells the plugin to leave the heading blank;Genre,Tags, andRelease Dateare the headings for the next threefields. As you probably noticed now, order counts. That’s why a comma was needed. If I didn’t add a comma,Genrewould have been attributed to thesearchfield, since they are the first options.
types– Changes the input type:- I added two commas (
,,) for thesearchandcategoryfields because I wanted the default options for them; checkbox– On the 3rd position, for thepost_tagfield, I wanted the tag inputs to be displayed as checkboxes, not as drop-down, which is the default option;date– For the 4th position, thepost_datefield, I wanted to display adateinput, which is shown as a calendar by the browser.
- I added two commas (
So, remember these important things:
- Everything I used in that shortcode is found in the Arguments table, in the Search & Filter plugin’s settings;
- Order counts, so add a comma when you don’t want something added or changed for a particular field;
- Don’t add spaces between commas when adding the options for the arguments. They might not appear in the front-end.
And that’s how you can create a search filter in WordPress. Shortcodes might be a bit confusing, but you’ll eventually get the hang of it.
If you need more help, you can also check the Search & Filter plugin’s documentation.
More Features with the Search & Filter Pro Version
What I’ve shown you is the free version of the Search & Filter plugin. If you want to create a more advanced search filter functionality for your WordPress blog or website, then you might want to check out the Pro version.
Here are some main things that it offers:
- AJAX feature to display results. This means that the user doesn’t have to click the Submit button anymore after applying the filters, and the page doesn’t need to refresh. The search results will appear in real-time;
- Works with WooCommerce, Easy Digital Downloads, and WP eCommerce. So, if you sell products using one of those plugins, you can apply search filters to your shop page as well;
- Works with Advanced Custom Fields (ACF) plugin. This is a plugin beloved by WordPress professionals and even developers who create WordPress websites;
- Drag-and-drop interface that allows you to create the search and filter form more easily;
- Works with the WPML plugin, which is a multilingual plugin for WordPress;
- You can use custom templates;
- It offers advanced fields;
- Dedicated support if you need help.
To check out all the Pro features, head over to their website.
Looking for an All-in-One WordPress Solution?
ReadyShip offers you ready-made WordPress sites and blogs, plus high-quality managed AWS hosting with free SSL and CDN, at no initial cost!
The End
I hope that I explained well the shortcode part, and you managed to create an awesome search filter for your WordPress blog or website. That part can be tricky for those that haven’t worked with shortcodes before.
If you have thoughts or questions, feel free to leave a comment below.