At some point, you’ll want to make changes to your WordPress website’s design. You go through your theme’s or plugin’s settings, but you notice that there’s no option to change what you want.
So, you reach out to the developers or the WordPress community. You’ll get a piece of custom CSS to add in WordPress, which is great. But, most of the time, you won’t get instructions on where to add it exactly. And if you’re a beginner, that’s a problem. The code is useless if you don’t know where to add it, right?
Well, that’s what I’m about to show you here, in this tutorial – how to add custom CSS in WordPress for your theme, plugins, or admin dashboard.
1. How to Add Custom CSS in the WordPress Customizer
WordPress has a great feature called Customize (sometimes referred to as Customizer), where a bunch of settings is found. Nowadays, most themes add their settings there too.
This is the fastest and easiest way to add custom CSS code in WordPress for your theme and plugins. The code will also remain after changing themes or removing plugins.
If you need to add a lot of custom CSS to your theme, you should also check the next section.
Step 1
To access Customize, go to Appearance > Customize from your dashboard’s menu.
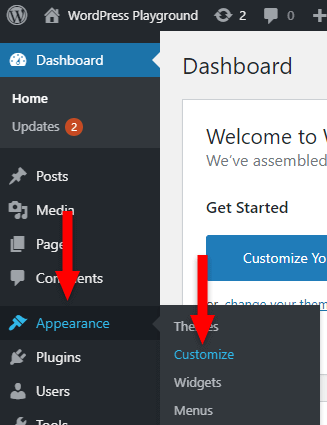
You can also access Customize from the admin toolbar, at the top, when you’re viewing one of your website’s pages.

Step 2
Inside Customize, click on Additional CSS.
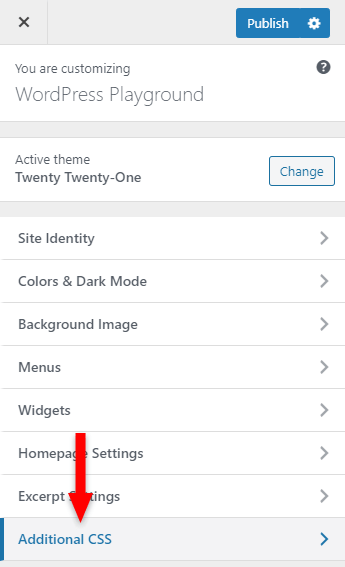
Some WordPress themes or plugins might change its name. For example, in some cases, you might see it as Additional CSS/JS. JS stands for JavaScript.
Step 3
Add the custom CSS code in the box, below the instructions.
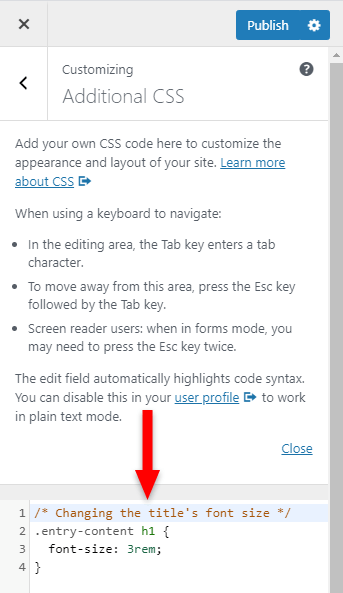
If you’re on the page where you want the changes to take place, then you’ll see the preview in real-time, if the CSS code is good and valid.
Once you’re satisfied with the result, click on the Publish button so that the changes can take effect.
Looking for an All-in-One WordPress Solution?
ReadyShip offers you ready-made WordPress sites and blogs, plus high-quality managed AWS hosting with free SSL and CDN, at no initial cost!
2. How to Add Custom CSS to Your WordPress Theme
If you need to add a lot of custom CSS that’s specific to your WordPress theme, then adding it in the style.css file is the best way to do it.
I don’t recommend using the style.css file found in the parent theme because the changes will go away with the next theme update. Instead, you should have a child theme with its own style.css file, and add the custom CSS there.
Since I’ve put together a separate and comprehensive tutorial on how to access and edit your WordPress files, I won’t go into details here.
But, in a nutshell, the easiest way to access your theme’s style.css file is using cPanel’s File Manager tool or an FTP client, such as FileZilla. Or, you could briefly install a plugin called File Manager, and edit the file from your dashboard.
The style.css file is usually found in:
public_html/wp-content/themes/YOUR-THEME-NAME-CHILD/style.cssIf you’re using an add-on domain, not your main one, the public_html folder might get replaced with your domain, so it can look like this:
example.com/wp-content/themes/YOUR-THEME-NAME-CHILD/style.css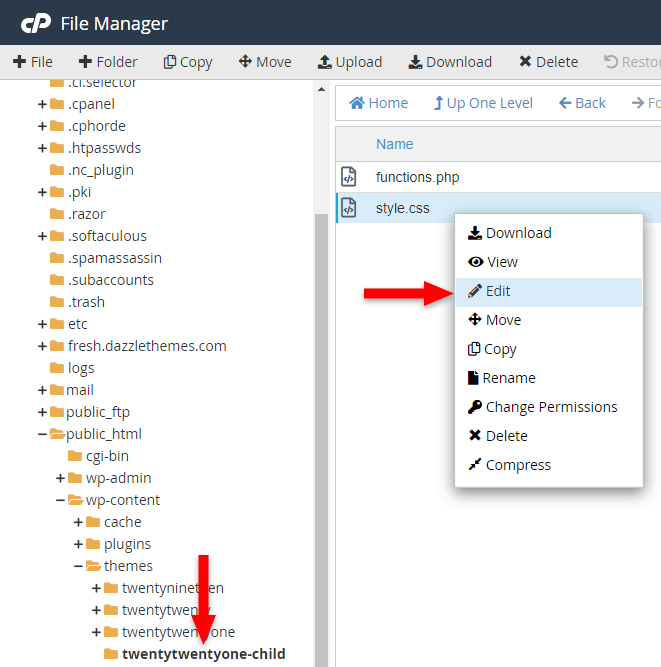
Once you’ve found the file and opened it for editing, you can paste the custom CSS code right after everything that’s added there by default.
Some WordPress themes come with a child theme automatically, so there could be a bunch of code already there. You just add yours after that.
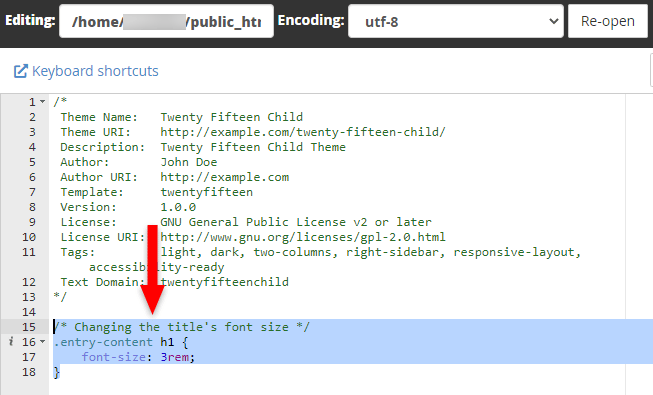
Don’t forget to save the file!
Now, if you change the WordPress theme, the custom CSS will be gone. But, it shouldn’t matter as long as you’ve only added code for the theme that you won’t use anymore.
3. How to Add Custom CSS to Your WordPress Dashboard
The above methods only work for your website’s front-end. They won’t work if you want to make some design changes to the back-end, which is your WordPress dashboard.
For this, I recommend a plugin called Add Admin CSS.
Step 1
Install and activate the Add Admin CSS plugin.
While the plugin is in the official WordPress repository, I could never find it by searching from Plugins > Add New. If that’s the case for you, too, then download it from its page and install it manually, as shown in my tutorial on how to install a WordPress plugin.
Step 2
Got to Appearance > Admin CSS to access its settings.
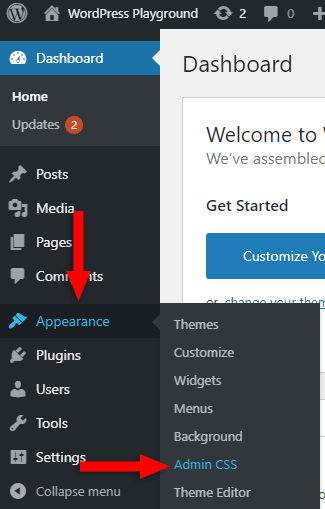
Step 3
Add the custom CSS code for your WordPress admin area, in the Admin CSS box, and click the Save Changes button.
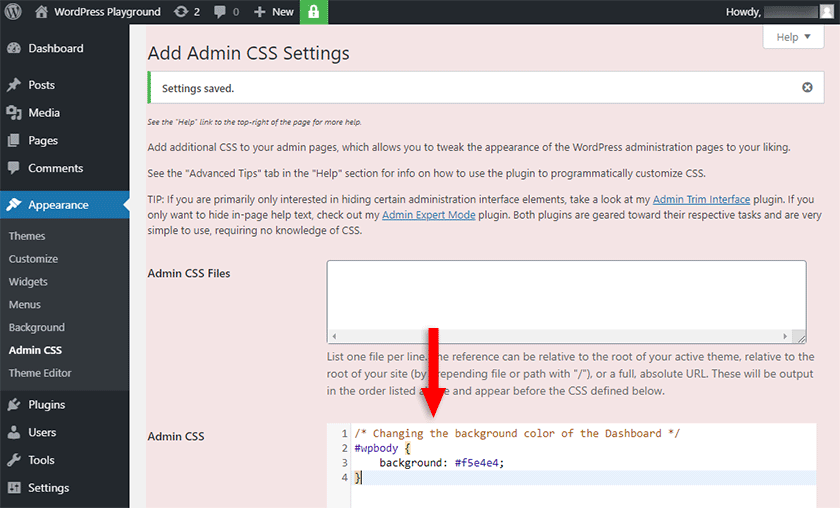
As you can see from the screenshot, I changed the dashboard’s background to a red-ish color. Well, I almost changed it. There’s still some margin on the left with the default color, but it’s just a quick and raw example.
If you’re a more experienced WordPress user or a developer, I don’t recommend using a plugin only for a small change. You could opt to add small custom CSS changes to your dashboard using a PHP snippet that you can add in your functions.php file, in your child theme. This code should still work.
4. Plugin Alternative to the First Two Methods
If you don’t want or can’t use the Additional CSS feature from the Customize tool, or editing the style.css file in your child theme proves to be frustrating, then you could use a plugin called Simple Custom CSS. It’s a bit outdated at the time of this writing, but it seems to be working fine.
Step 1
Install and activate the Simple Custom CSS plugin.
Step 2
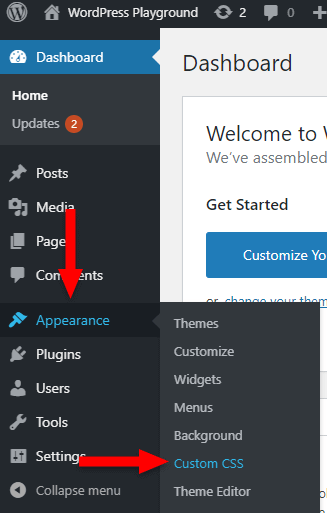
Go to Appearance > Custom CSS to access its settings.
Step 3
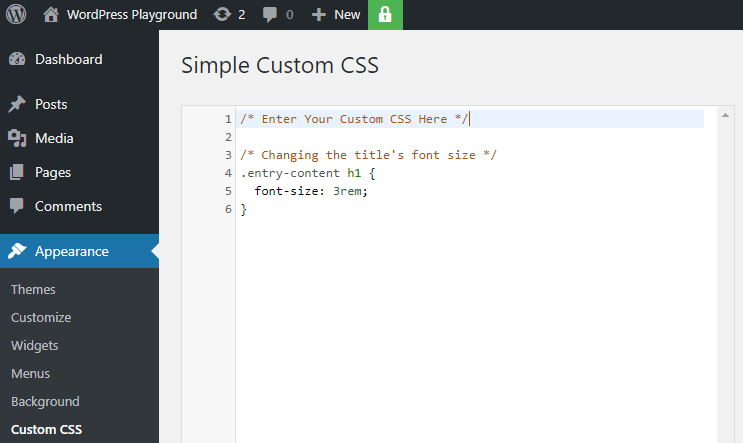
Add your custom CSS in the box and click on the Update Custom CSS button.
Why and What to Do If the Changes Won’t Show Up
There could be several different reasons why the changes won’t show up after you’ve added custom CSS in WordPress. Here are the main ones:
- Your CSS code is not valid, or there’s a typo somewhere. You can use this tool to check if the CSS code is valid;
- You’re using the wrong selector (e.g.
#entry-contentinstead of.entry-content); - Your selectors aren’t specific enough (e.g.
a {color: #ccc}instead of.entry-content a {color: #ccc}); - Some CSS codes need some prefixes (e.g.
-moz-for Firefox) to work in certain browsers. Paste your code in this CSS Autoprefixer tool. It will automatically add the proper prefixes if needed; - Caching is involved. You need to clear the WordPress cache from your browser, or plugin, or server, or CDN, or all of the above. In a nutshell, caching offers copies of your data to deliver the content faster. Sometimes, the old copies are served instead of your updated content which contains the changes.
Looking to Buy or Sell WordPress Sites?
At ReadyShip, we offer an all-in-one WordPress solution for those looking to start a blog or site, as well as the opportunity for WordPress developers or professionals to sell their products!
The End
These are the main and easiest ways to add custom CSS in WordPress for your theme, plugins, or admin dashboard. I hope that the tutorial was detailed enough for you, and you managed to easily apply the changes that you want.
If you have thoughts or questions, don’t hesitate to leave a comment below.


