WordPress doesn’t work without a theme installed and activated, even if you want to completely build your site using a page builder, such as Elementor with its Theme Builder feature.
Installing a theme in WordPress is basically the same as installing a plugin. You just need to perform the actions in different sections of your site.
Before proceeding to the installation part, I’ll write a bit about two important things:
- Choosing the right WordPress theme;
- Using a child theme.
Let’s begin!
Choosing the Right WordPress Theme
After the web host, choosing the right WordPress theme is another vital part of your site’s performance and loading time.
Even though there are a gazillion WordPress themes out there, very few are well optimized. So, you need to be really careful with that. Depending on what theme you use, changing it later can be a nightmare.
I recommend choosing a premium theme over a free one because:
- You’ll get support or better support;
- Issues will be fixed faster;
- Updates will be more frequent to improve compatibility or performance;
- You’ll get more features;
- It can offer better support for main plugins, such as WooCommerce, WPForms, etc.
Nonetheless, there are some very good free themes in the WordPress repository, such as GeneratePress or Astra.
To make things easier for you, I’ve written detailed guides on how to choose the right WordPress theme and places where you can find WordPress themes. They should help you make a good decision.
If you don’t want to read yet another long WordPress guide, then I’ll make it even easier for you. I recommend using GeneratePress or Genesis themes from StudioPress, depending on your need. You can’t go wrong with them when it comes to performance and optimization.
If you choose GeneratePress, you can pair it with GenerateBlocks to build your landing pages, in case you want a more marketing-ish site with a more fancy design. It’s a light and optimized page builder based on the WordPress editor’s block system.
Looking to Buy or Sell WordPress Sites?
At ReadyShip, we offer an all-in-one WordPress solution for those looking to start a blog or site, as well as the opportunity for WordPress developers or professionals to sell their products!
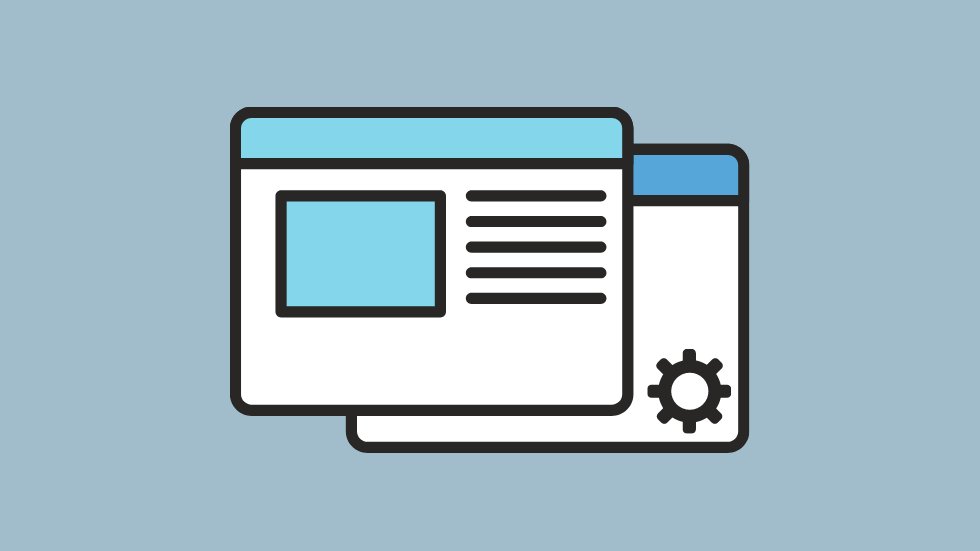
Using a Child Theme
A child theme is installed along with the parent (main) WordPress theme, and it’s the one that’s going to be activated instead of the parent theme.
The child theme inherits everything from the parent theme, but doesn’t get its files replaced after a theme update. So, it allows you to make design or functionality changes to your WordPress theme that won’t go away with the next update.
Back in the day, having a child theme was pretty mandatory if you needed to add design or functionality changes to your WordPress theme.
Nowadays, it’s kind of optional because WordPress lets you add custom CSS code directly in the Customizer, which is accessed from Appearance > Customize. And there are plugins, such as Code Snippets, which let you add functionalities with PHP.
CSS and PHP are web development languages. CSS handles design, PHP handles functionalities. Most of you don’t know anything about them, but you don’t need to unless you want to make some changes to your WordPress site that aren’t possible via theme settings or plugins.
Now, I still use and recommend a child theme because:
- The fewer plugins you have, the better;
- If you perform a lot of changes to your theme, it’s better to place them in the child theme, especially if it’s CSS code because the Customizer adds it as internal CSS, directly into the source code of your page. Usually, CSS should be external, put into one or more separate files.
Even though possible and mentioned in a lot of tutorials, you shouldn’t use the child theme to add design and functionality changes that are not related to the WordPress theme. That’s because if you want to switch the theme in the future, all those changes will be gone.
Usually, the names of the child theme’s .zip file and installation folder have the -child suffix in them, like this: ThemeName-child.
There are some themes, such as those from StudioPress, that are child themes from the start, based on a parent theme/framework. So, they won’t work without their parent theme. This type of child themes usually don’t have nor need the -child suffix added to them.
1. How to Install a WordPress Theme from Your Dashboard
All the free WordPress themes from the repository are found inside your WordPress admin dashboard. So, if you want to install a free WordPress theme, here’s what you need to do.
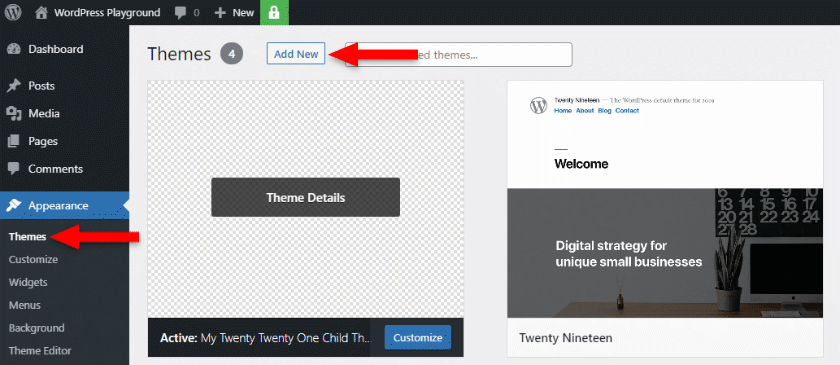
Step 1
Go to Appearance > Themes and click on the Add New button at the top.
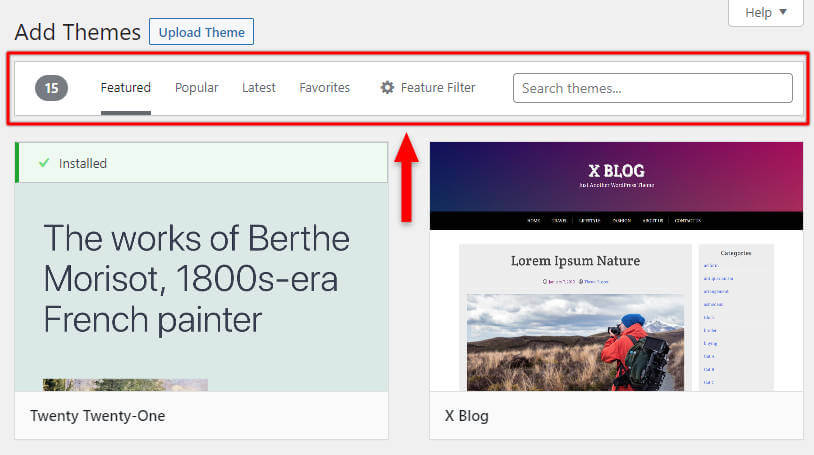
Step 2
Find a WordPress theme by using the filters or adding its name in the search field.
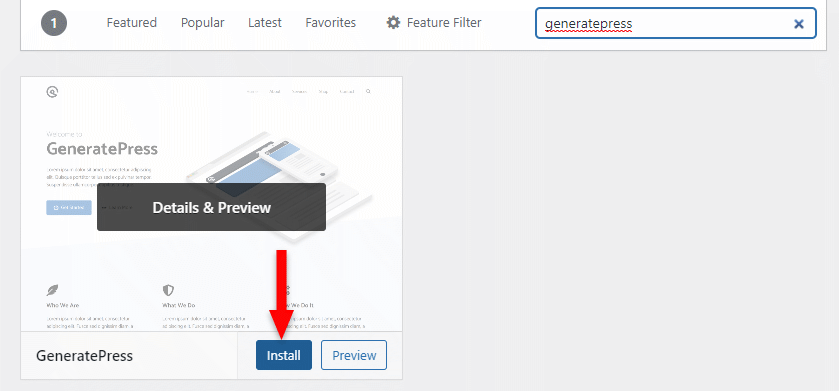
Step 3
Once you found the WordPress theme that you like, hover your mouse cursor over it and click on the Install button.
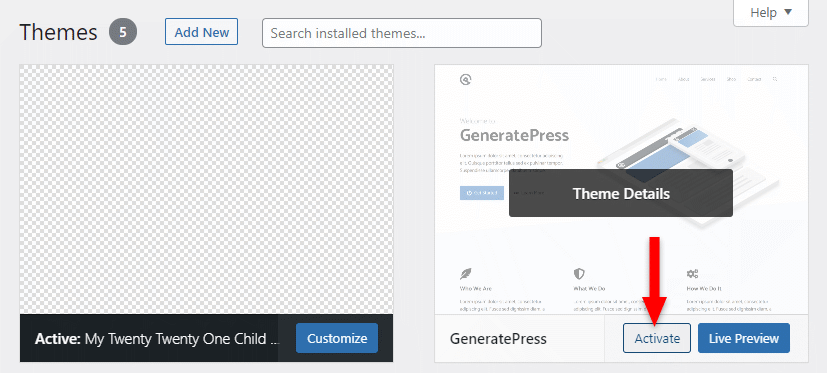
Step 4
If you’re not using a child theme for it, then you need to activate the WordPress theme that you have installed.
Go to Appearance > Themes again, hover your mouse cursor over it, and click on the Activate button.
If you’re using a child theme for it, then don’t activate it. You’ll need to upload the child theme and activate that one. You’ll see how to upload a WordPress theme in the next sections.
2. How to Upload a WordPress Theme from Your Dashboard
Uploading a WordPress theme is straightforward as well. This option is usually used when buying a premium WordPress theme, which you’ll not find in the WordPress repository.
Step 1
Download your WordPress theme from wherever you bought it/found it. It has to be in a .zip file.
Some developers offer an archive with everything in it: documentation, installation file, child theme, etc. So, you might need to unzip that file to get to the installation file.
Step 2
Go to Appearance > Themes and click on the Add New button at the top.

Step 3
- Click on the Upload button at the top;
- Click on the Choose File button and select the installation file from your computer;
- Click on the Install Now button.

Step 4
If you don’t use a child theme, then click on the Activate link after the WordPress theme has been installed successfully.
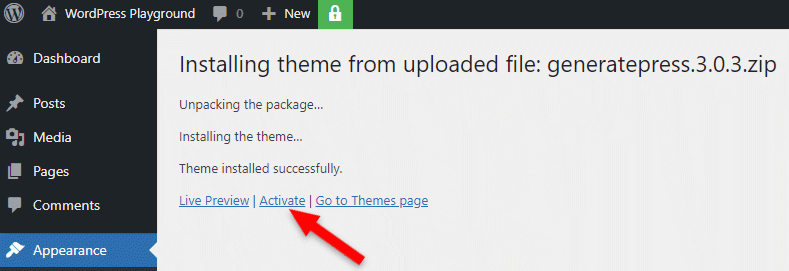
If you want to use a child theme, then you’ll need to upload it, too, as seen in steps 2 and 3. After it’s installed, activate it as seen in this step.
Looking for an All-in-One WordPress Solution?
ReadyShip offers you ready-made WordPress sites and blogs, plus high-quality managed AWS hosting with free SSL and CDN, at no initial cost!
3. How to Manually Install a WordPress Theme in cPanel
A lot of WordPress users are on Shared hosting plans. And virtually all Shared hosting plans use cPanel, which is the most popular control panel for servers.
You can install a WordPress theme using cPanel if the default options don’t work for some reason.
The cPanel interface differs from host to host. Yours might look a bit different than the one from my screenshots, but the File Manager tool will be there.
Step 1
Log in to cPanel.

Normally, you receive your cPanel login information after purchasing the hosting plan. If you don’t have it, check your web host’s documentation or contact support for help.
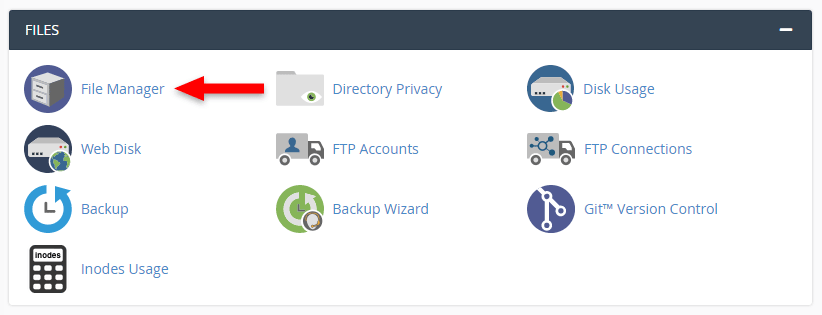
Step 2
Search for the File Manager tool.
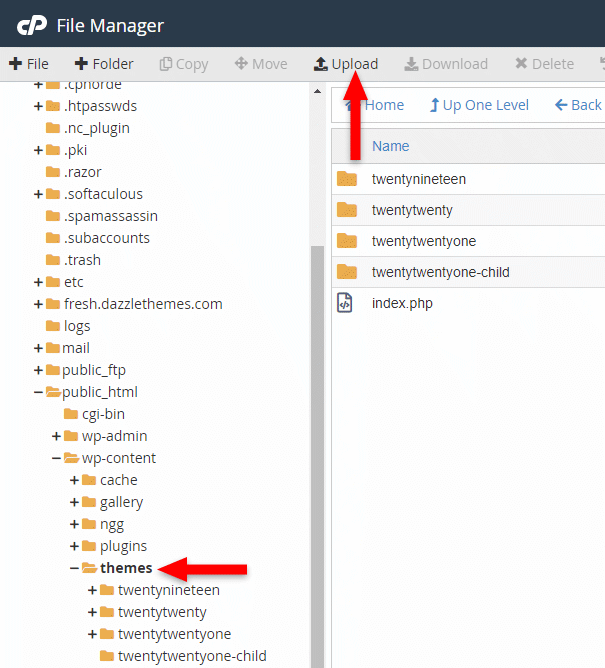
Step 3
Navigate to the public_html/wp-content/themes folder. Once there, click on the Upload button at the top. It will open a new tab.
If you’re doing this for an add-on domain, not your main one, the files are usually in a folder with your domain name, instead of public_html.
Step 4
Click the Select File button and select your WordPress theme’s installation file. Wait for the uploading process to get to 100%, then click on the Go Back link at the bottom.
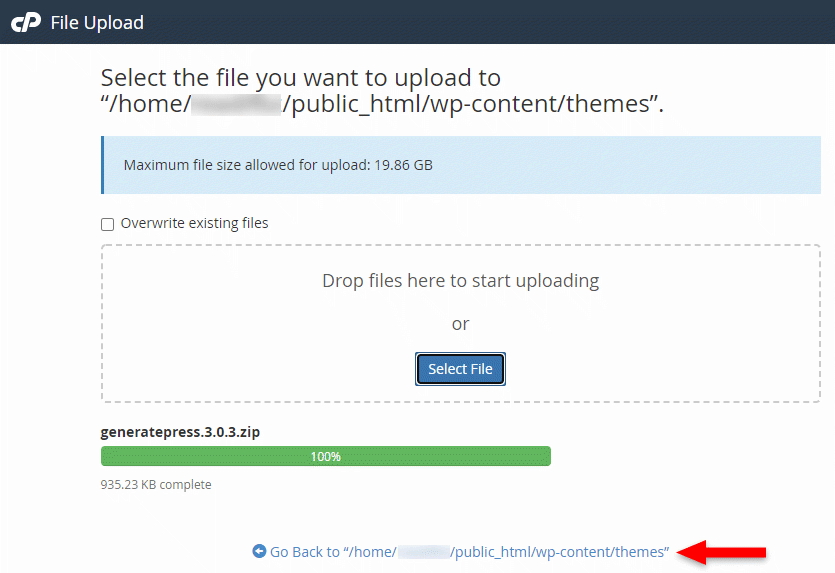
That should send you back to the themes folder. If not, navigate to it again as seen in step 3.
If you’ll use a child theme, upload and extract it, too, in the same folder, using the same process.
Step 5
In the themes folder, you should now see your WordPress theme’s .zip file. Right-click on it and select Extract.
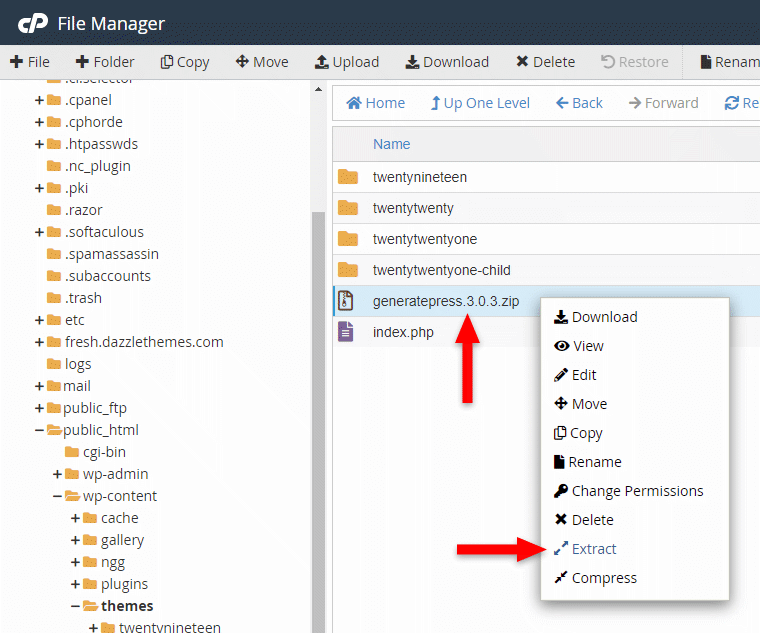
Step 6
A confirmation pop-up will appear. If you uploaded the WordPress theme in the correct folder, the path will be automatically applied – /public_html/wp-content/themes.
So, if everything looks in order, just click on the Extract File(s) button.
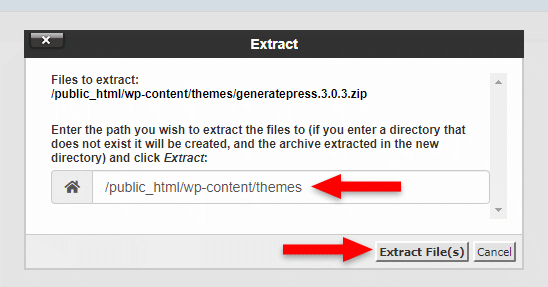
After the extraction has finished, you should see your WordPress theme’s folder there.

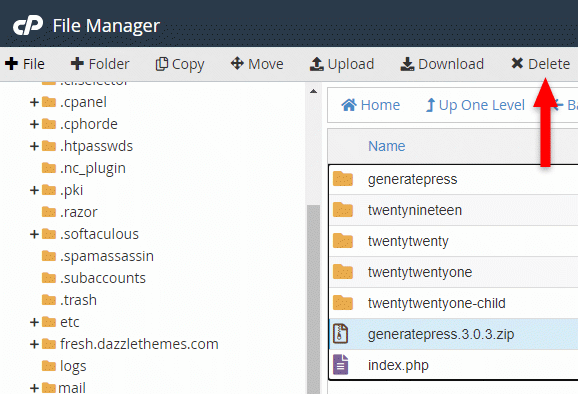
Step 7
Delete the .zip file because it occupies space unnecessarily. Select it and click on Delete from the toolbar. You can also right-click on it and select Delete.
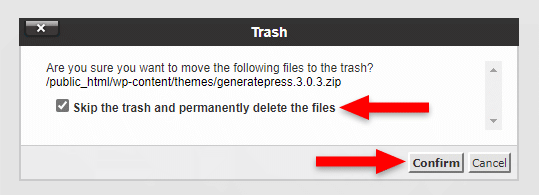
If a confirmation popup shows, select Skip the trash and permanently delete the files and click on the Confirm button.
Step 8
After you’ve uploaded the WordPress theme in cPanel, you need to activate it in WordPress.
Go to Appearance > Themes, hover over it, and click on the Activate button. If you installed a child theme, too, activate that instead of the parent theme.
4. How to Manually Install a WordPress Theme via FTP
FTP stands for File Transfer Protocol. SFTP is the better, safer version, but not all web hosts offer access to it. If you have access to it, use that instead.
You can use this method to install a WordPress theme if the default options don’t work, and you also don’t have cPanel.
Step 1
Unzip your WordPress theme’s installation file on your drive because you’ll need to upload the folder this time, not the .zip file.
All of your theme files need to be in a single, main folder named after your theme (e.g. generatepress). If you’re also using a child theme, it should contain the -child suffix after the parent name (e.g. generatepress-child).
Example
My theme’s .zip file is called generatepress.3.0.3.zip.
When I unzip it on my local drive, the resulting folder is generatepress.3.0.3. And inside of that, it will be another folder, called generatepress, where the actual theme files are.
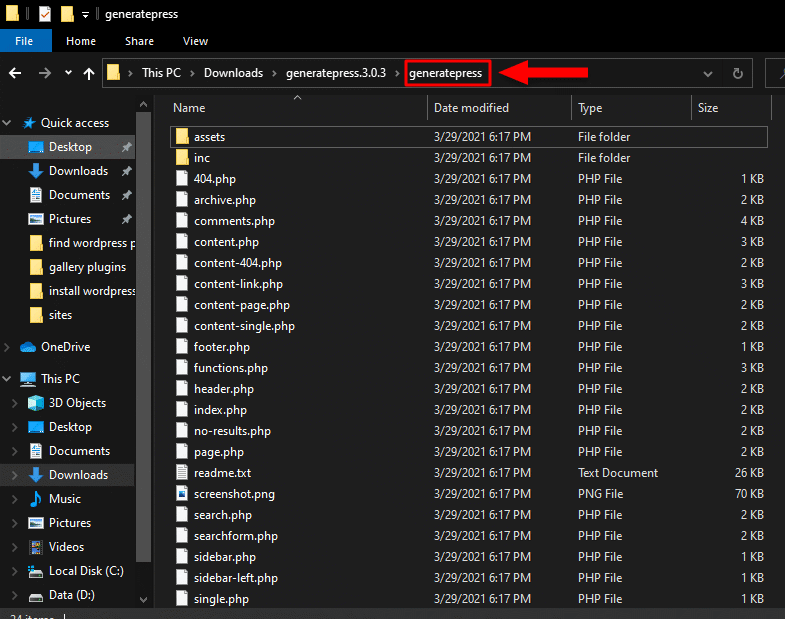
That’s the one I need. So, I take it out from the generatepress.3.0.3 folder and paste it on its own, in another place. Then, when the time comes, I upload the generatepress folder which holds the WordPress theme files.
Step 2
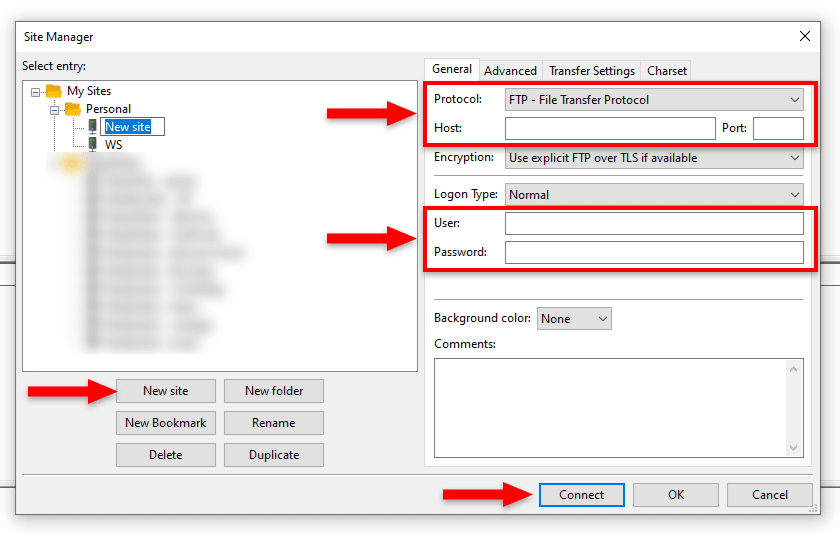
To access your FTP, you’ll need an FTP client. I recommend FileZilla. So, download and install it on your computer.
Step 3
Open up Filezilla and connect to your FTP with the info provided by the web host. If you don’t have it, check their documentation or contact them for help.

At the top of FileZilla, you’ll see a Quickconnect feature. It requires your:
- Host:
- For FTP, it’s usually
ftp.followed by your domain name (e.g.ftp.example.com). If that doesn’t work, try your server’s IP address. If you don’t how to get the IP, check your control panel, web host docs, or ask support; - For SFTP, adding the server IP works best.
sftp.followed by your domain name might also work (e.g.sftp.example.com);
- For FTP, it’s usually
- Username and Password;
- Port: It will automatically set it to 21 for FTP and 22 for SFTP. These are the default values in most cases. Unless your web host doesn’t require another port, leave it blank.
After you filled that up, click on the Quickconnect button.
Alternatively, you can save your site in the Site Manager, so you won’t have to add your login info all the time.
Go to File > Site Manager and:
- Click on New site;
- Select the Protocol: FTP or SFTP;
- Add the Host and Port (if necessary);
- Add User and Password;
- Click on Connect.
Step 4
After you’ve successfully connected to your FTP, you’ll have:
- Local site on the left – Those are the files from your local drive;
- Remote site on the right – Those are the files that you have access to on the server, including your WordPress files.
From the Local site, search for your unzipped theme folder.
From the Remote site, navigate to /public_html/wp-content/themes. The public_html folder might be named differently, depending on your host or if you’re using an add-on domain.
Then, drag and drop the unzipped theme folder from the Local site’s second box inside the themes folder, in the Remote site’s second box, where the other theme folders are.
Make sure that you don’t drop it over an existing folder because it will add it in there. Drop it over some white space.
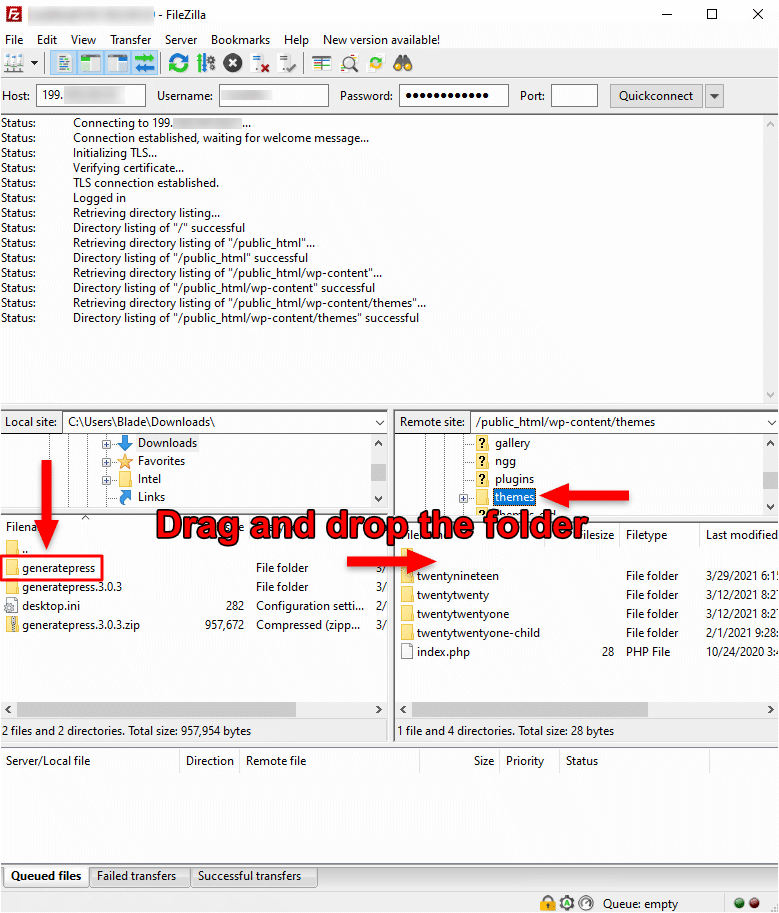
Do the same for the child theme, if you’re using one.
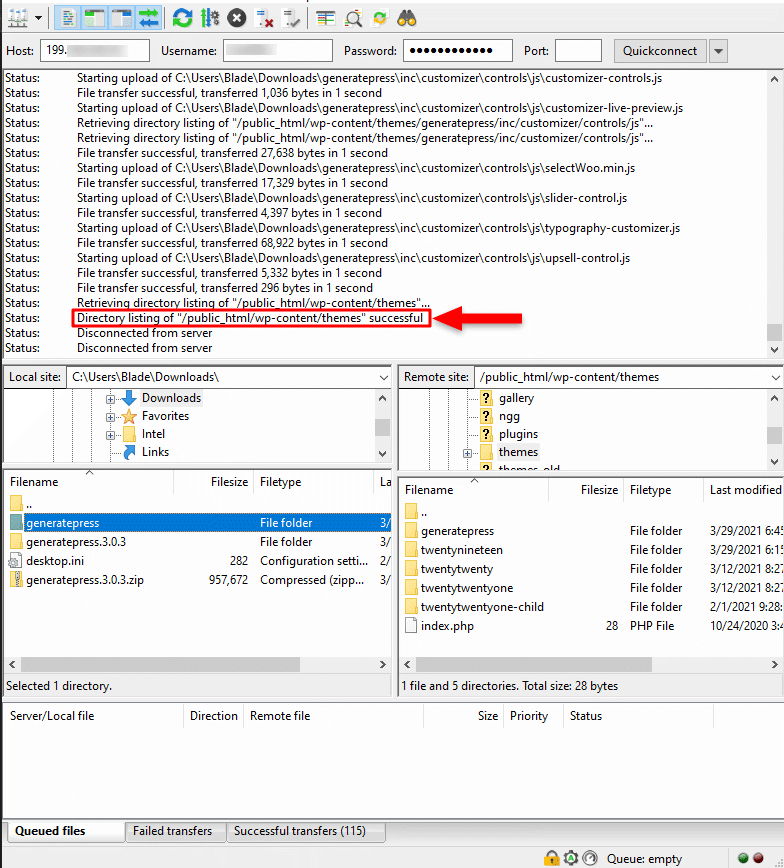
You’ll see a bunch of uploading statuses at the top. When it has successfully finished uploading the WordPress theme over FTP, you’ll see a status that writes Directory listing of “/public_html/wp-content/themes” successful.
The WordPress theme also appears as a standalone folder in the themes folder, on the right.
Step 5
Activate the theme in WordPress by going to Appearance > Themes, hovering over it, and clicking on the Activate button.
If you’ve also uploaded a child theme, activate that instead.
Looking for an All-in-One WordPress Solution?
ReadyShip offers you ready-made WordPress sites and blogs, plus high-quality managed AWS hosting with free SSL and CDN, at no initial cost!
The End
And that, ladies and gentlemen, is how to install a WordPress theme in not one, but four different ways.
Just make sure that the WordPress theme you’re about to install is a good one, and will not negatively impact your WordPress site’s performance and loading time.
If you have questions or thoughts, feel free to drop a comment below.