By default, you can’t organize the files from your WordPress media library. You can’t create folders, categories, and such. Everything’s dumped into one place.
That would be a useful feature, especially if you’re running a portfolio website, for example, where you need to show your work based on categories, therefore organize your files from the WordPress media library into folders.
Perhaps, in the future, WordPress will add such a feature. But, until then, you’ll have to rely on a plugin.
The free plugin that I recommend is called FileBird, and I’ll show you how to use it, in this step-by-step tutorial.
Organize WordPress Media Library into Folders with the FileBird Plugin
FileBird is a user-friendly media library plugin. It allows you to easily organize your WordPress media library into folders using drag-and-drop functionality.
Let’s see how to use it.
Step 1
Install and activate the FileBird plugin. If you’re new to WordPress, here are 4 different ways to install a WordPress plugin.
Looking to Buy or Sell WordPress Sites?
At ReadyShip, we offer an all-in-one WordPress solution for those looking to start a blog or site, as well as the opportunity for WordPress developers or professionals to sell their products!
Step 2
From your WordPress dashboard, go to Settings > FileBird to access the plugin’s settings. There’s one setting that might interest you.
In the first tab, Settings, you might want to enable Each user has his own folders.
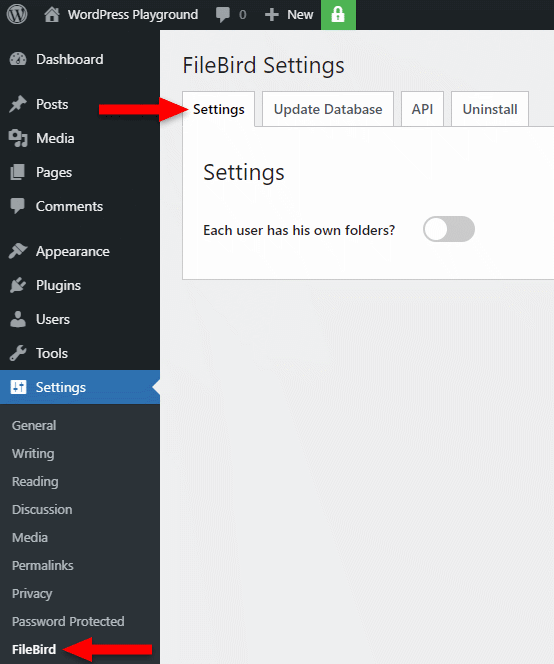
This is useful if multiple users have access to your WordPress website or blog, and you want them to have their own folders. For example, if you’re running a blog with multiple authors.
Step 3
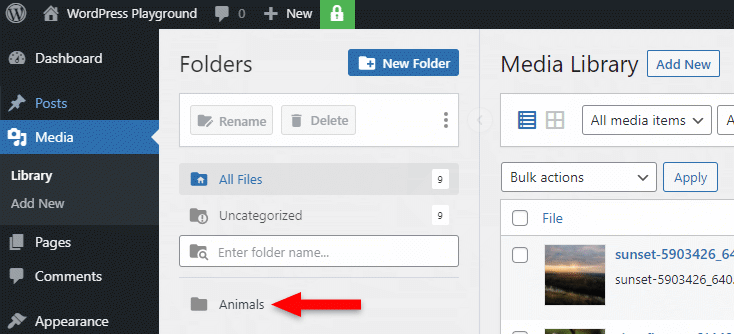
After you’ve installed and activated the plugin, you’ll notice that your WordPress media library has changed. A Folders section will appear on the left side.

There, you can start creating your media library folders in WordPress.
To create a new folder, click on the New Folder button. A new section will appear, where you can name your folder and save it.
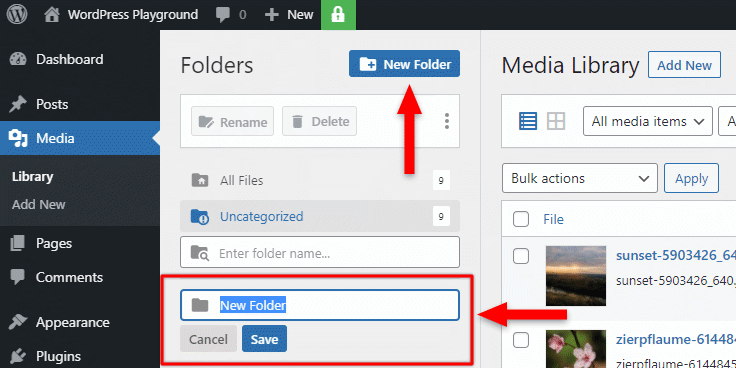
Now, the folder will be added to the list. For this example, I named my folder “Animals”.
Creating a subfolder
To create a subfolder, click on a folder to select it, then click on the New Folder button.
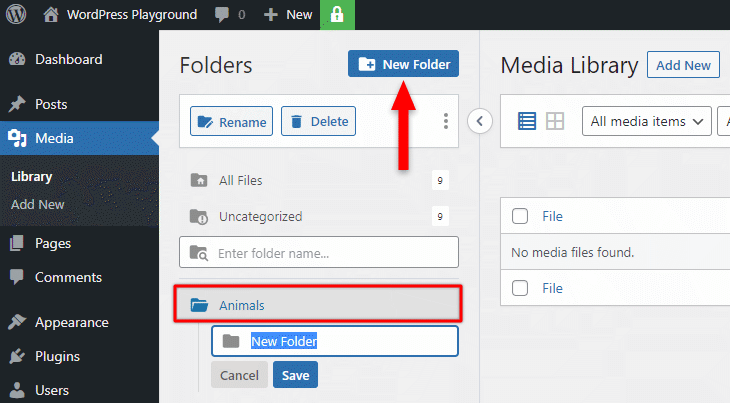
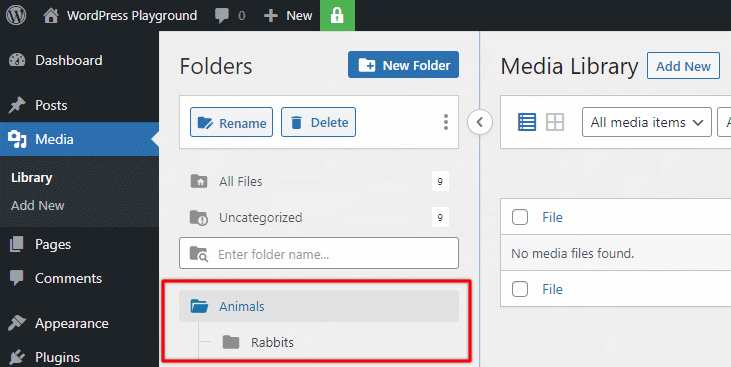
Add a name for the subfolder, then save it.
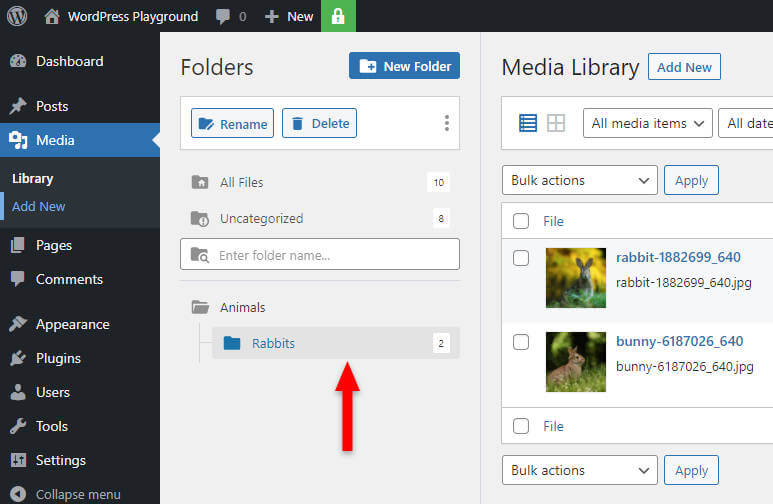
Now, you’ll have a folder with a subfolder in the list. For this example, I named mine “Rabbits”.
Step 4
1. Adding existing files to folders
Here’s what you need to do to add existing files to the newly created folders in the WordPress media library.
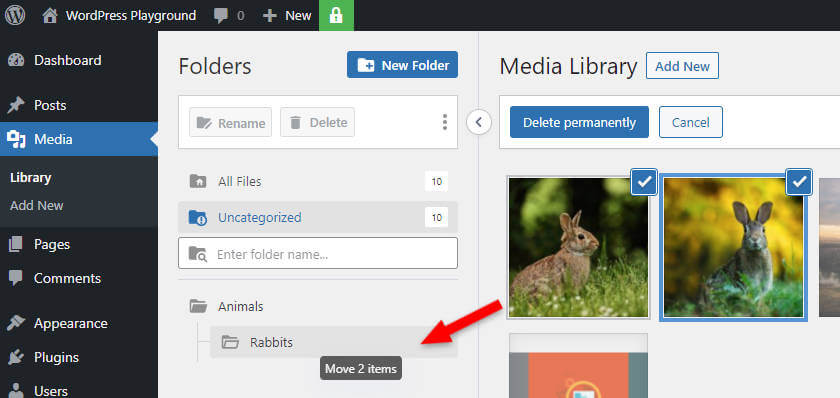
- Select the files by checking the box next to them;
- Click and hold anywhere in the File table, then drag them into the folder. A tooltip will appear, with Move X items, where “X” is the number of files you’ve selected.
In my example, I’ll add the images with the rabbits in the Rabbits subfolder.
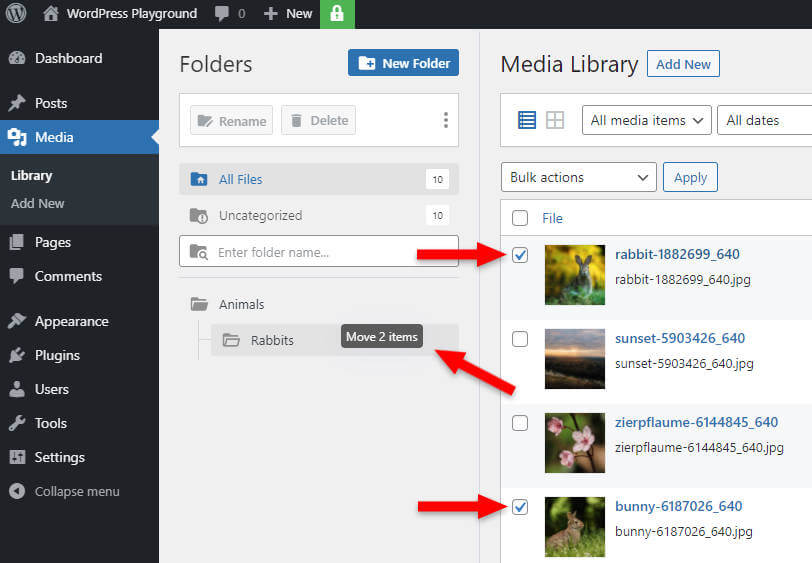
To see the files, select the folder. Next to the folder’s name, the FileBird plugin will also display the number of files found inside.
Grid mode
Alternatively, you can select the Grid mode for your WordPress media library. Then, click on the Bulk select button.
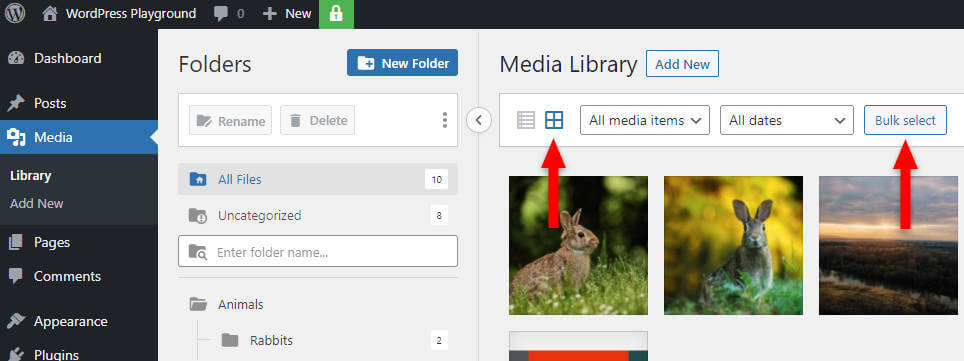
After that:
- Click on the files to select them;
- While having your mouse cursor over one of the selected files, click, hold, and drag them to the folder.
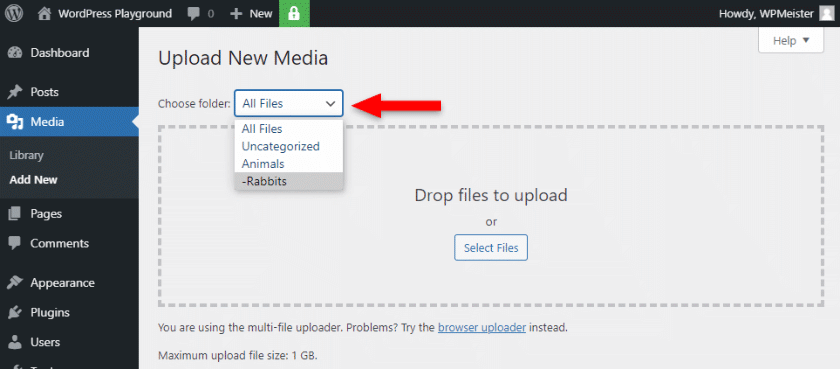
2. Adding new files directly into folders
To add new files directly into folders, you simply need to select a folder from the Choose folder drop-down menu before uploading files in your WordPress media library.
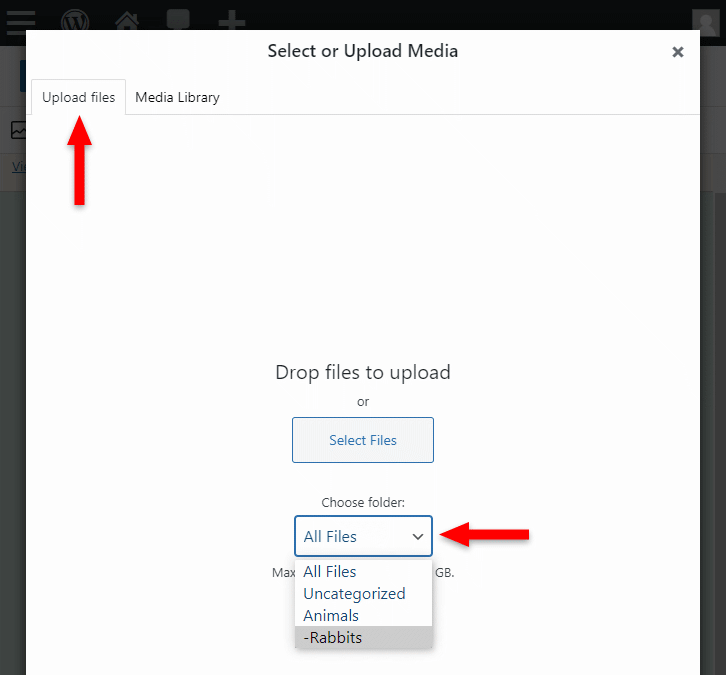
Using the WordPress editor
If you want to upload files directly into folders from the WordPress editor, by using the Image block, then don’t select the Upload button because it won’t let you select a folder before uploading.
Instead:
- Click on the Media Library link;
- Select the Upload files tab;
- Select a folder from the Choose folder drop-down menu;
- Click on the Select Files button;
- Select your file(s) from your local drive, and add it to your post or page.
That’s it with this part. As you can see, FileBird makes it easy to organize your WordPress media library into folders.
Useful Info on the FileBird Plugin
Here are several things that I think you should know when using the FileBird plugin to organize your WordPress media library.
Looking for an All-in-One WordPress Solution?
ReadyShip offers you ready-made WordPress sites and blogs, plus high-quality managed AWS hosting with free SSL and CDN, at no initial cost!
Deleting files from the media library folders
Don’t use the Delete permanently link to delete the files from a folder. They will be deleted permanently from your entire site.
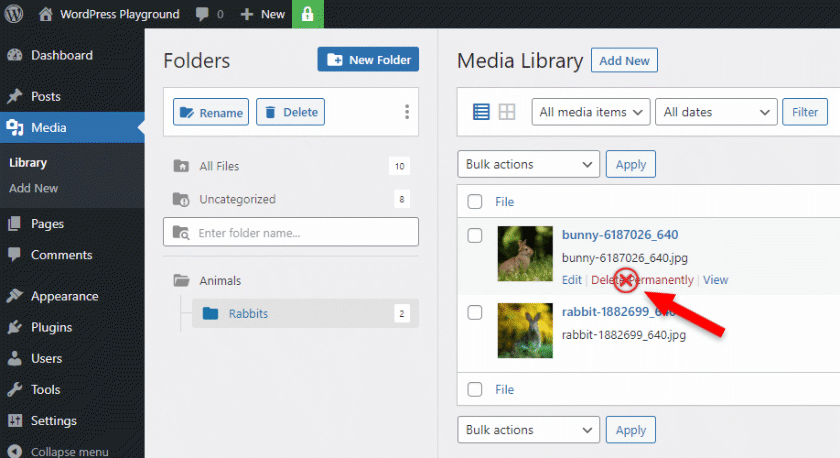
Instead, move them to the Uncategorized folder by dragging them. Basically, that’s your delete/remove option.
You can’t delete or rename the Uncategorized folder
The Uncategorized folder is necessary, so it cannot be deleted or renamed. As you can see in the previous section, it can be used to move the files that you don’t want anymore in a certain folder, since there’s no delete or remove option.
Folder options
To display a folder’s options, right-click on it.
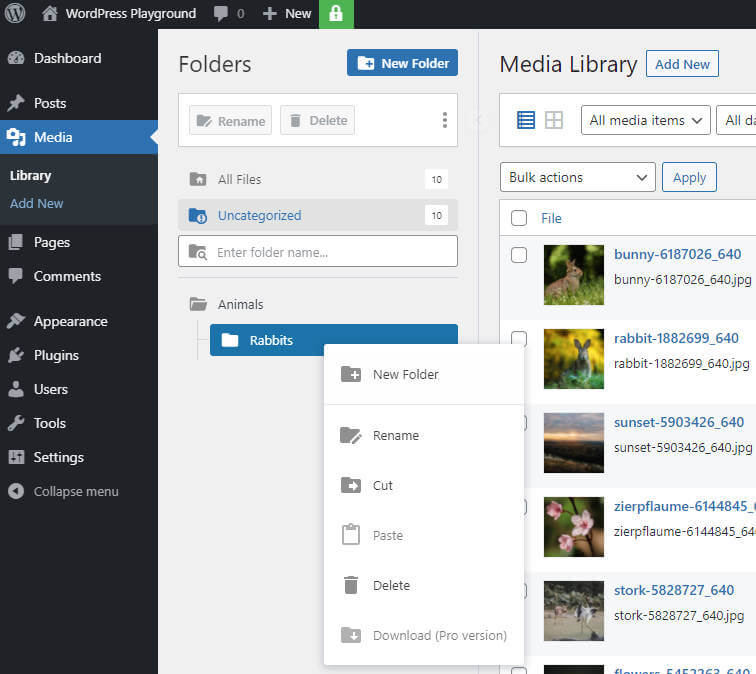
You can:
- Create a new folder/subfolder;
- Rename a folder;
- Cut a folder;
- Paste a folder;
- Delete a folder;
- Download a folder, but only if you have the Pro version.
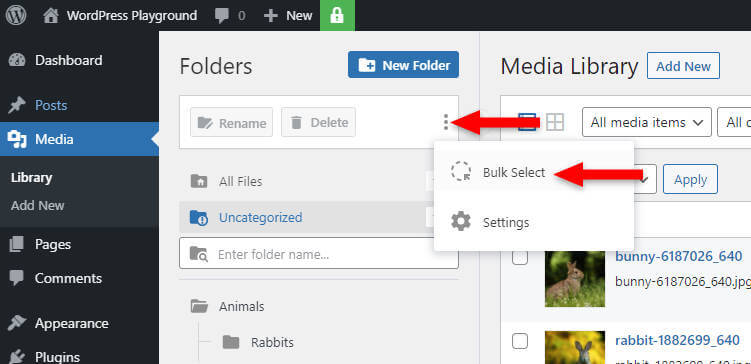
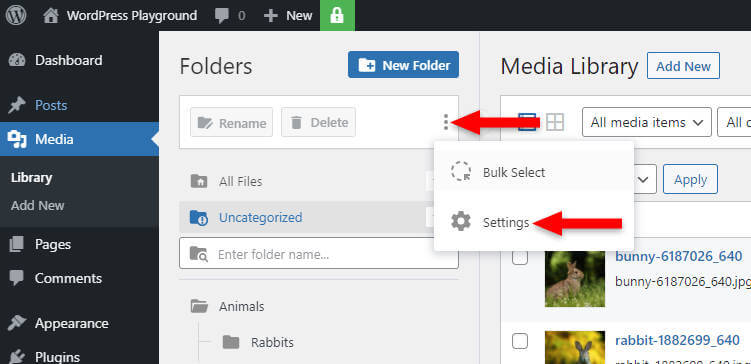
Selecting folders in bulk
To select multiple folders, click on the 3 vertical dots and select Bulk Select. Checkboxes will appear next to the folders so that you can select them.
Selecting the default startup folder
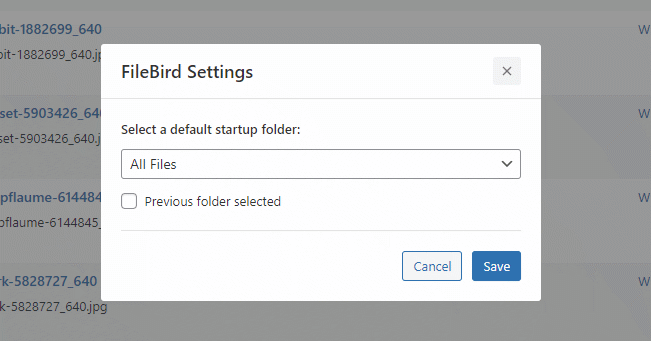
By default, all uploaded files will be added to the Uncategorized folder. If you want to add another default folder, then click on the 3 vertical dots and select Settings.
In the FileBird Settings popup, select a default startup folder from the drop-down menu. Or, you can select Previous folder selected, which means that the previously used folder will be set as default.
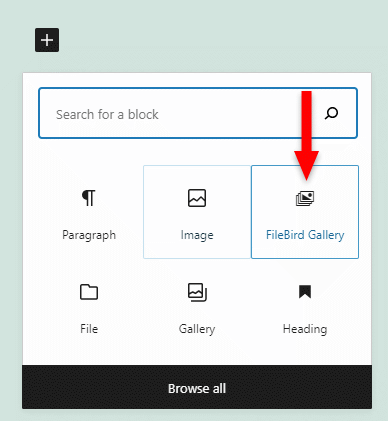
Gallery block
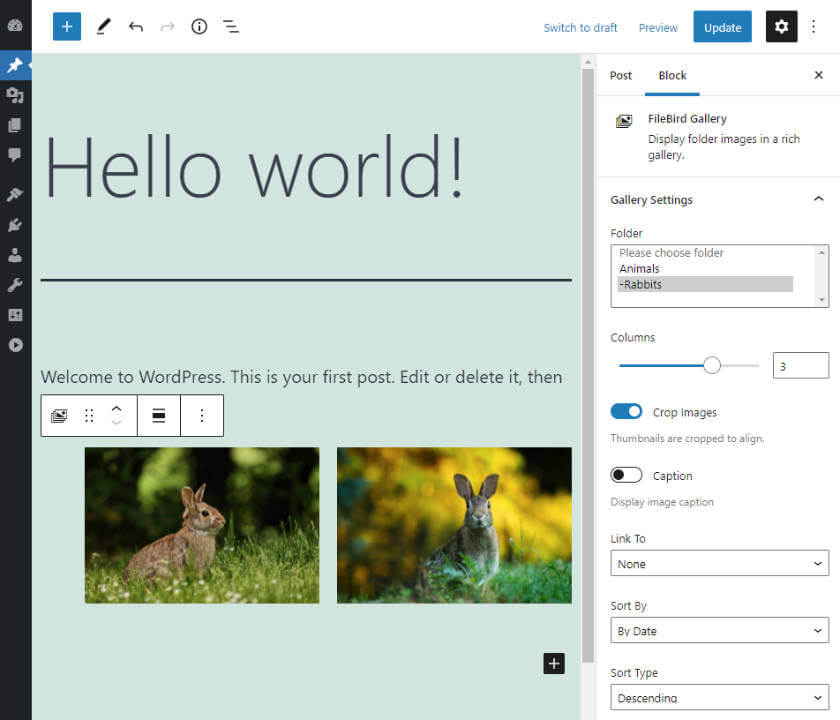
FileBird also comes with a gallery block for the WordPress editor, called FileBird Gallery. This is useful, and it saves you the trouble of looking for other WordPress gallery plugins.
The block comes with several settings that you can find in the editor’s right sidebar.
What happens to the files and folders if the plugin is deleted
If you delete the FileBird plugin, your WordPress media library won’t be organized into folders anymore because the folders will be gone, but the files will remain in your media library, posts, and pages.
Basically, everything goes back to the way it was before installing the plugin.
You see, the FileBird plugin is smart, and it doesn’t create actual folders on your server. It only creates virtual folders so it won’t alter the files and links when you stop using it.
Completely uninstall the FileBird plugin
In general, when you uninstall a plugin in WordPress, it won’t remove everything. Virtually all of them keep some data and settings in the database, in case you reinstall them.
This is useful because some data and settings will be restored on reinstallation, so you won’t have to set them up from scratch. But it also creates unnecessary bloat.
Luckily, the FileBird plugin allows you to completely clear all the data when uninstalling the plugin.
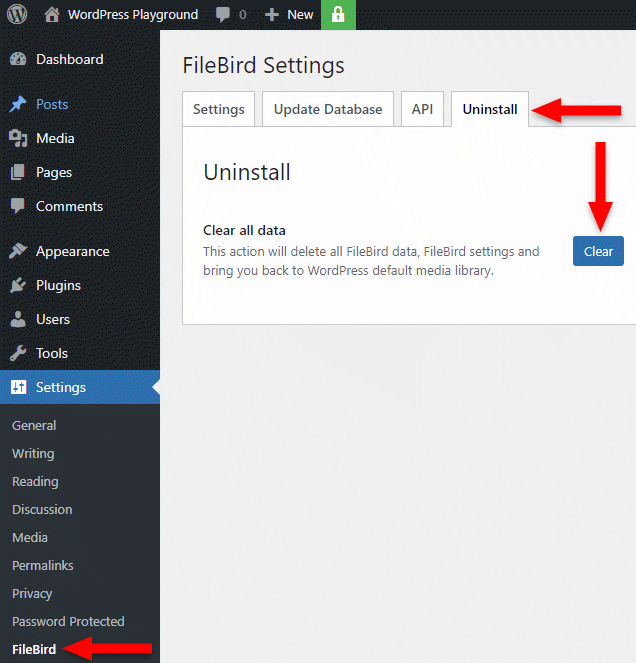
So, if you are sure that you won’t use the FileBird plugin again to organize your WordPress media library into folders, go to Settings > FileBird and select the Uninstall tab. There, click on the Clear button.
After that, deactivate and delete it from the Plugins section.
Looking for an All-in-One WordPress Solution?
ReadyShip offers you ready-made WordPress sites and blogs, plus high-quality managed AWS hosting with free SSL and CDN, at no initial cost!
The End
That’s it for this step-by-step tutorial on how to organize your WordPress media library into folders using FileBird, a simple and free plugin. I hope it was comprehensive.
If you have questions or thoughts, feel free to drop a comment below.